Test execution- WheelerJump
The Wheeler Online ecosystem is constantly evolving to meet your needs.
Your current experience may differ from what you see here.
Learn what each test means and how to interpret them with this comprehensive guide.
On this section, you will learn how to explain the test and interpret it to you athlete/patient
If you would like to schedule a free demo, you can email us at contac@wheelersportstech.com
Individual Jump
Neuromuscular Profile
Drop Jump Height
Plyometric Hurdle Height
Neuromuscular Fatigue
Training Fatigue
Lateral Deficit
Sprint Repetition
Individual Jump
Do you need to measure the height of a vertical jump?
The Individual Jumps test assesses the jumping height of 6 different Jumps.
- Squat Jump (SJ)
- Counter Movement Jump (CMJ)
- Abalakov
- Rocked Jump
- Jump with weight on shoulders
- Jump with hands
See the video to learn how to run it!
Still unsure after watching the video? Follow the step- by- step process below!
1. Click on the test “Individual Jump”

2. Once on the testing interface, select which test you would like to run. For this example, we will initially choose the “Squat Jump” or “SJ”.
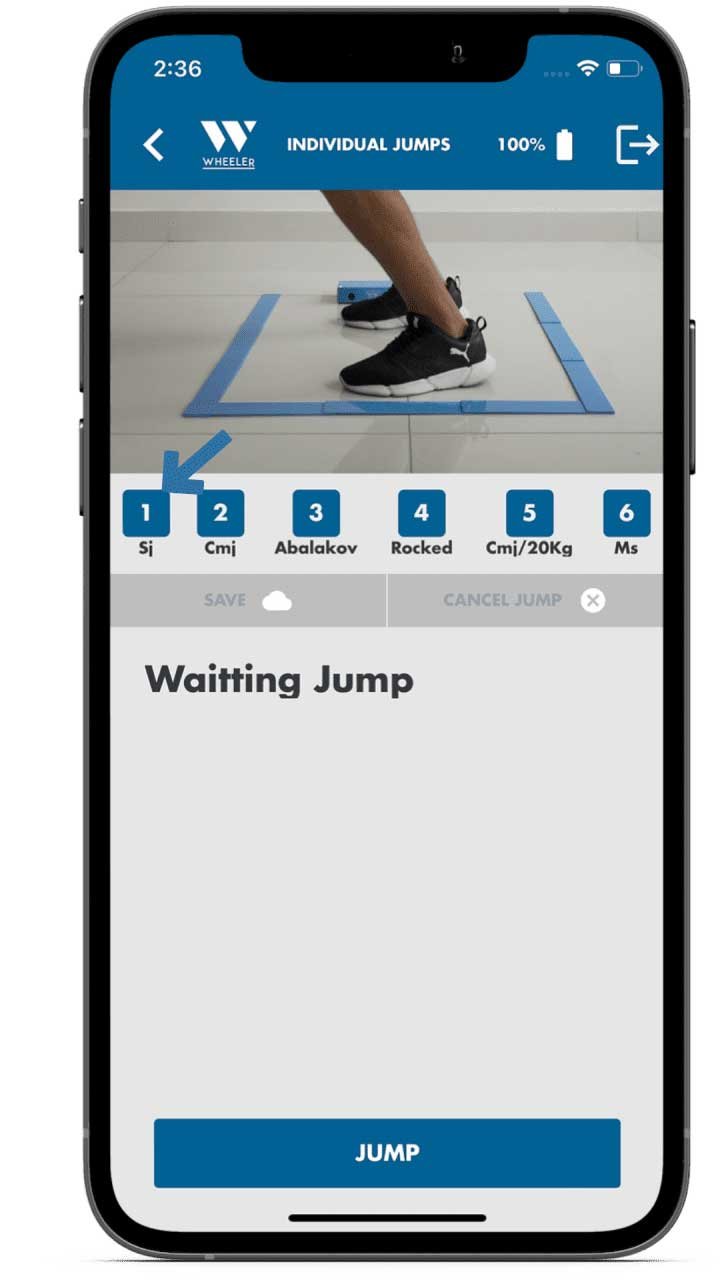
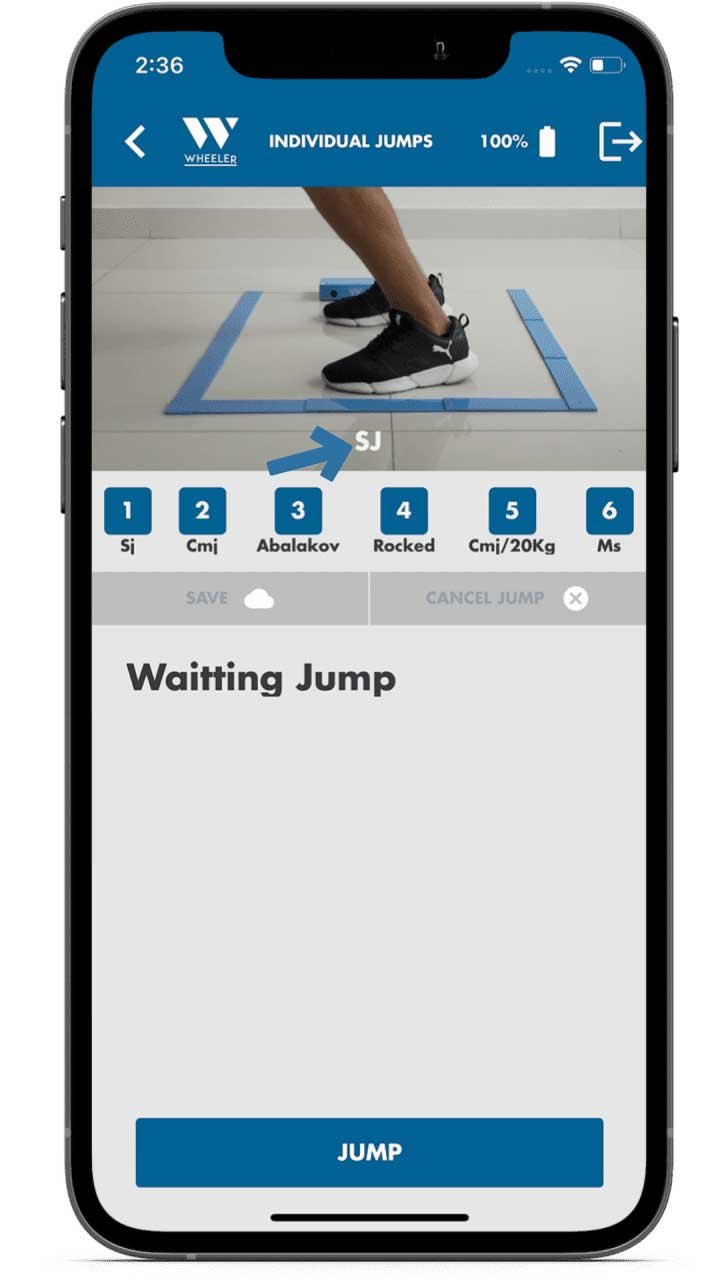
3. Once selected, the test name will appear above the test names.
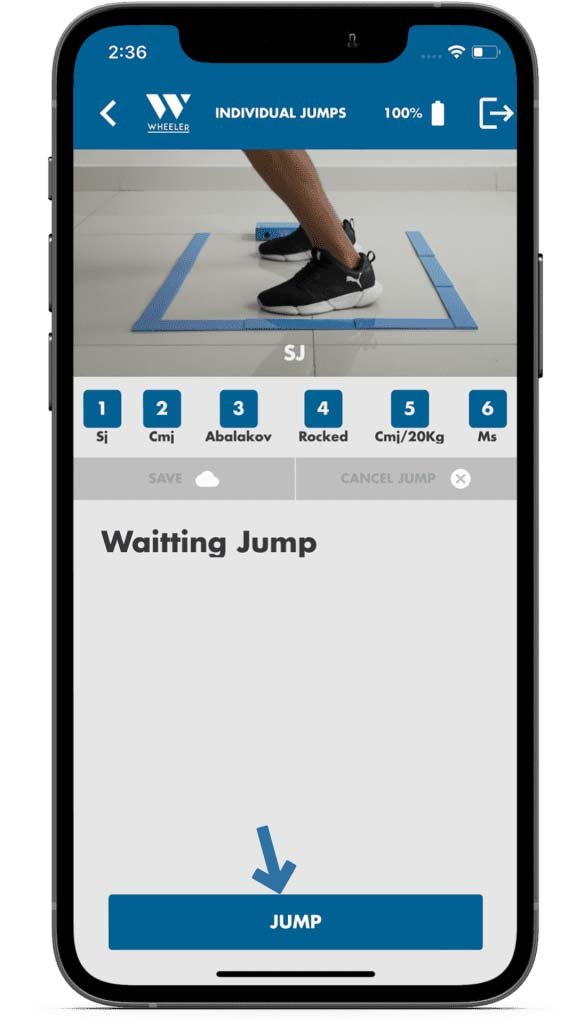
4. To initiate the test, the athlete needs to be located in the assessment area. Tap on “Jump”. The athlete needs to take off and land in the area. As soon as the athlete lands, results will be displayed on the screen.
5. Once the results are displayed, the evaluator will be able to:
a. Initiate another test without saving the previous test by tapping on any other test.
b. Save the test results by tapping on “Save”, and initiate another test.
c. Repeat the test by tapping on “Jump”.
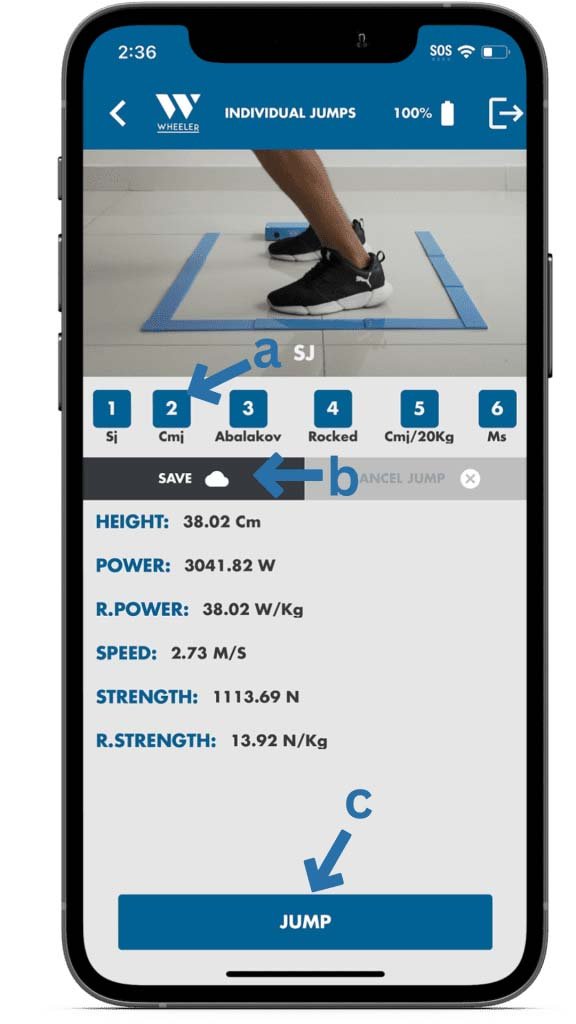
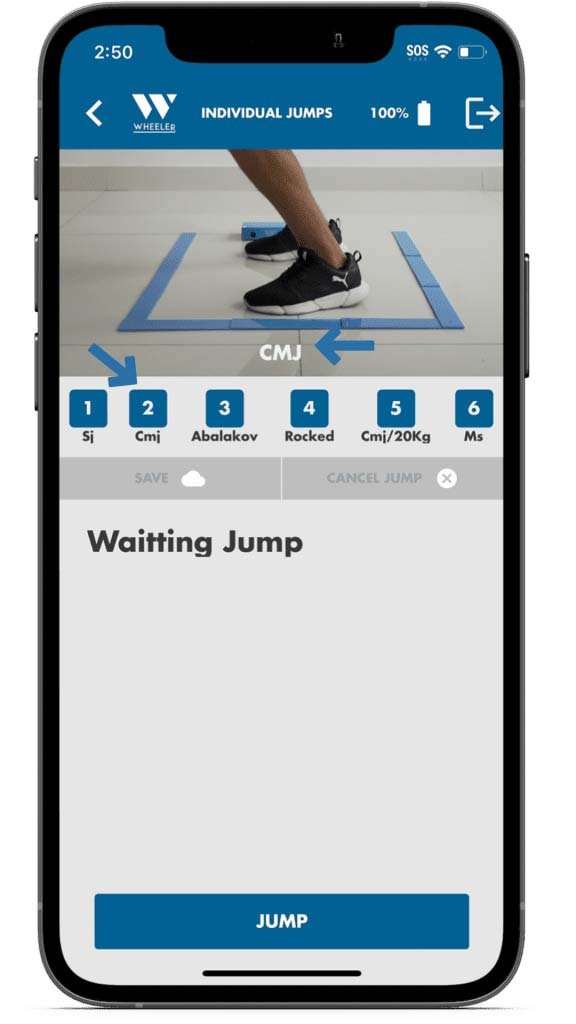
6. To change to a different test, tap on the test icon of the test that will be run. The title of the test will appear once the test is selected. In the following example, we selected the “Counter Movement Jump” (CMJ).


Correct execution
Common mistakes
- Landing outside the marked area.
Neuromuscular Profile
The neuromuscular profile assesses the level of an athlete in 3 different phases of the movement (concentric, eccentric, reactive) by assessing 3 different jumps:
- Squat jump
- Countermovement jump
- Continuous jumps
This test will help the evaluator to assess the strength condition of the athlete in 3 minutes and to prescribe strength training later.
Still unsure after watching the video? Follow the step- by- step process below!
1. To start, select the “Neuromuscular fatigue” assessment.
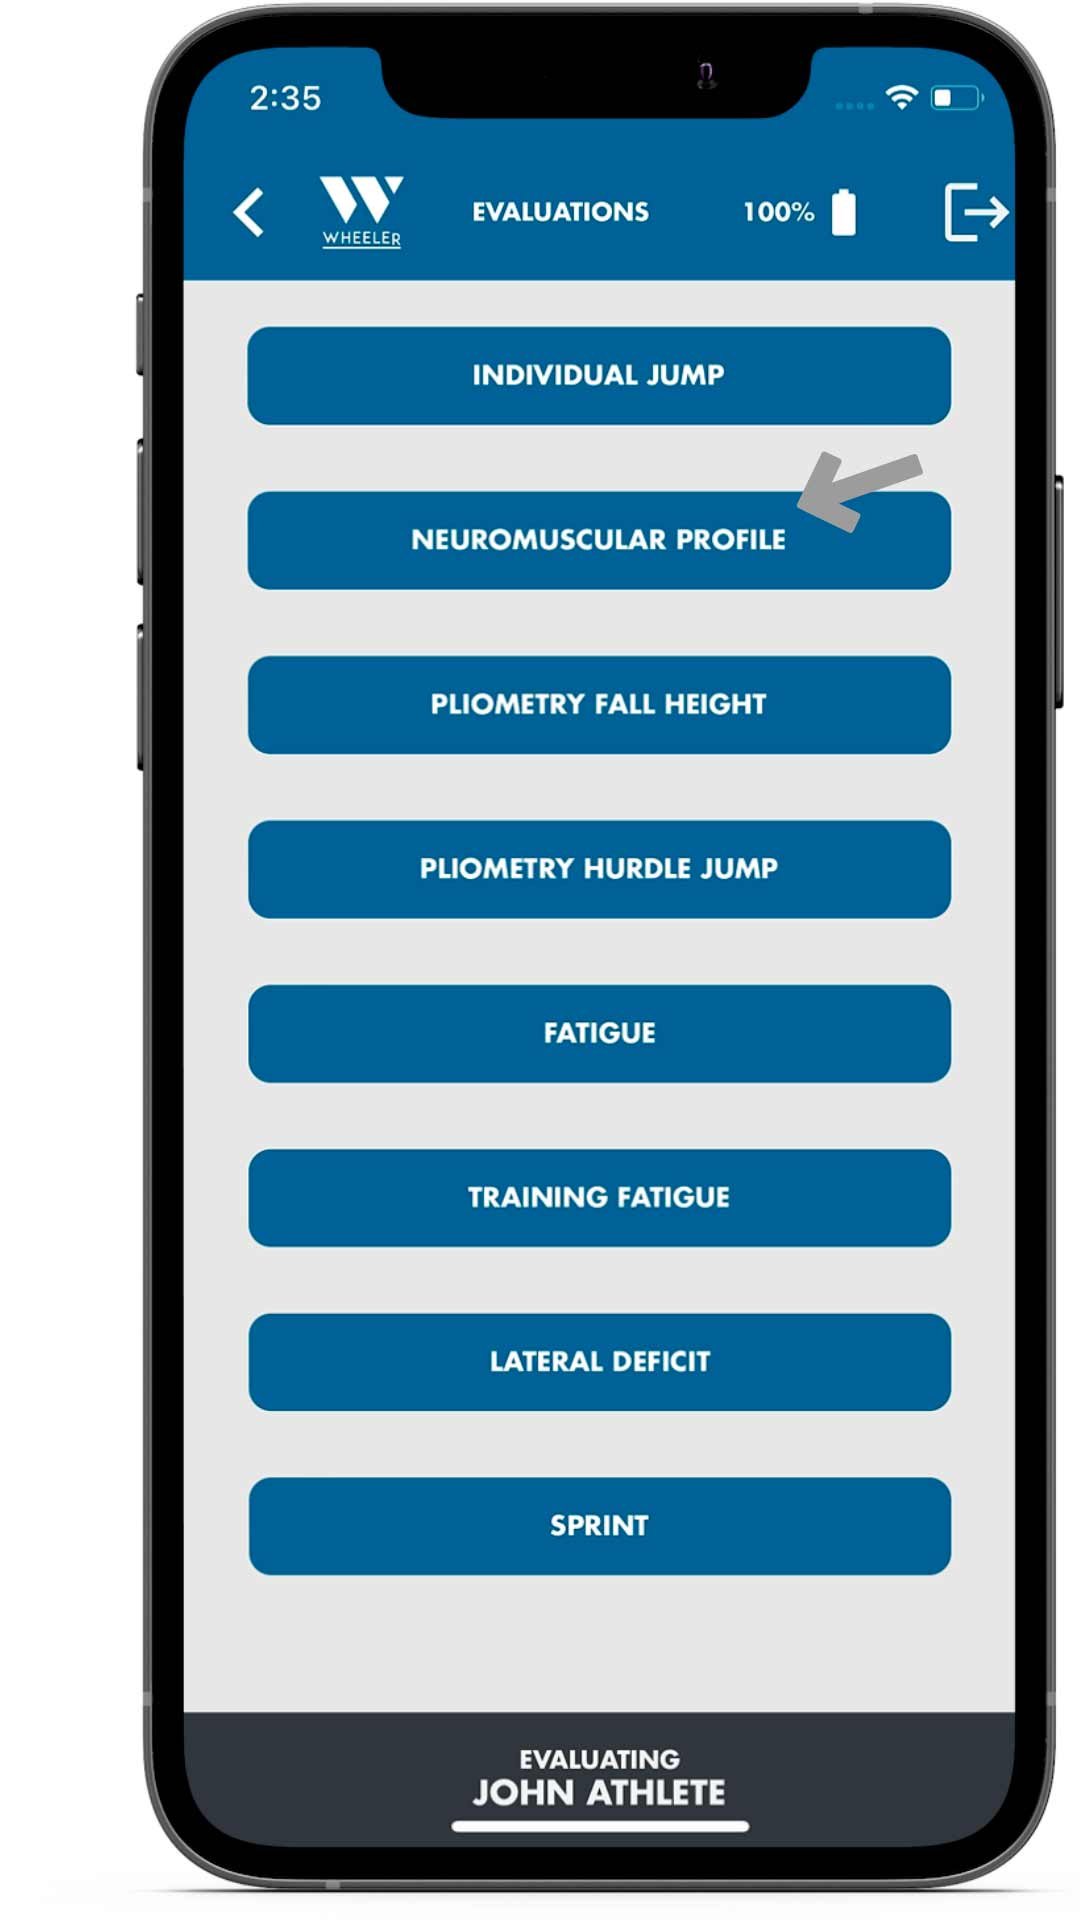
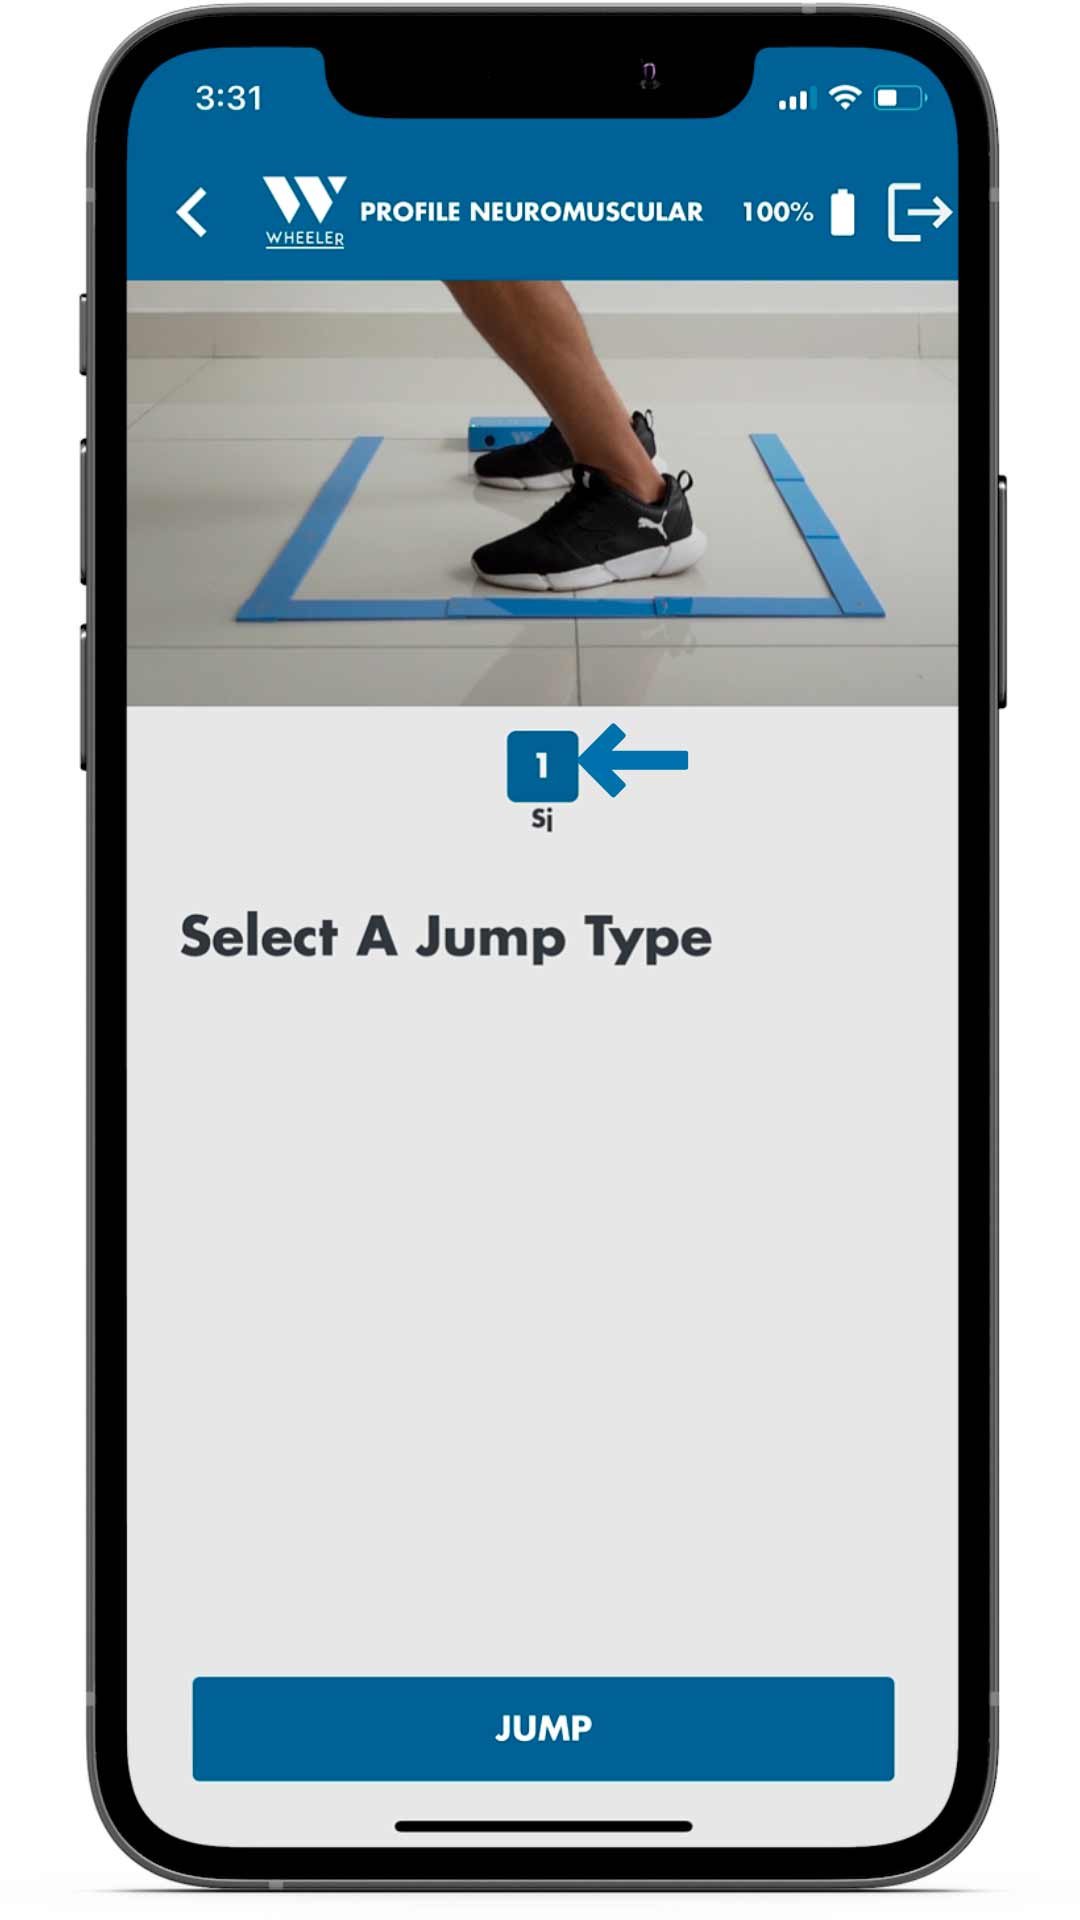
2. Once on the assessment interface, tap on “SJ”. This is the first jump of the Neuromuscular Profile.
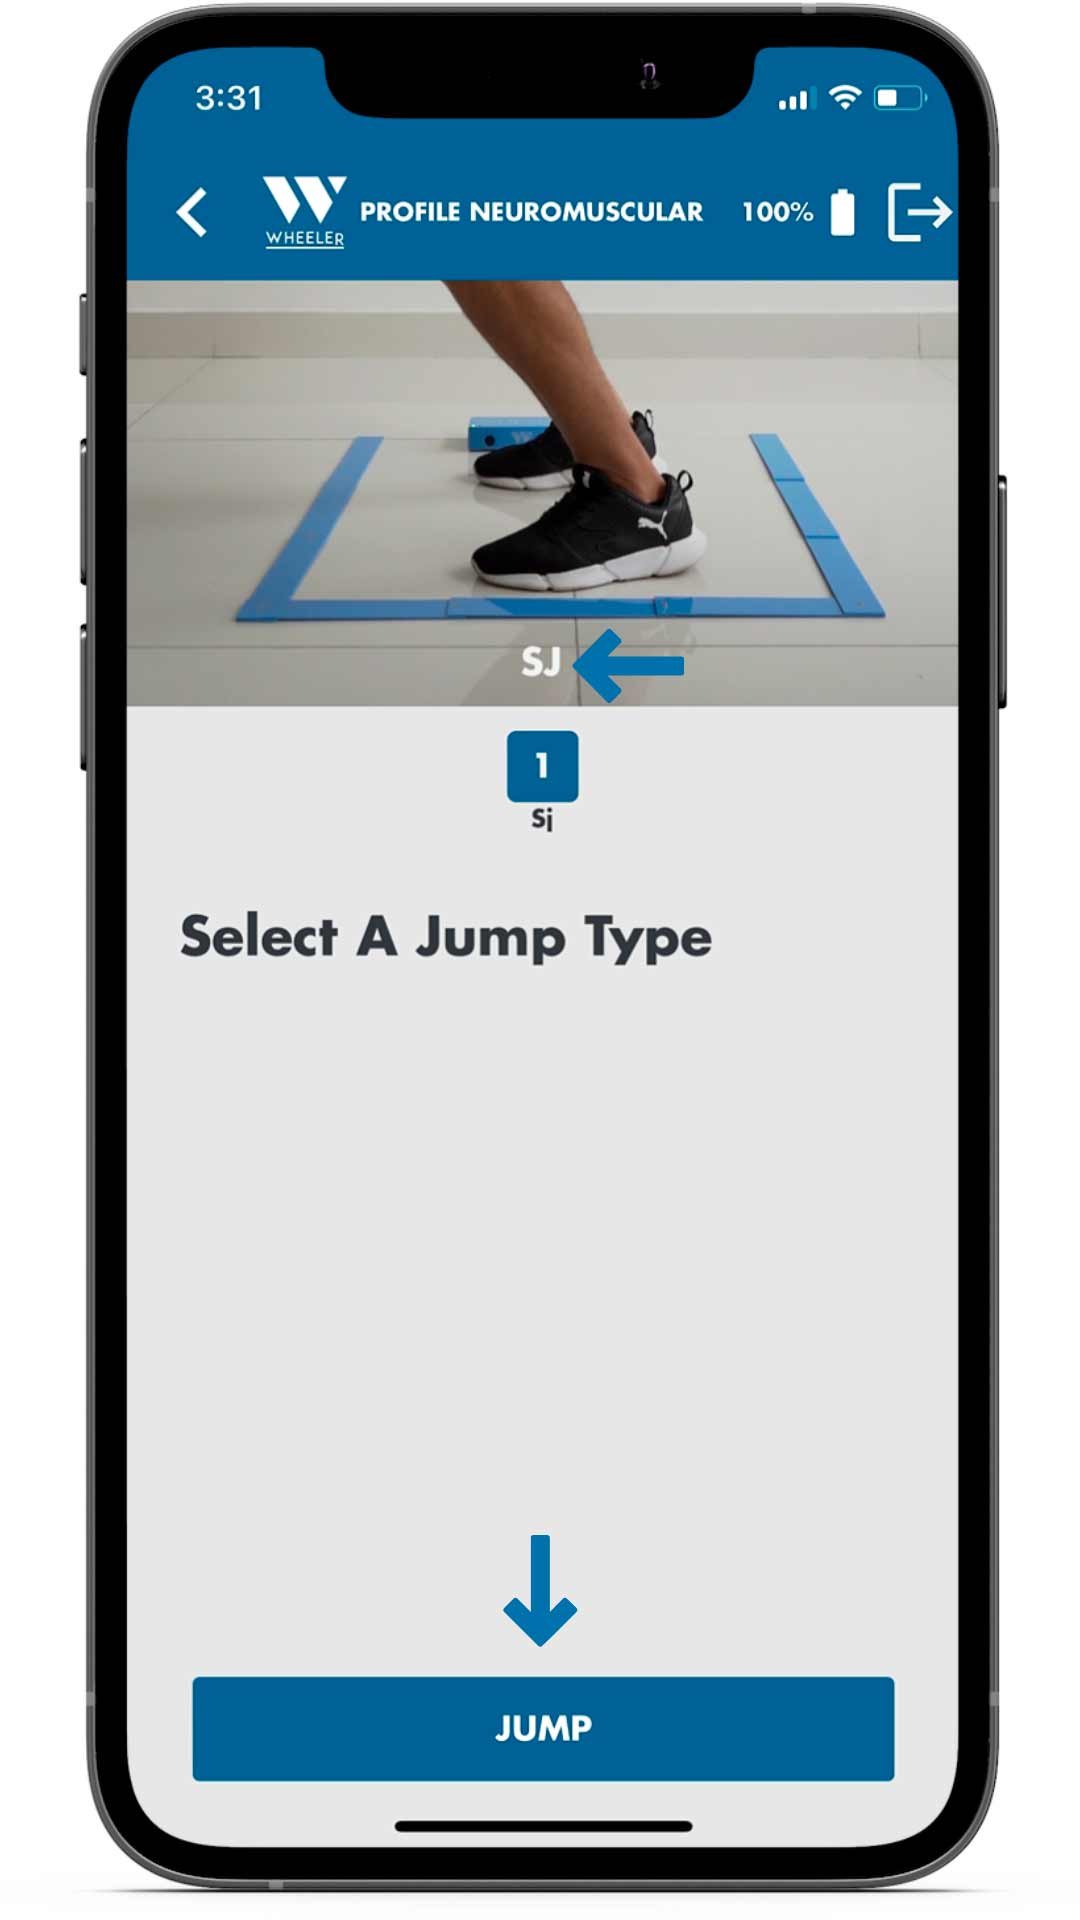
3. Once selected, the title of the jump will appear on the top of the screen. Locate your athlete in the assessment area and select “Jump” to start the assessment.
4.To continue with the Countermovement Jump, tap on “CMJ”.
If you need to repeat the SJ, select “Jump”.
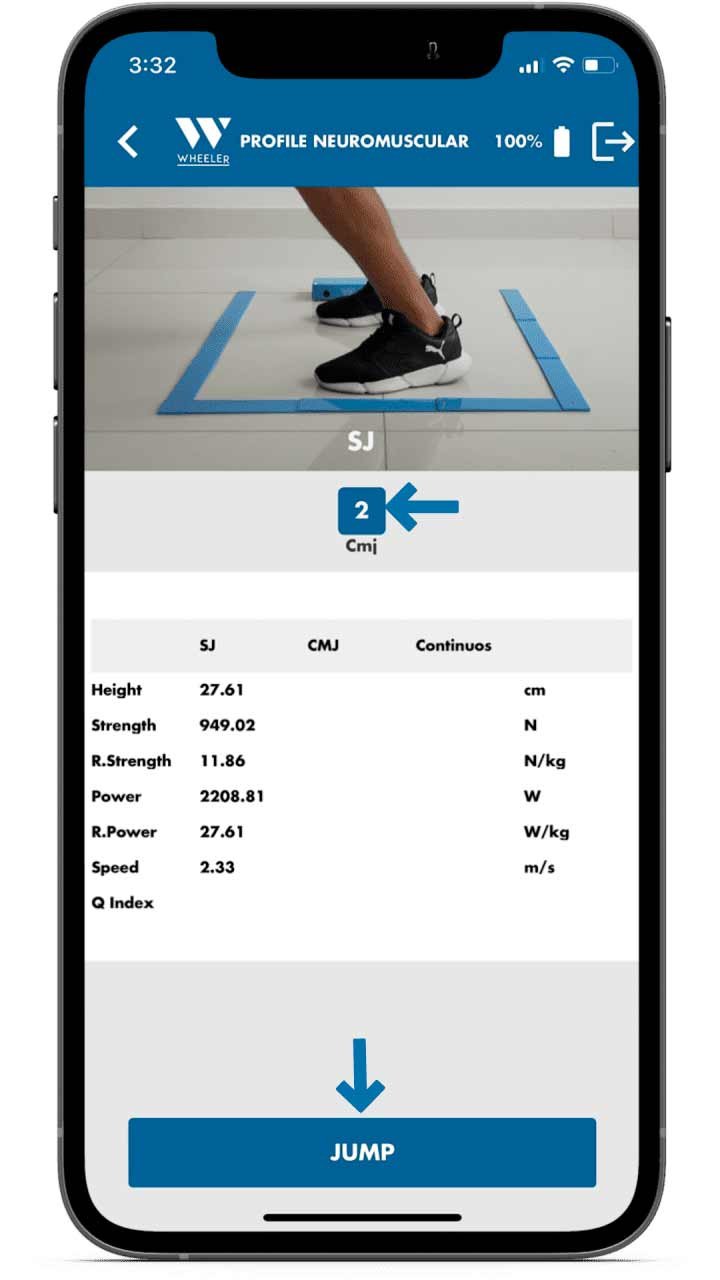
5. If correctly selected, the title CMJ of will appear on the top of the screen. Locate the athlete in the assessment area and select “Jump” to initiate the Countermovement Jump assessment.
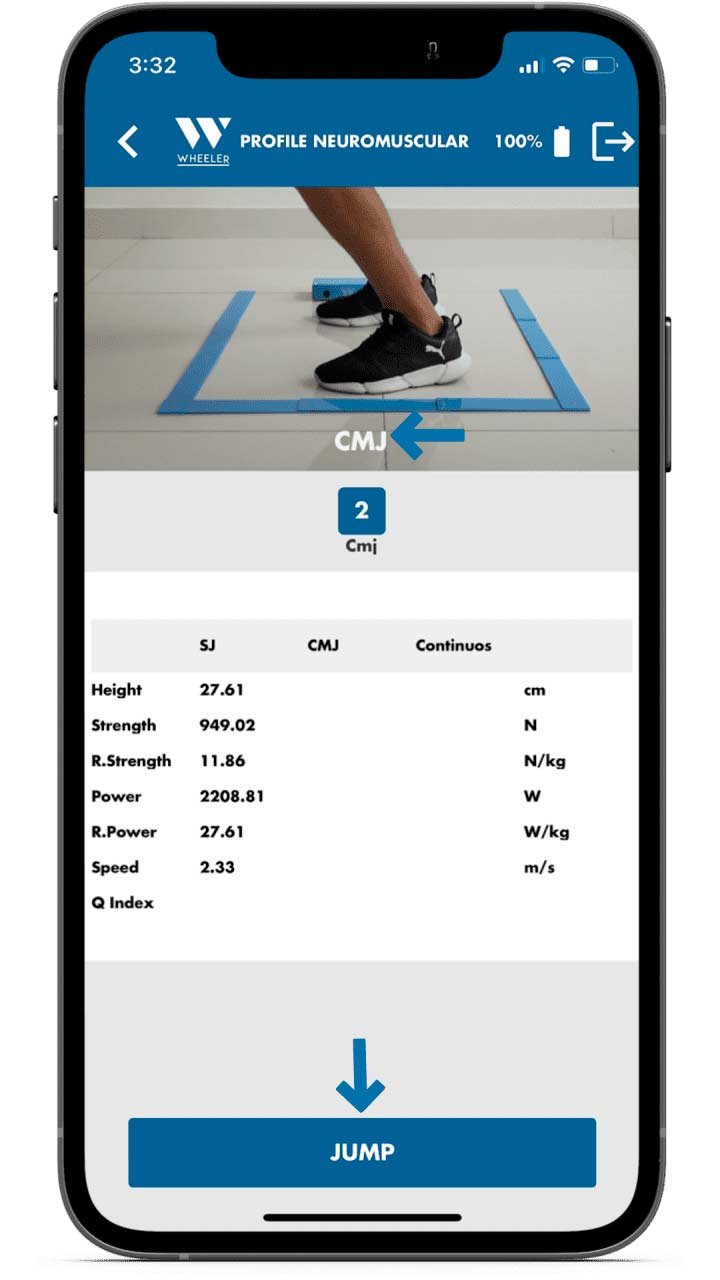
6. If you need to repeat the CMJ, select “Jump”.
To continue with the Continuous Jumps, tap on “Continuous”.
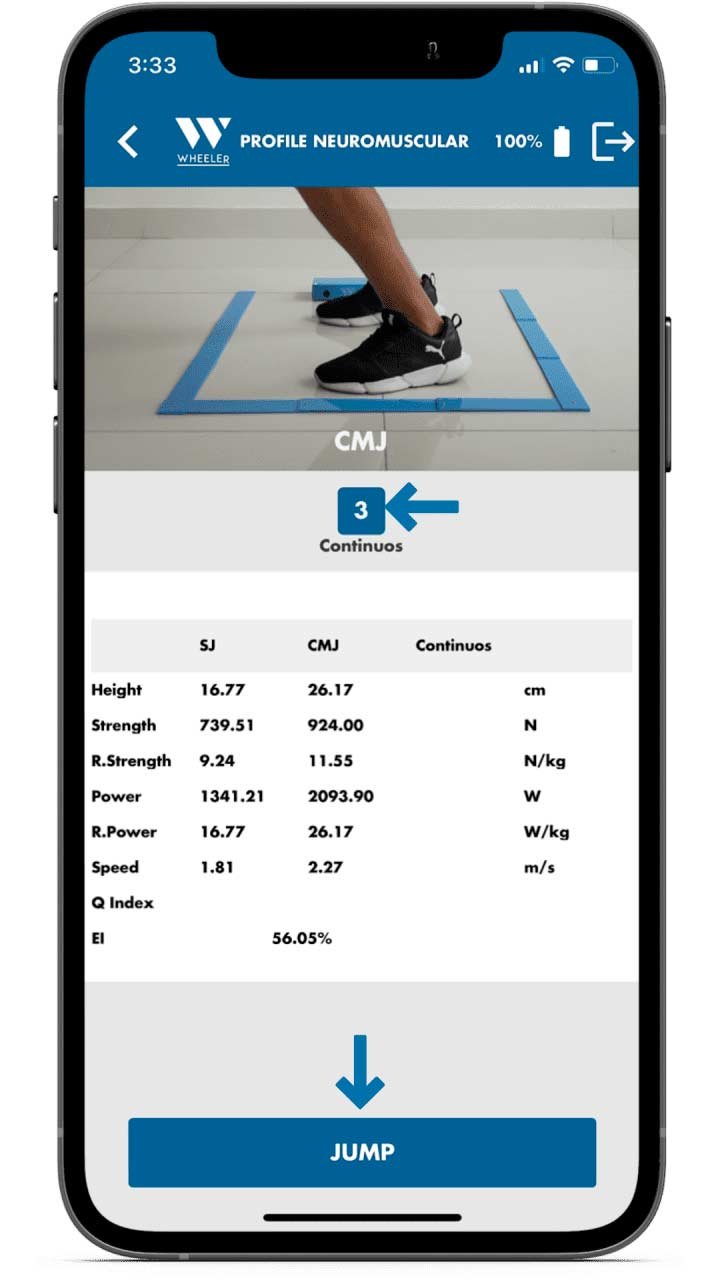
7. If correctly selected, the title Continuous will appear on the top of the screen. Locate the athlete in the assessment area and select “Jump” to initiate the Continuous Jump assessment.
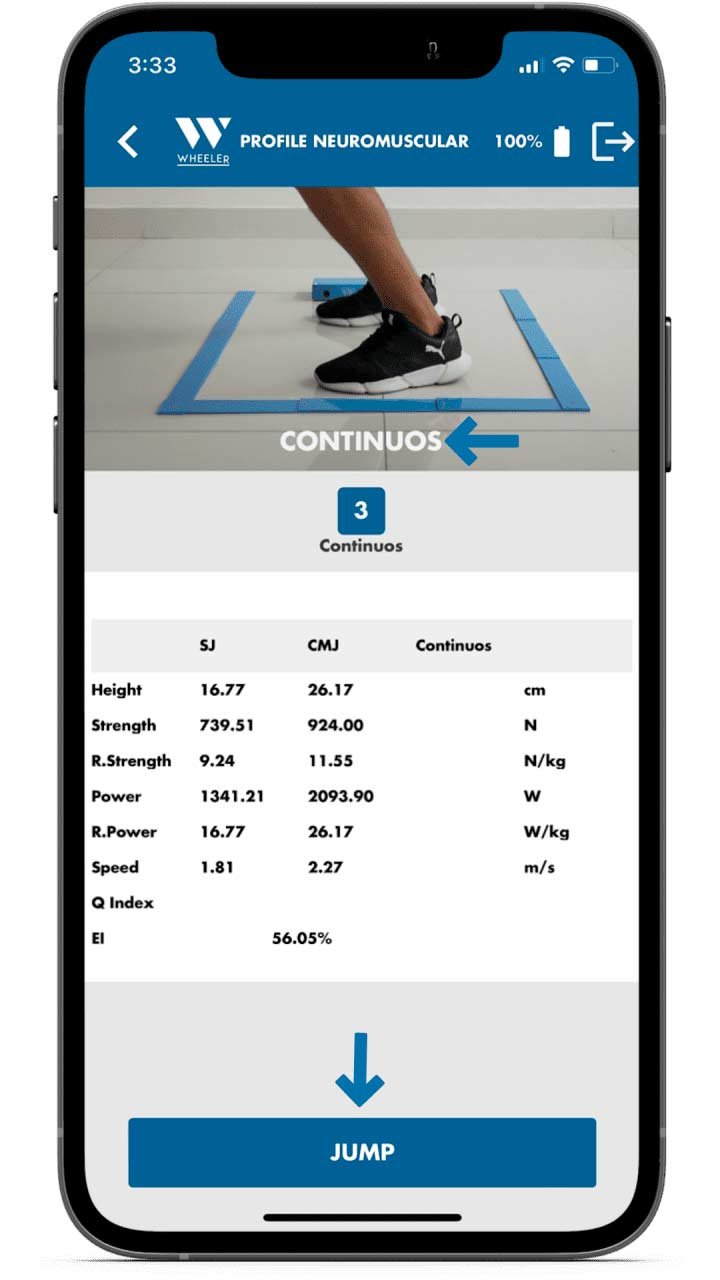
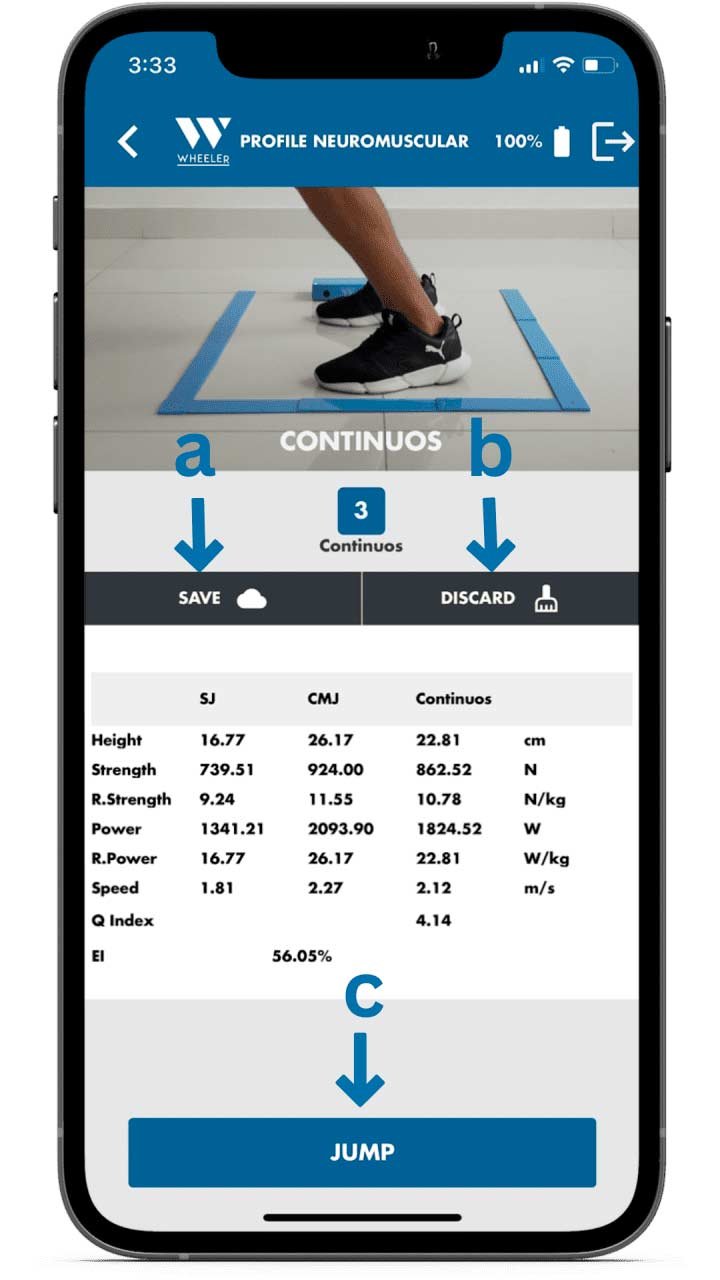
8.When the assessment is completed the following options will become available:
a. Save the assessment on the cloud by selecting “Save”.
b. Discard the assessment by selecting “Discard”.
c. Repeat the Continuous jumps by selecting “Jump”.
You can review the test results right away. If you decide to save them, you can review them later in the “Results” section of the app.
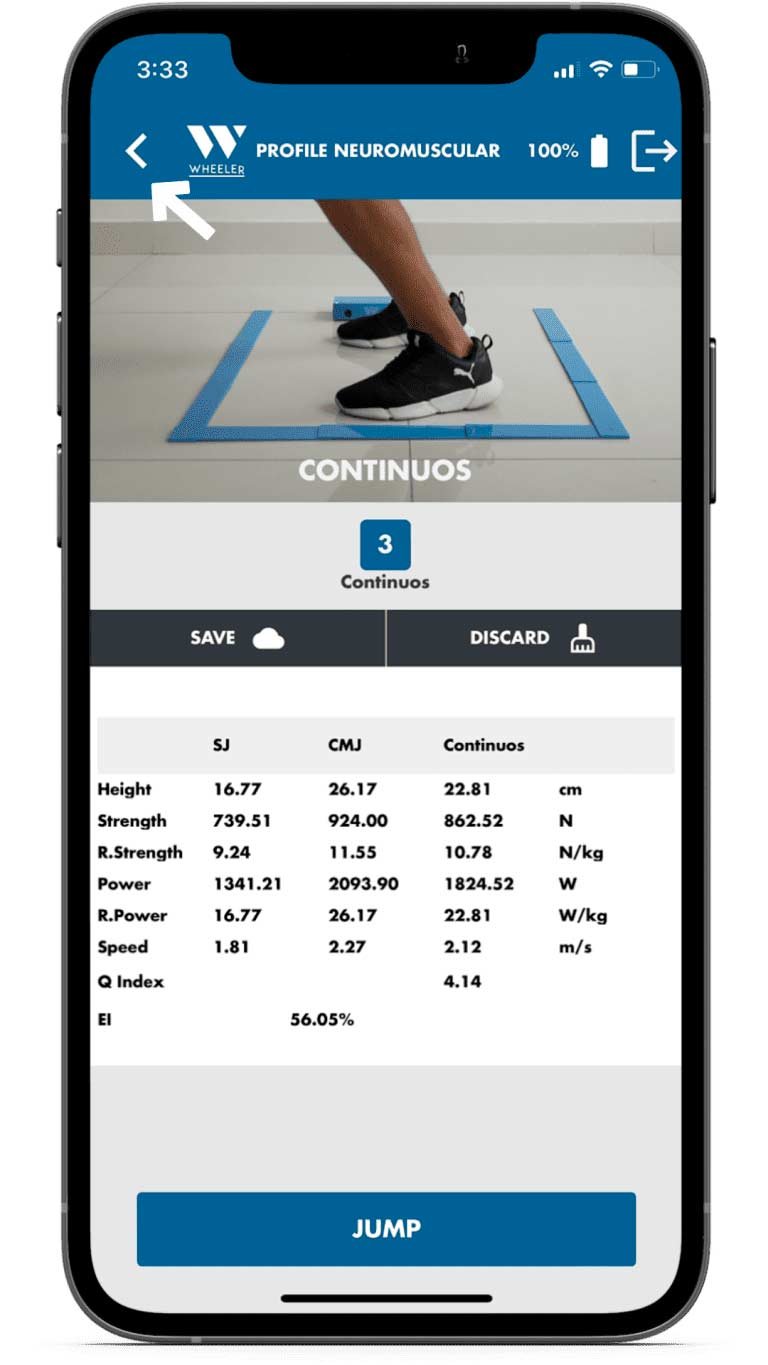
9. To go back to the other tests, tap on the < of the left upper corner.


Correct Execution
Common Mistake
Drop Jump Height
The Plyometric drop jump assessment helps the evaluator finding the optimal height for an athlete or patient to perform drop jumps.
Assess your athlete’s drop jump at 4-5 different heights to find the best reactivity index.
Still unsure after watching the video? Follow the step- by- step process below!
1. To start, choose the test “Plyometrics: Drop Jump”.
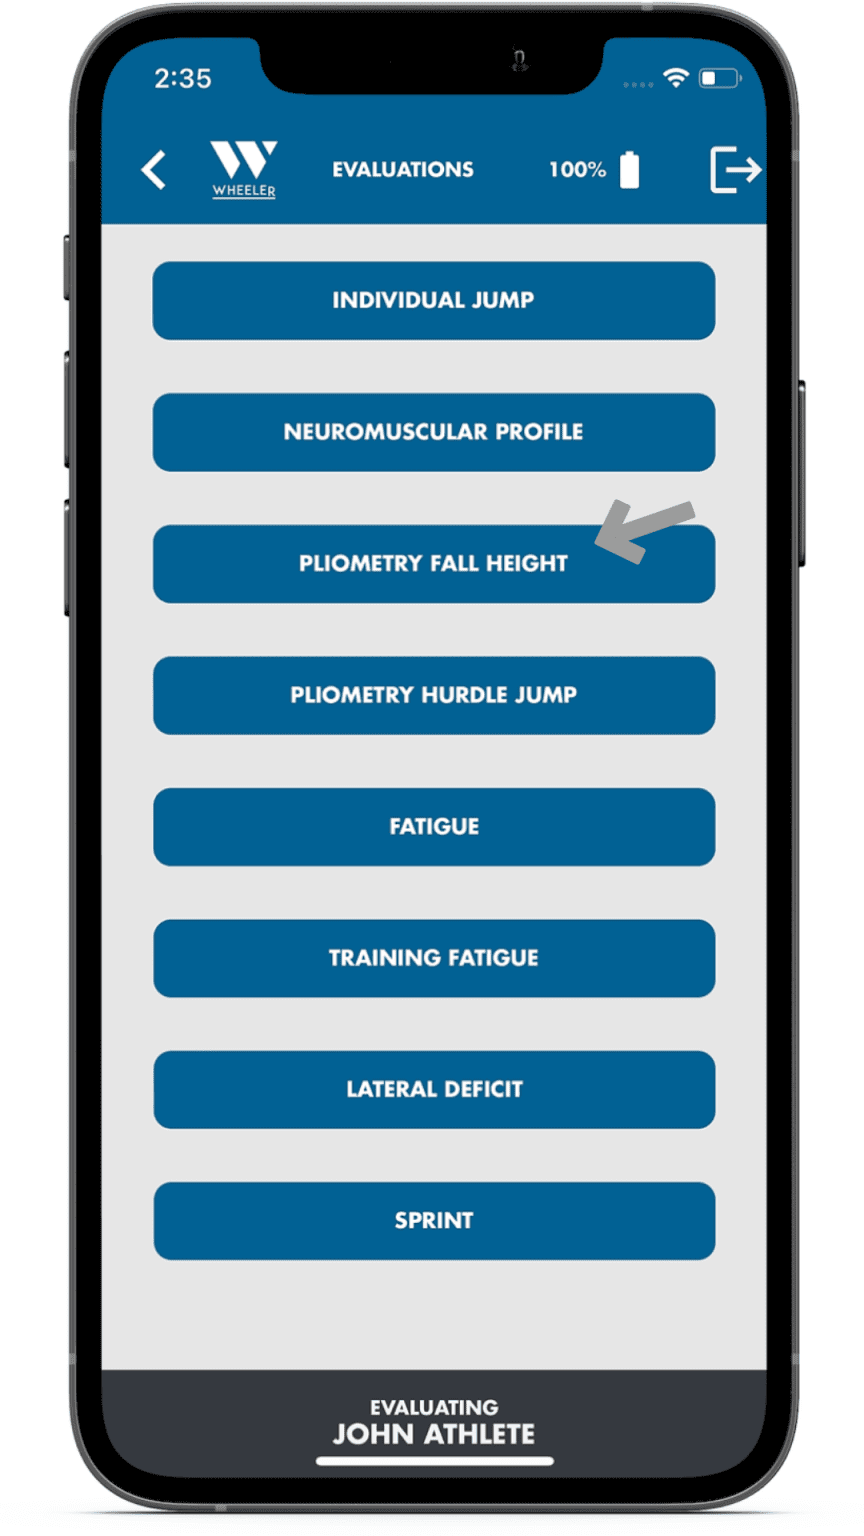
2. Tap on the height space to input the first box height.
For this example, we will use 10, 20, and 30 cm as the boxes’ height. The first height will be 10 cm.
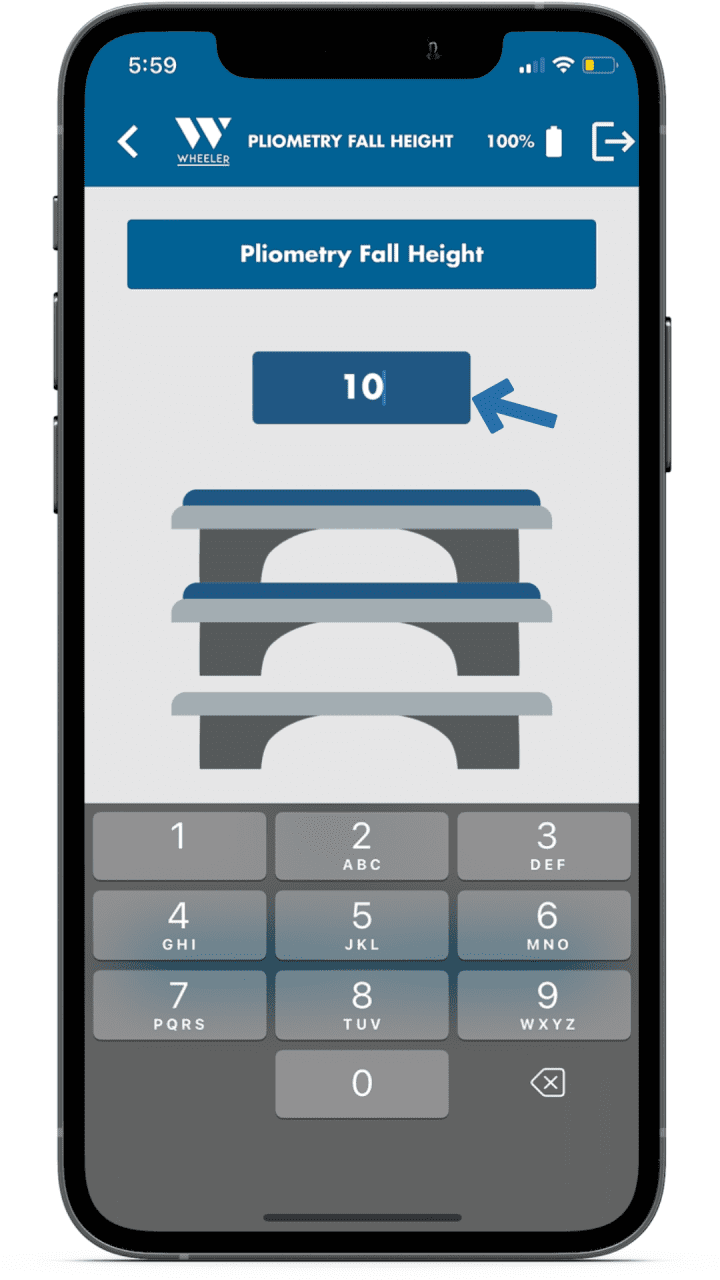
3. Once the height has been added, select “Jump”.
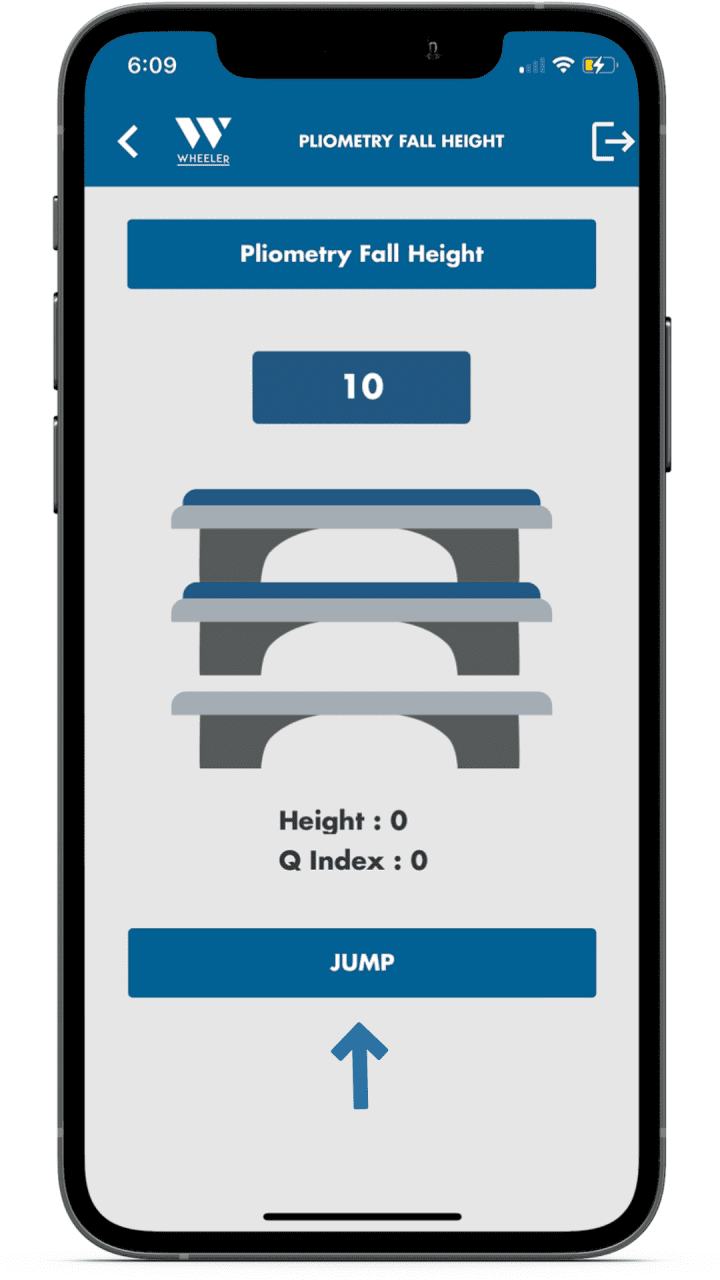
4. After getting the results, type the second height to assess the athlete.
For this example, we will add 20.
Once the height has been added, select “Jump”.
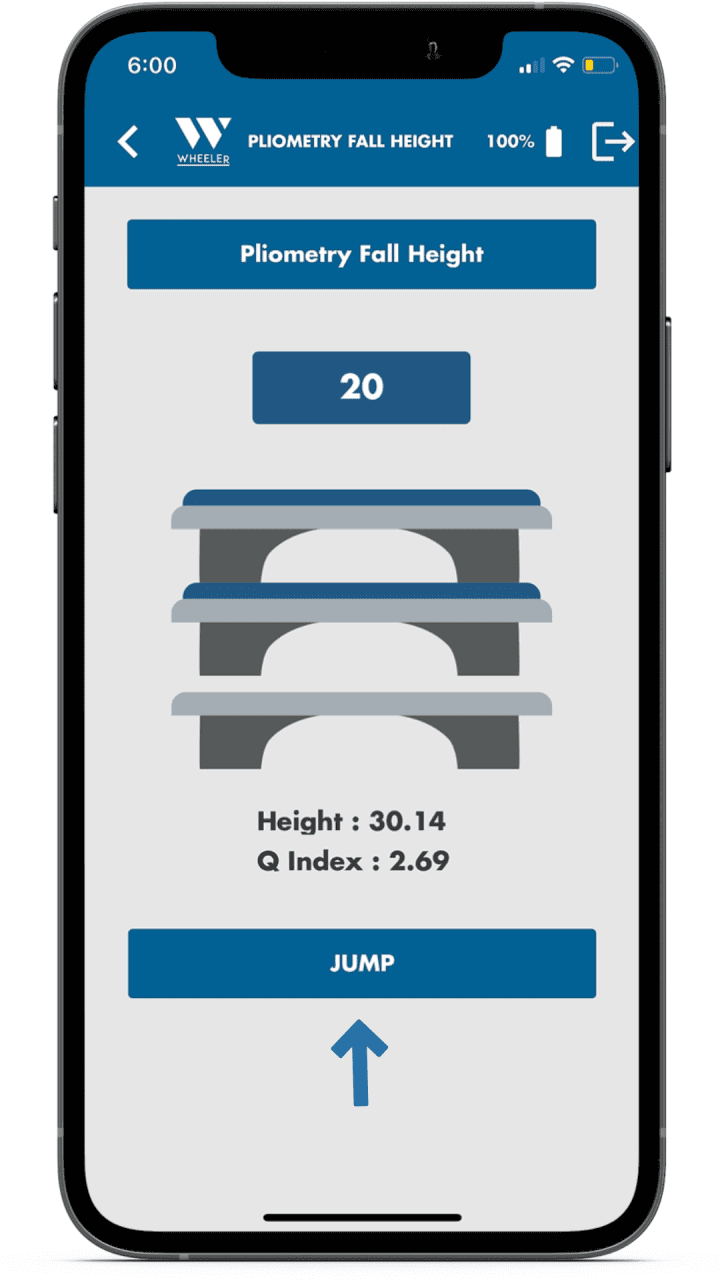
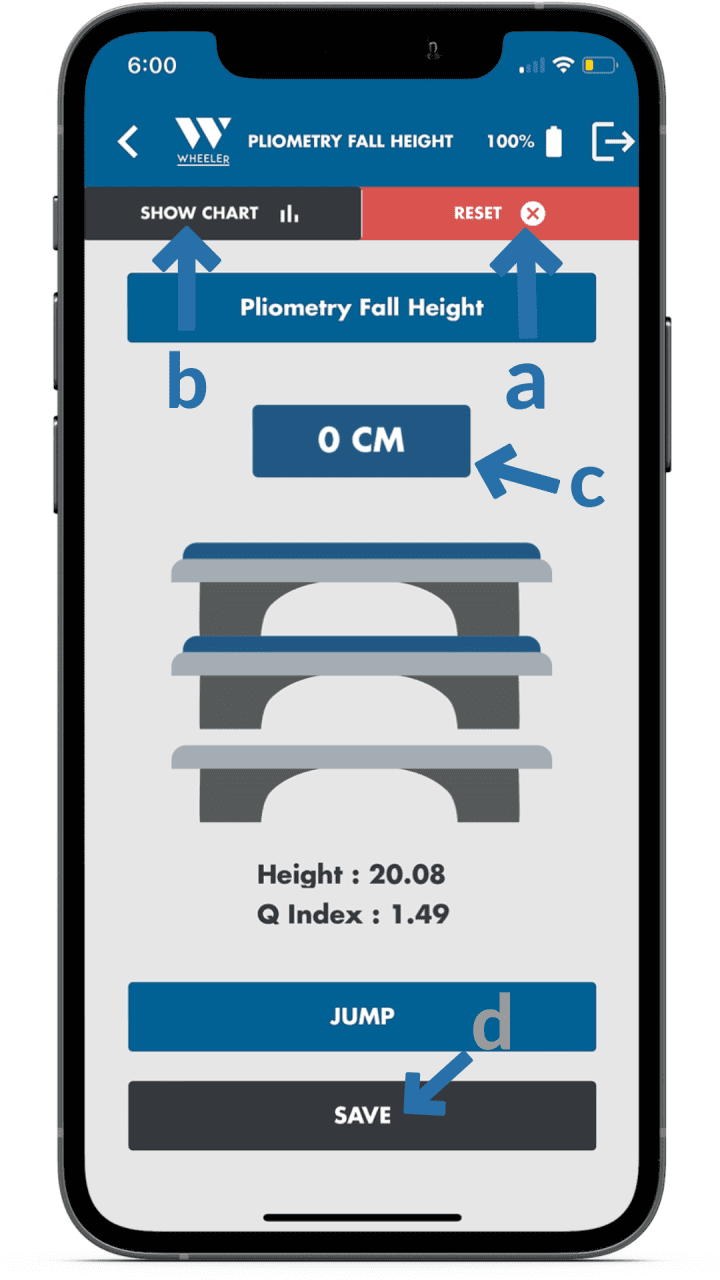
5. After performing 2 or more jumps, multiple options will become available.
a. Select “Reset” to restart the test from the beginning.
b. Select “Show chart” to see the graph of the results.
c. Select the height space to add the next height for assessing a third drop jump
d. Select “Save” to save the data on the cloud of the two (2) previously performed jumps.
In this example, we will choose a third (3rd) height to compare three (3) different data points later on.
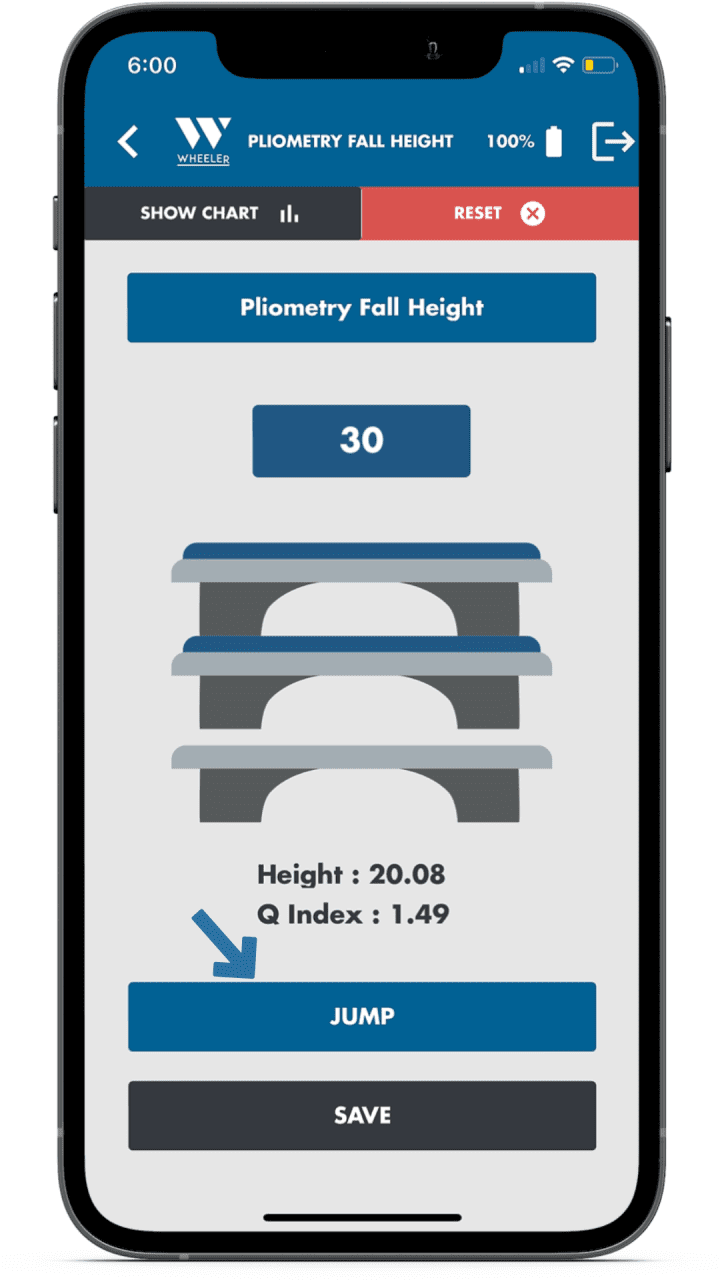
6. After adding the third (3rd) height, select “Jump” to initiate the third drop jump.
For this example, we will add 30 cm.
7. After performing the last drop jump, tap on “Show Graph” to see the results.
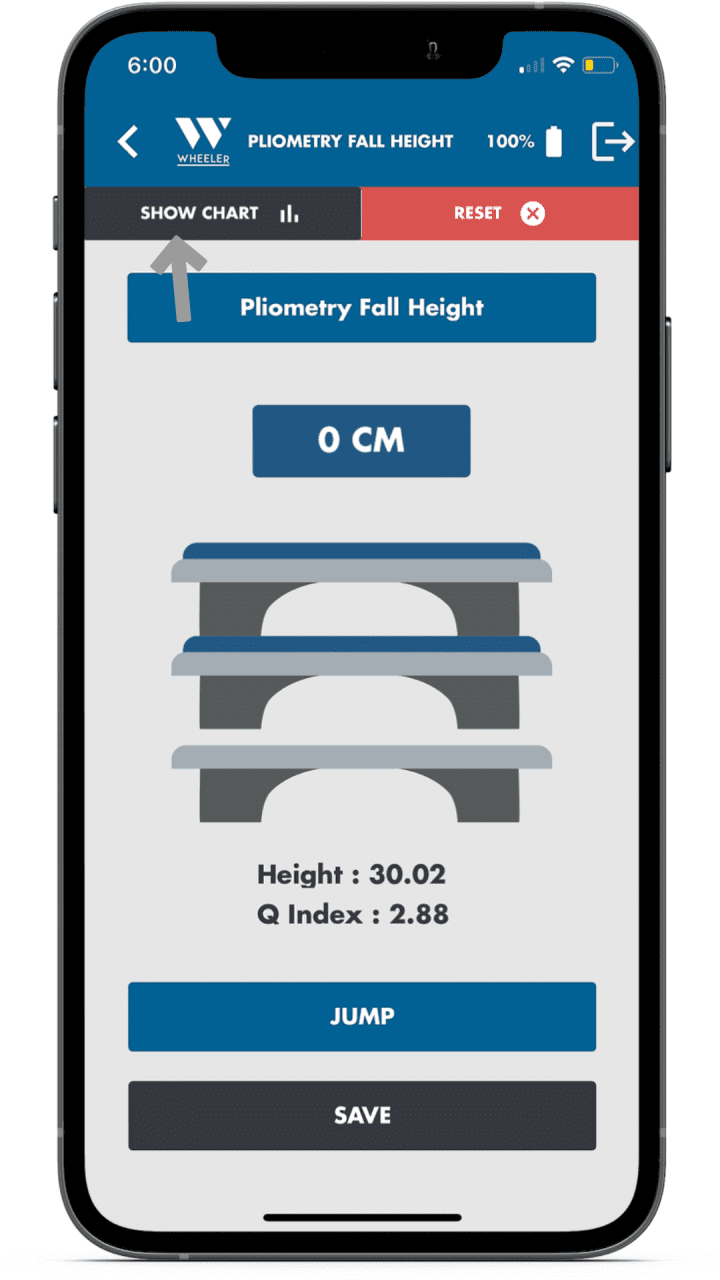
8.The graph interface will show the Height and the Q index developed by the athletes on the jumps performed. In this case, 3 jumps were performed, so our curve will have three (3) different dots for Q index and height.
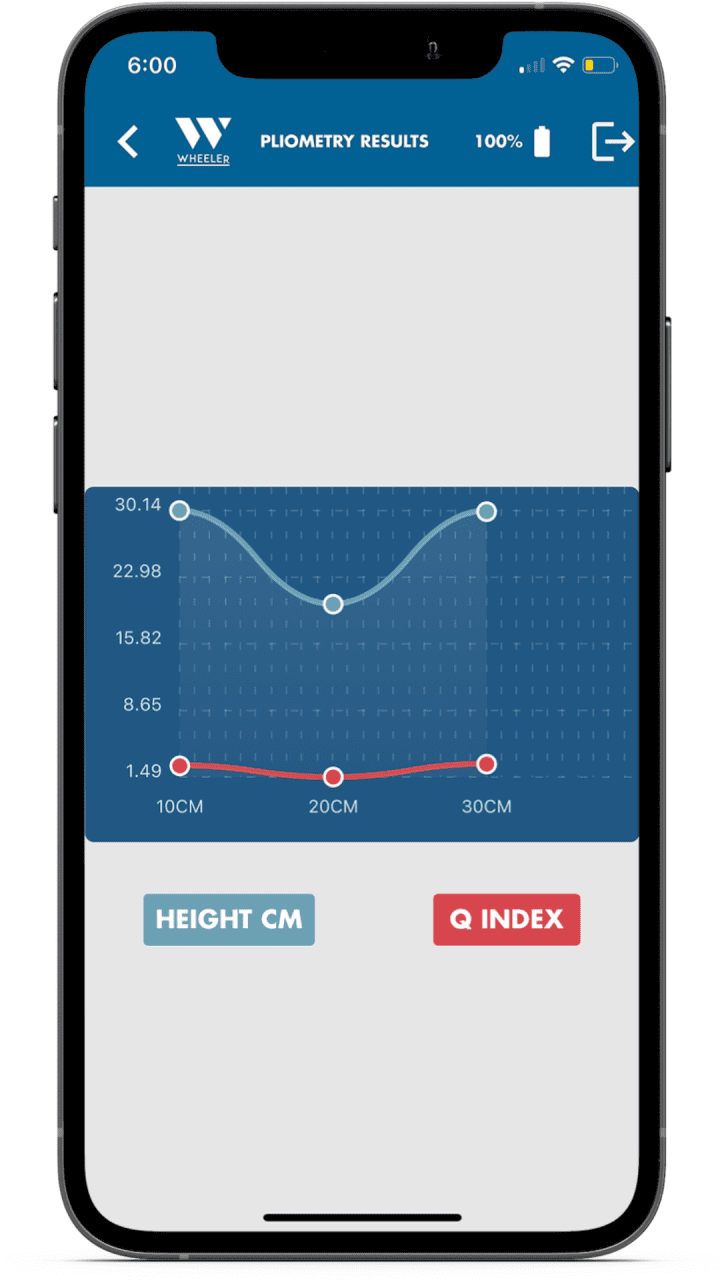
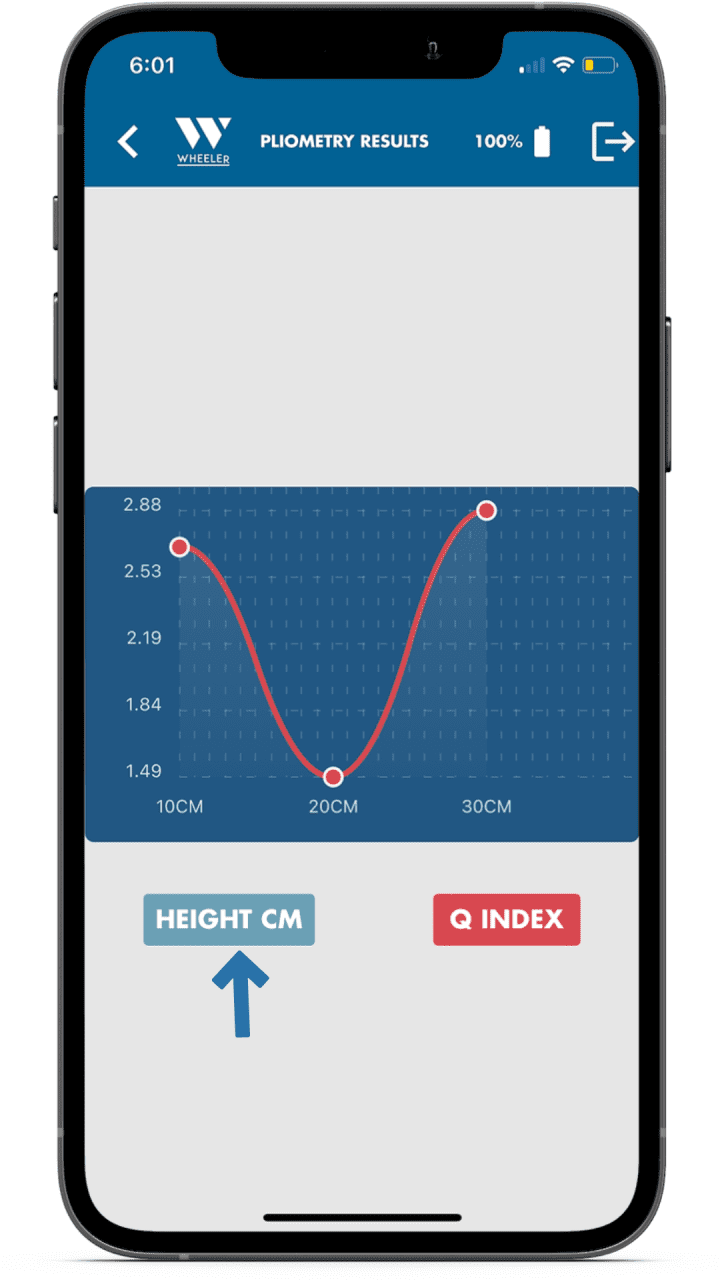
9. Because of the scale, it is clearer to see one curve at a time. To hide a curve, tap on its name. In this case, we will hide the “Height cm”.
If you want to see only the Height, select “Q Index” do hide the Q index curve and only show the height.
10. To return to all the assessments, tap on < in the top left corner.


Common mistakes
Plyometric Hurdle Height
The Plyometric Hurdle Height assessment allows you to find the optimal height an athlete needs for developing their best reactivity when performing plyometrics with hurdles.
The athlete will only need to perform continuous jumps as high as possible and with minimum contact time with the ground.
Still unsure after watching the video? Follow the step- by- step process below!
1. To start, select “Plyometric Hurdle Height”.
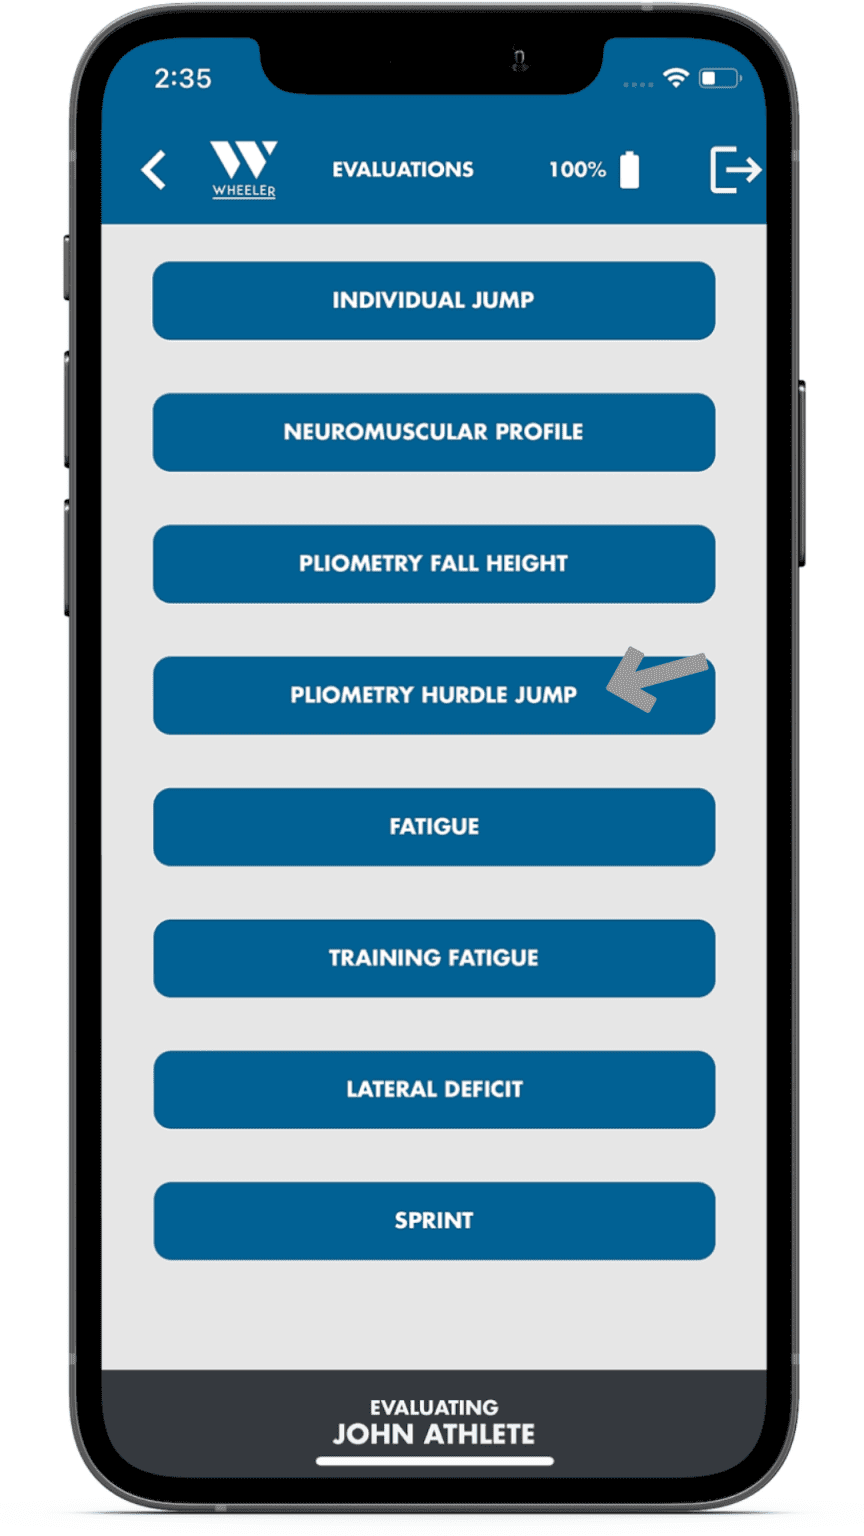
2. Once the athlete is located in the Jumping area, select “Jump”.
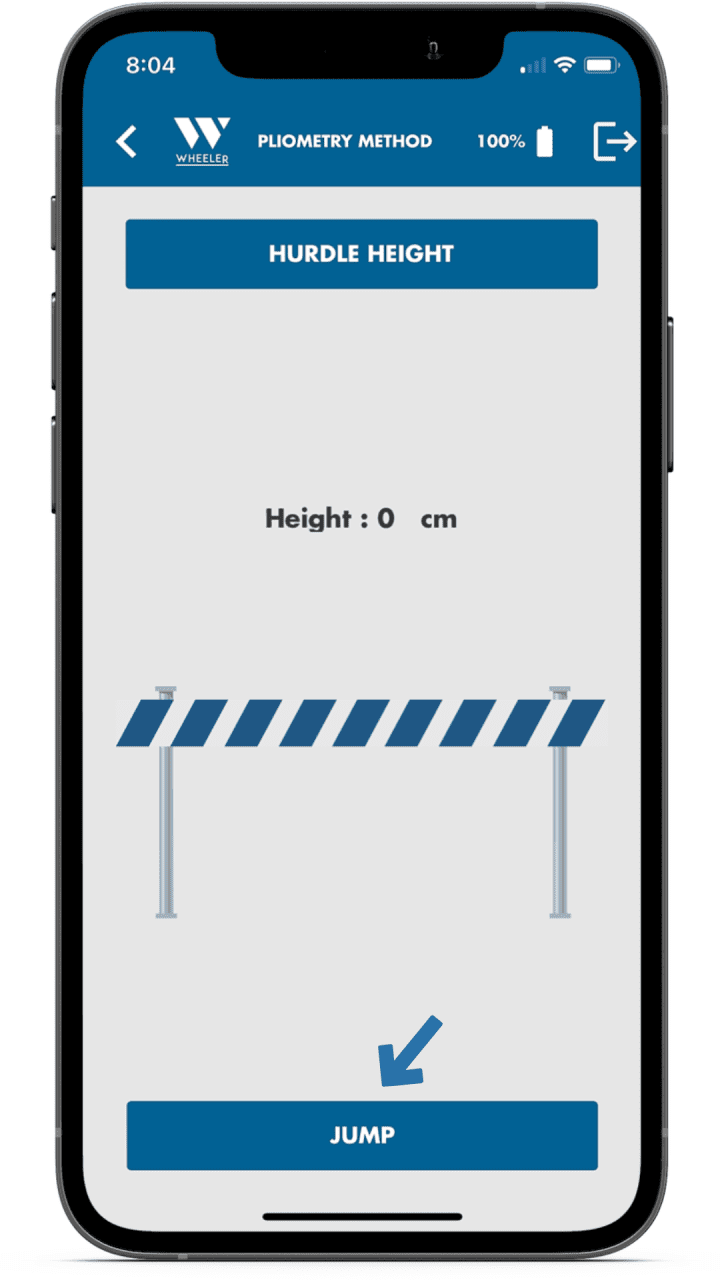
3. After 5 seconds of continuous jumps, the test will yield results. Two (2) options will become available.
a. Tap on “Jump” to re-assess.
b. Tap on “Reset” to restart the test from 0.
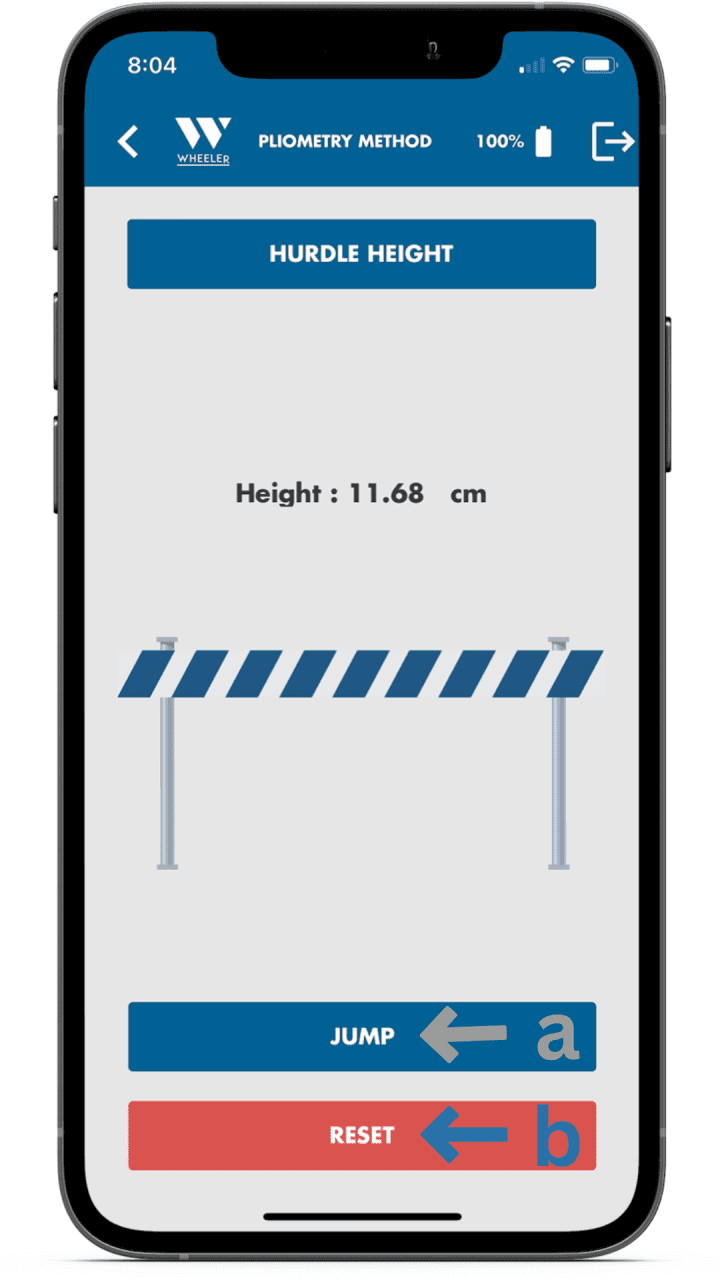
4. To return to all the assessments, tap on < in the top left corner.


Correct execution
Common Mistakes
Neuromuscular Fatigue
The neuromuscular fatigue assessment allows the evaluator to assess the athlete’s fatigue after competition or a long game by analyzing the reactivity index evolution through time on continuous jumps.
Still unsure after watching the video? Follow the step- by- step process below!
1. To start, select the “Fatigue” assessment.

2. Select the space for Time to add the time needed to complete the assessment.
We recommend assessing for 10-15 seconds max for this test.
For this example, we will choose 10 seconds.

3. Tap on “Jump” to start the assessment.

4. The following screen means that the assessment is currently being recorded.

5. Once the assessment is completed, the following options will become available:
- a. Tap on “Reset” to restart the assessment from the beginning.
- b. Tap on “Show chart” to see the results on a graph.
- c. Tap on “Jump” to do a second assessment.
- d. Tap on “Save” to save the data on the cloud.
For this example, we will tap on “Show chart”.

6. Because of the scale, it is clearer to see only one curve at a time. To hide a curve, tap on its name. In this case, we will hide the Height curve.
You can do the same with the Q Index curve if you only want to only see the Height.

7. Para volver a todas las evaluaciones, toque


Correct Execution
Common Mistakes
Training Fatigue
The training fatigue test allows the trainer to assess how fatigued the athlete or patient is after a training or rehabilitation session.
Still unsure after watching the video? Follow the step- by- step process below!
1.To start, select the “Training fatigue” assessment.
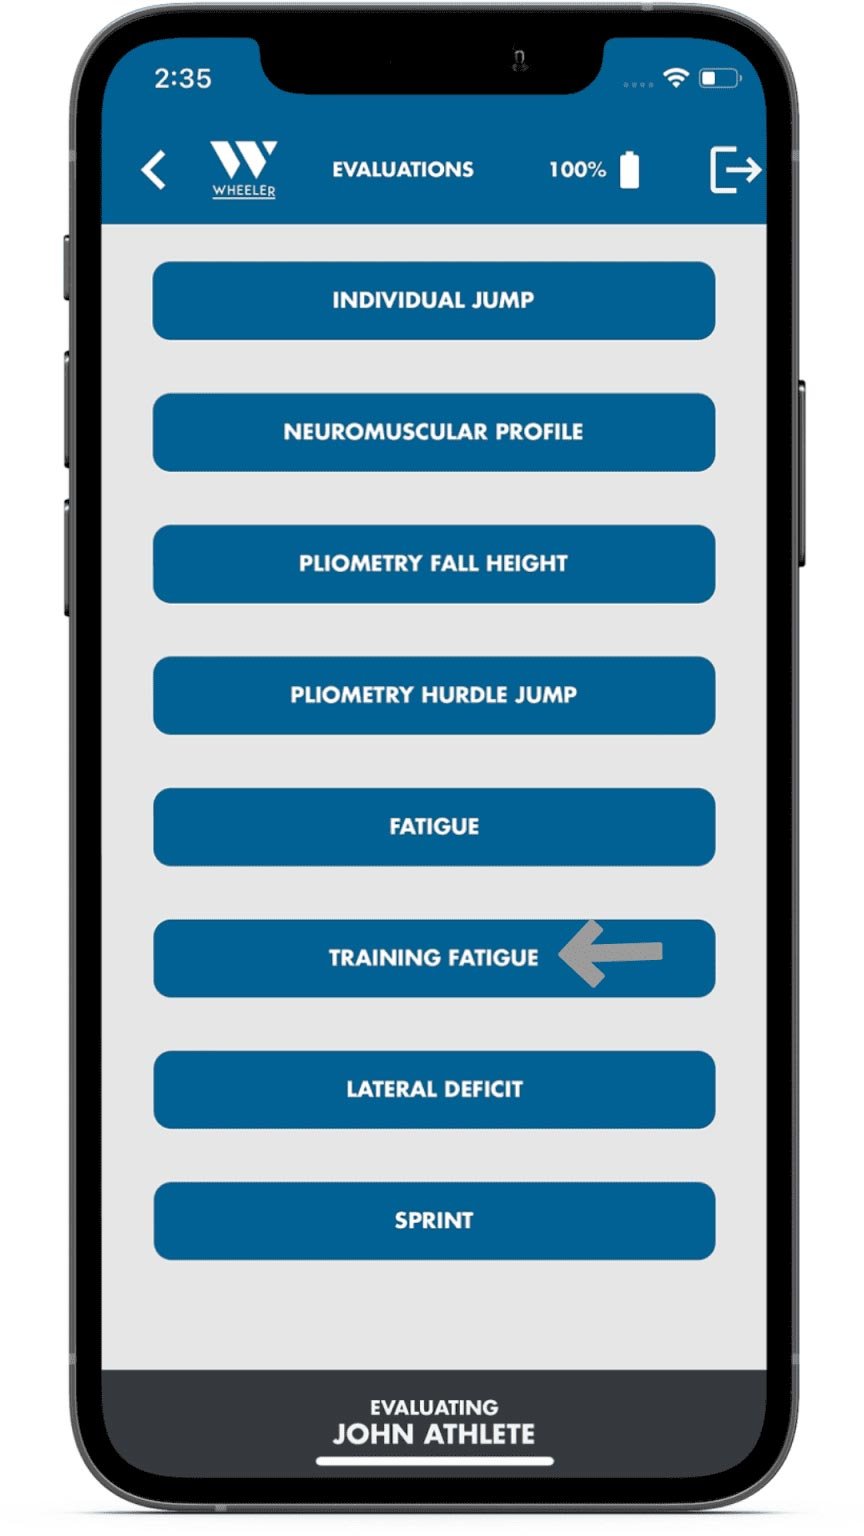
2. Once on the assessment interface, locate the athlete in the jumping area and select “Pre-Training” to choose the first jump.
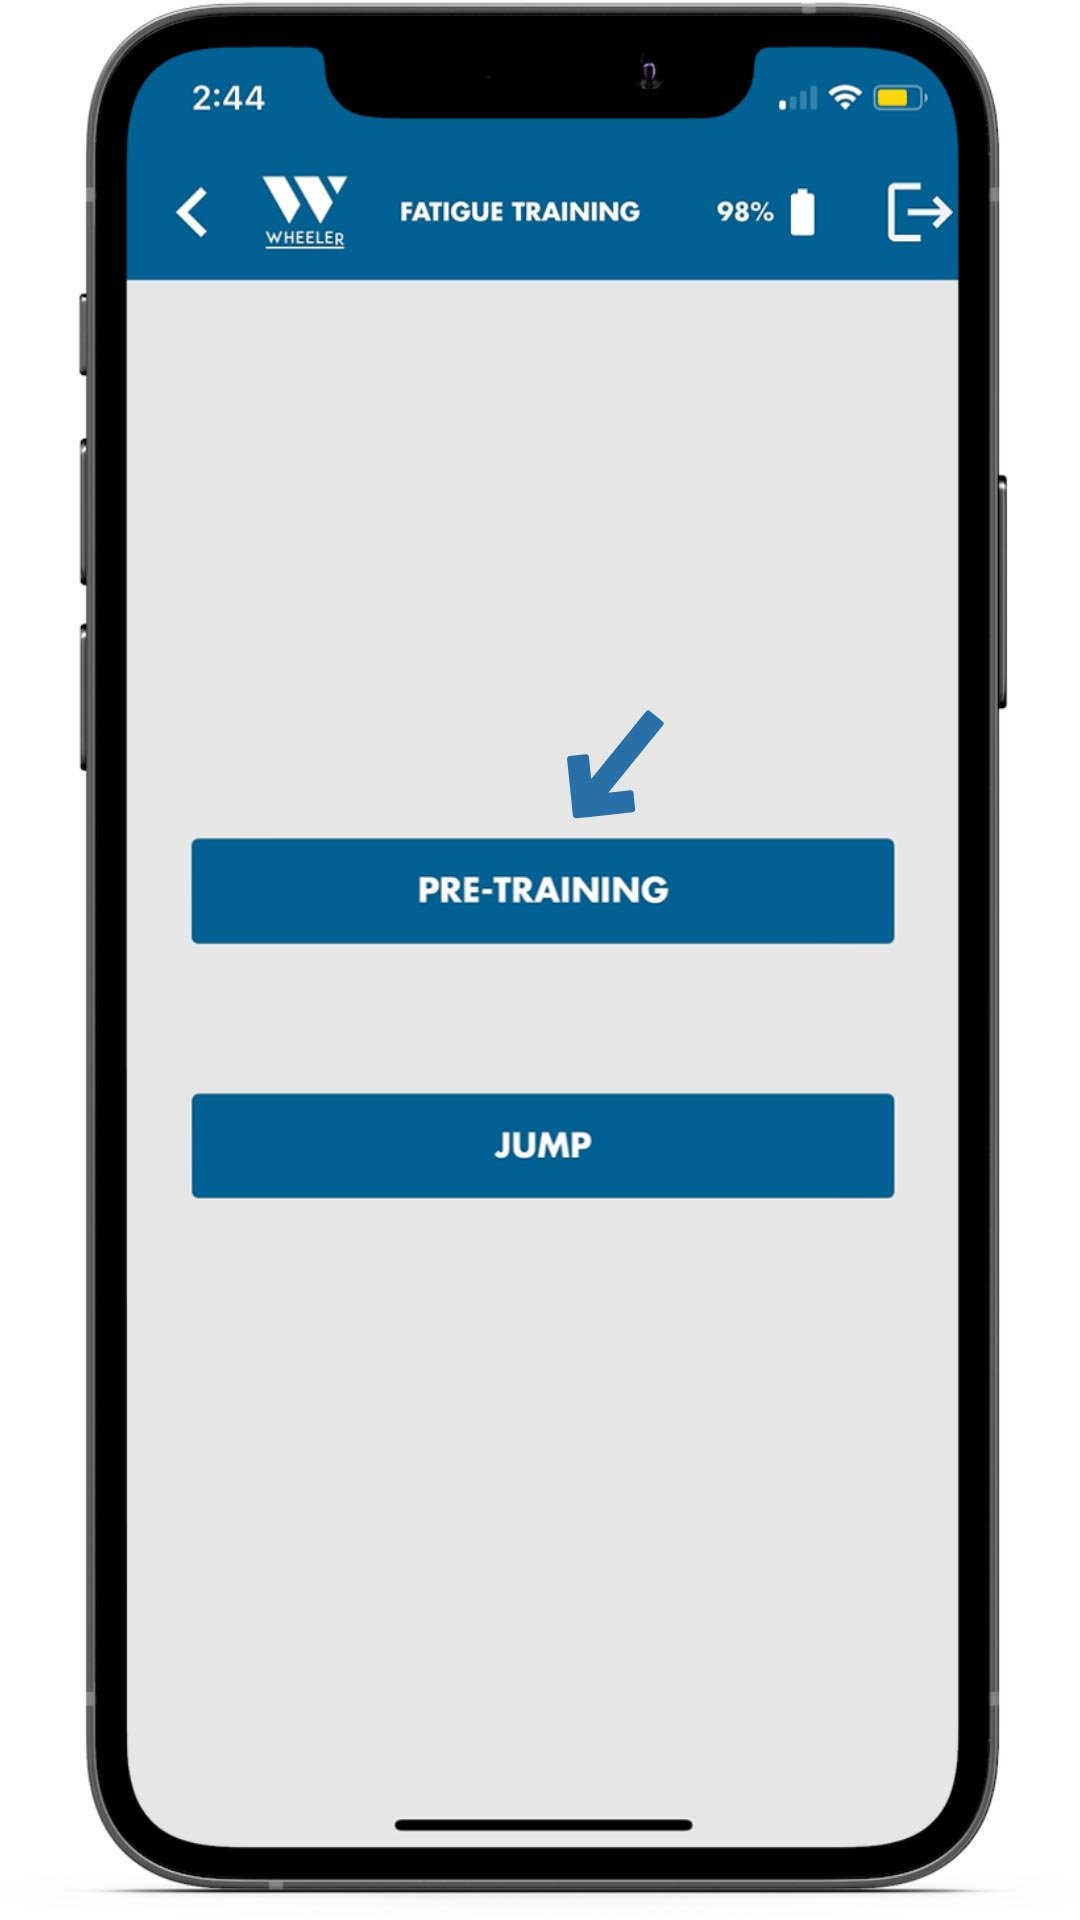
3. Select “Jump” to initiate the assessment.
The athlete will have to perform a CMJ (Counter Movement Jump).
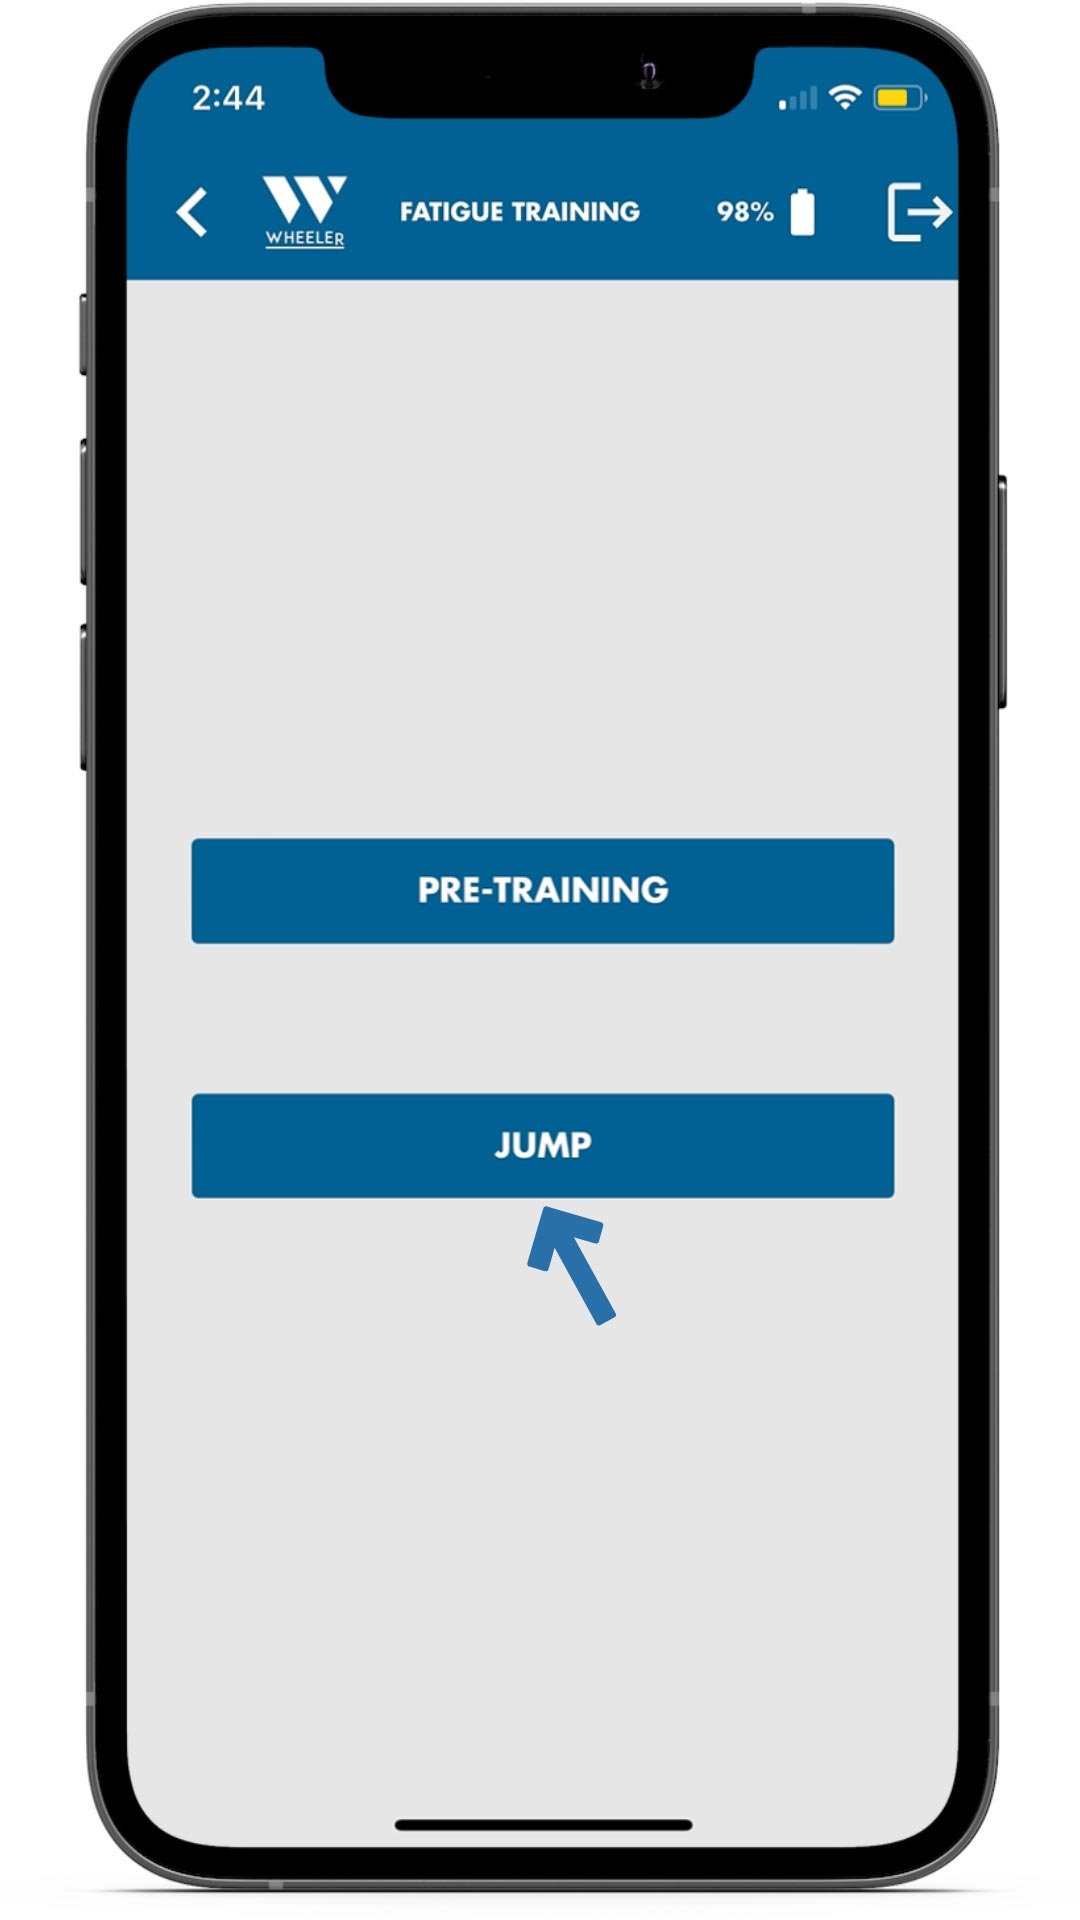
4 You can exit the app and go about your training session. The test will stay active until you perform the second test.
5. After finishing the training session, open the Training Fatigue test again.

6. Once on the assessment interface, select “Post-Training” to choose the post-training countermovement jump.
Select “Jump” to initiate the test.
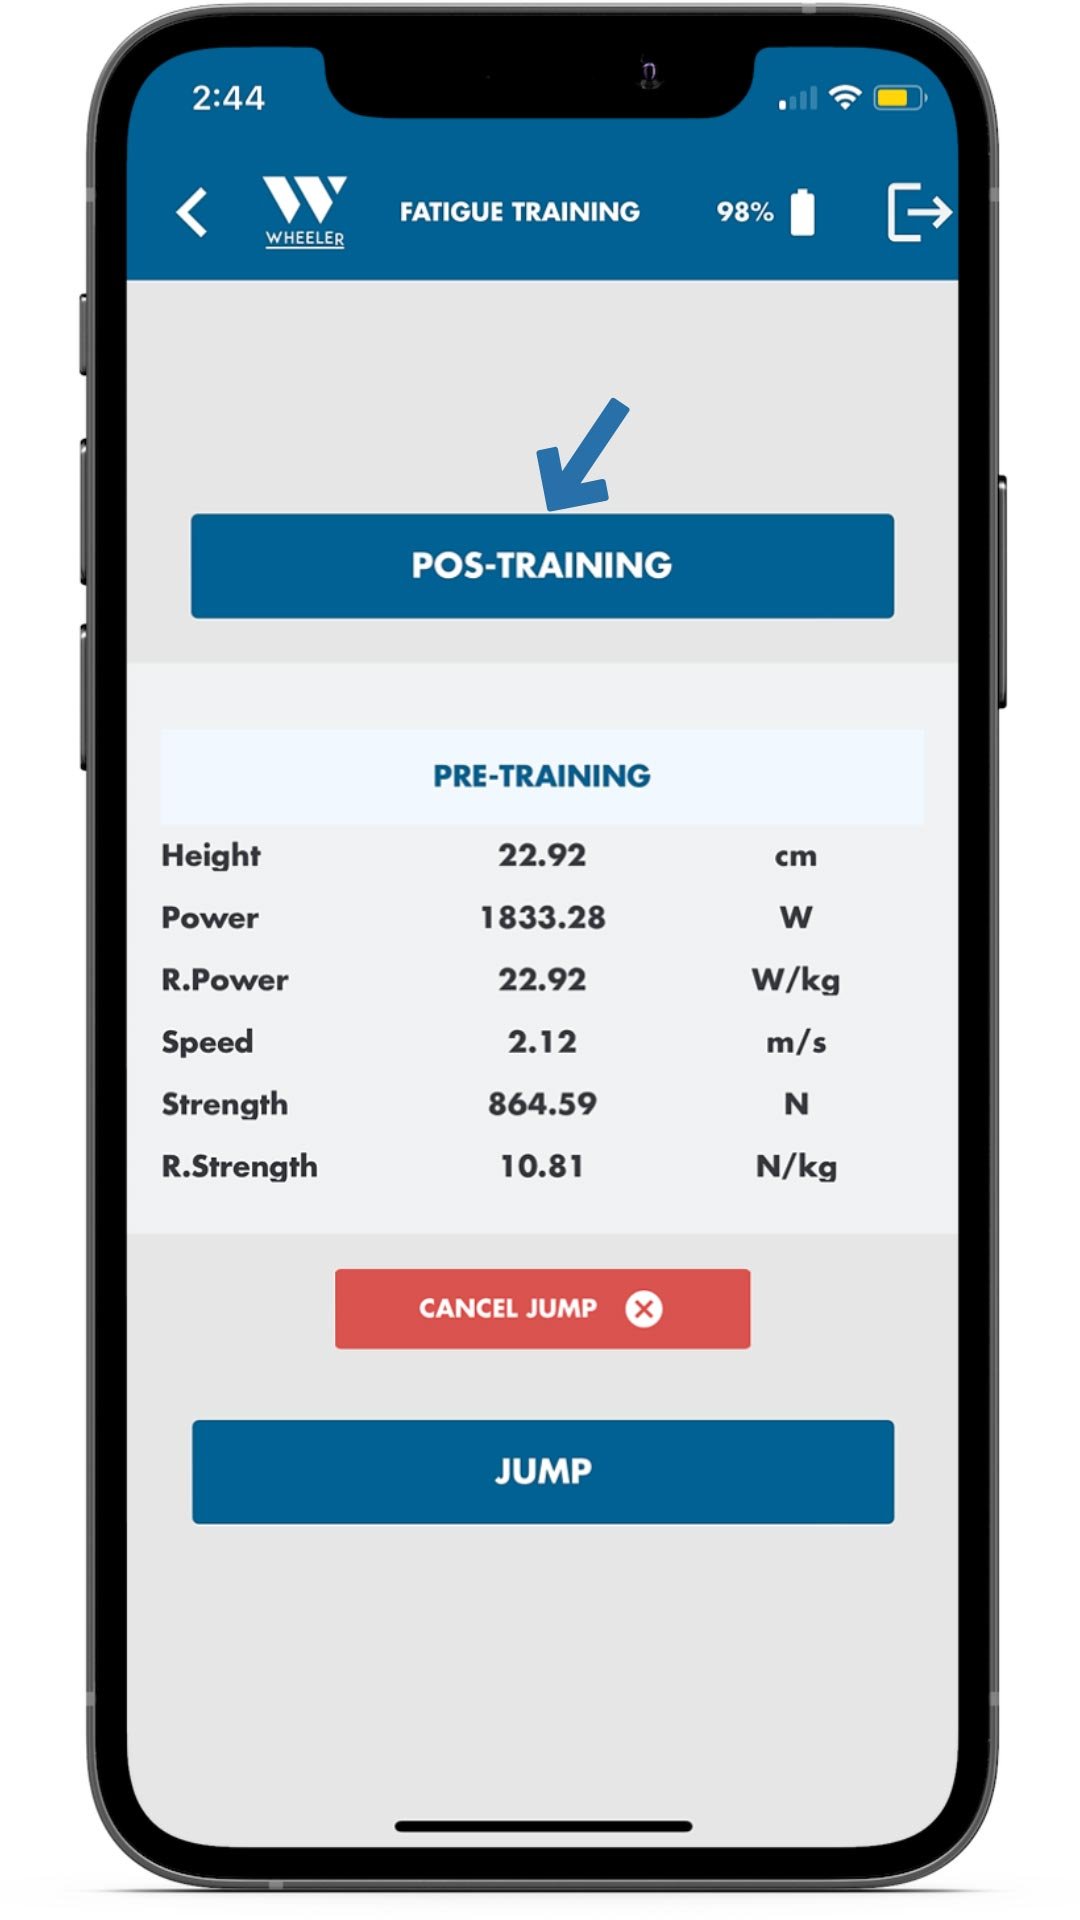
7. After performing the Post-training test, 3 options will become available:
a. Tap on “Cancel Jump” to cancel the test.
b. Tap on “Show Graph” to show the graph
c. Tap on “Save” to save the assessment on the cloud.
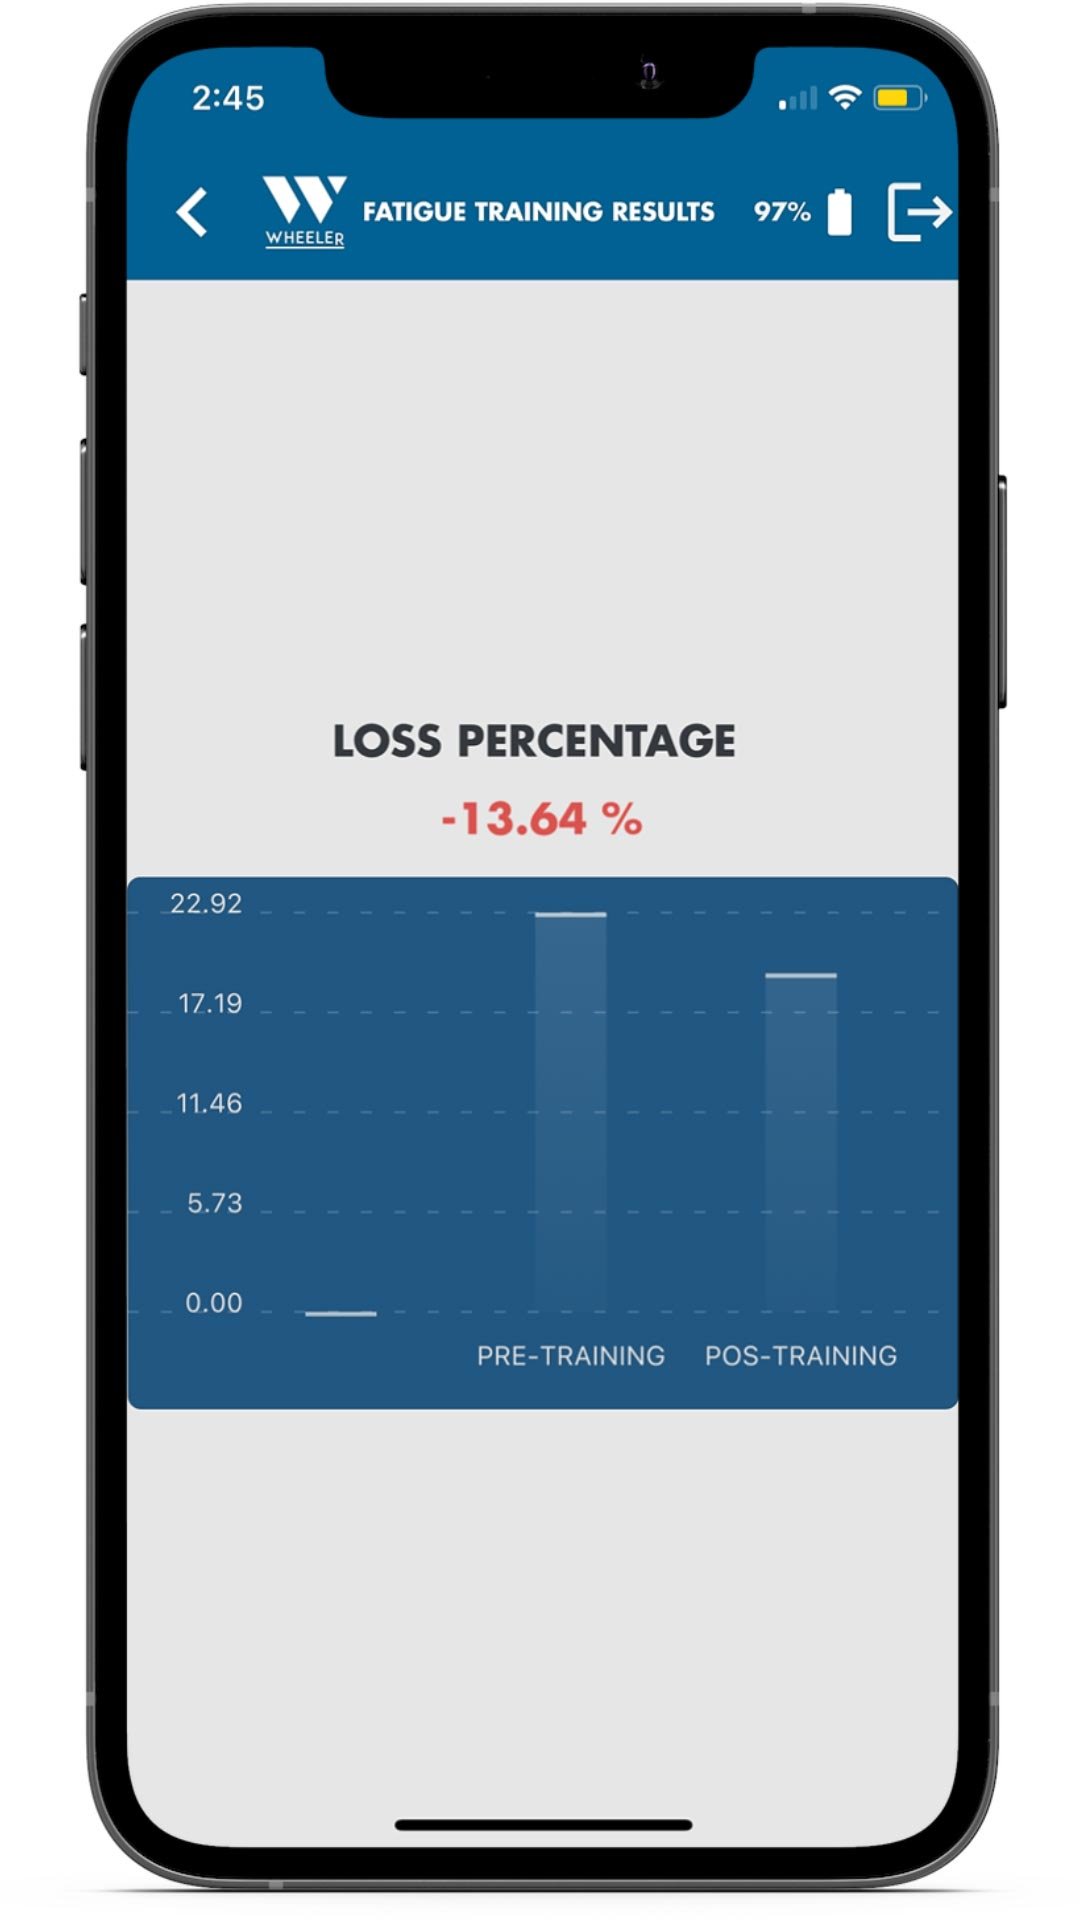
For this example, we will choose Show Graph.
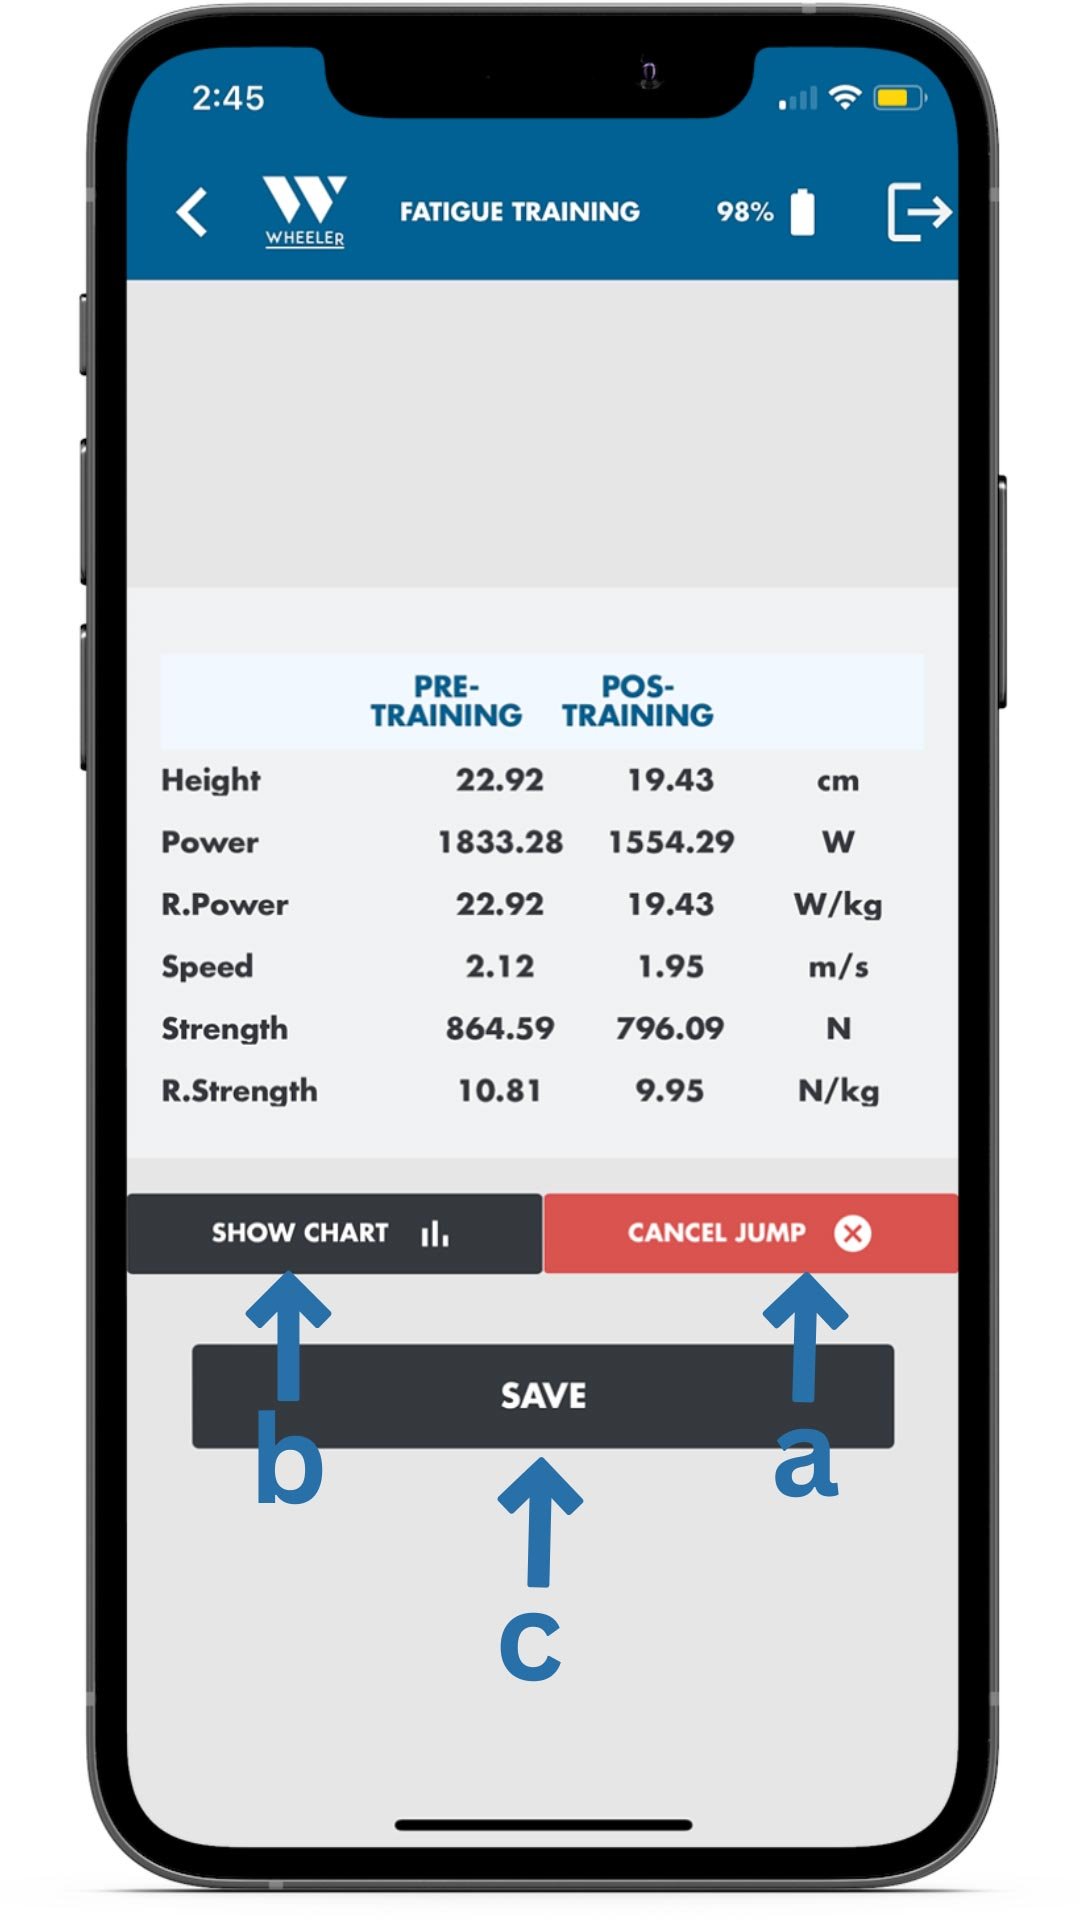
8. On the following screen, both jumps will be compared for interpretation. The percentage shown will be the difference between the Pre-Training and Post- Training.
9. To return to all the assessments, tap on < in the top left corner.


Correct Execution
Common Mistakes
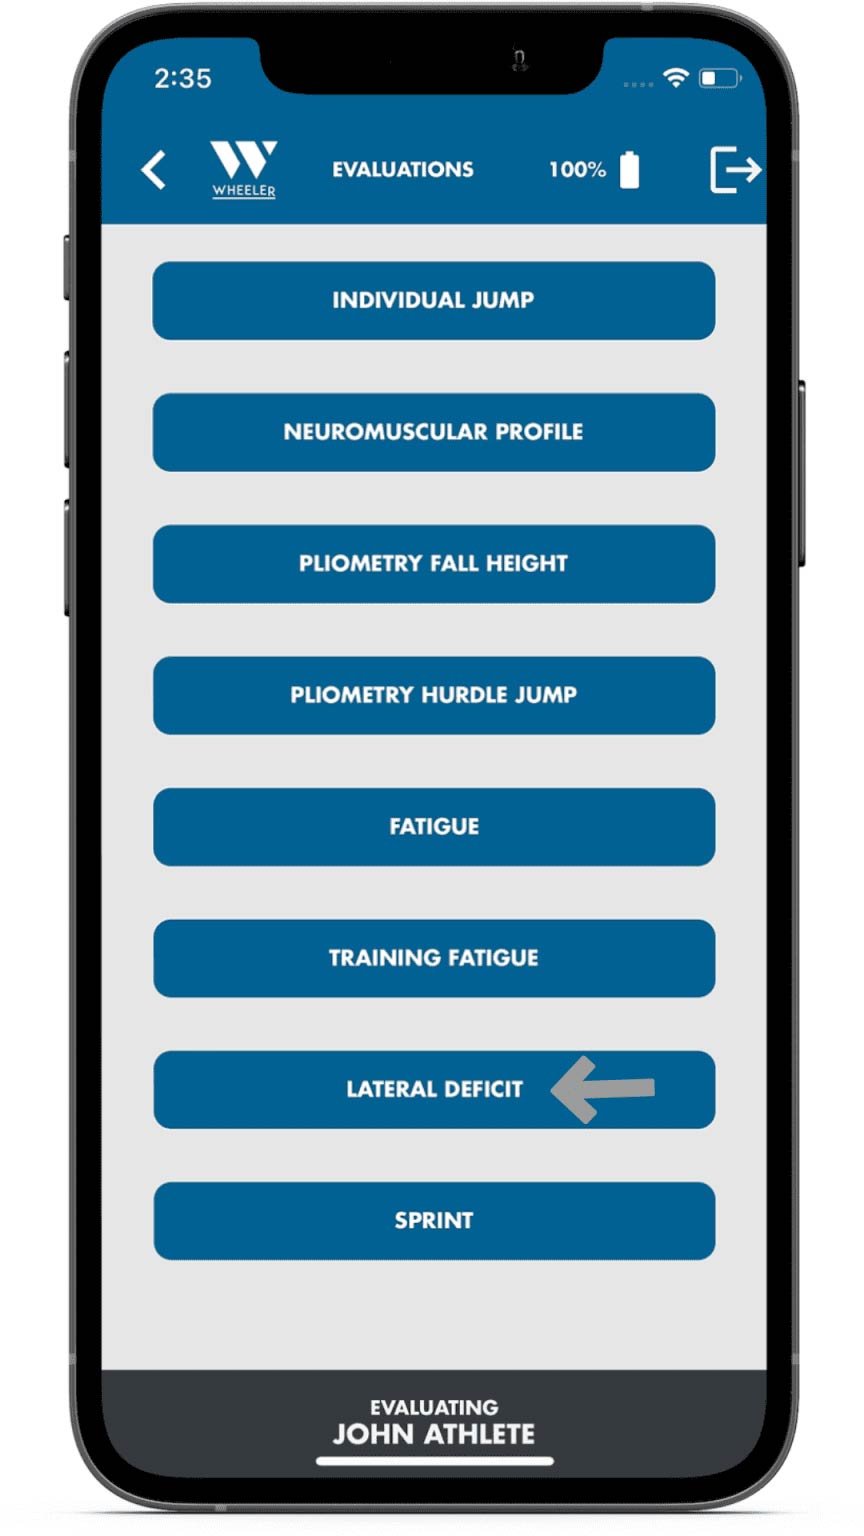
Lateral Deficit
The Lateral Deficit test allows the evaluator to assess the Neuromuscular Profile for each leg and find deficits between legs.
Still unsure after watching the video? Follow the step- by- step process below!
1.To start, select the “Lateral deficit” test.
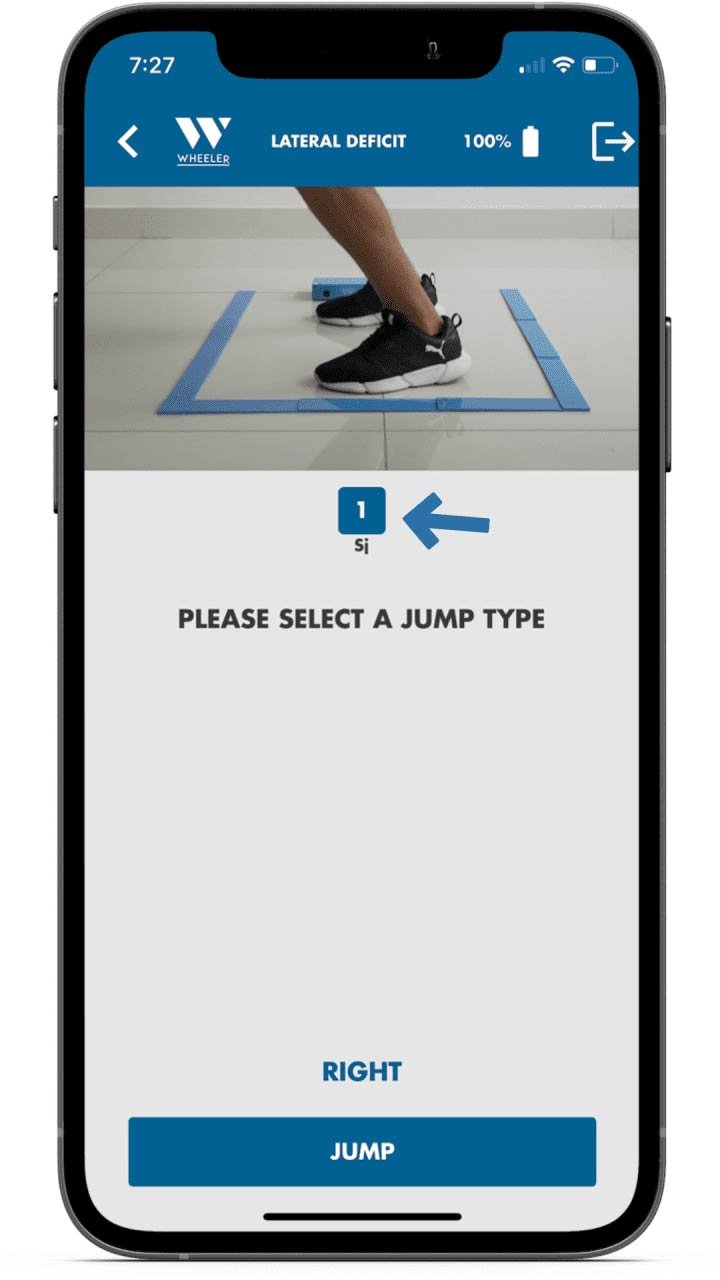
2. The assessment will start always with the Right Leg.
On the assessment interface, select the jump.“SJ” (Squat Jump).
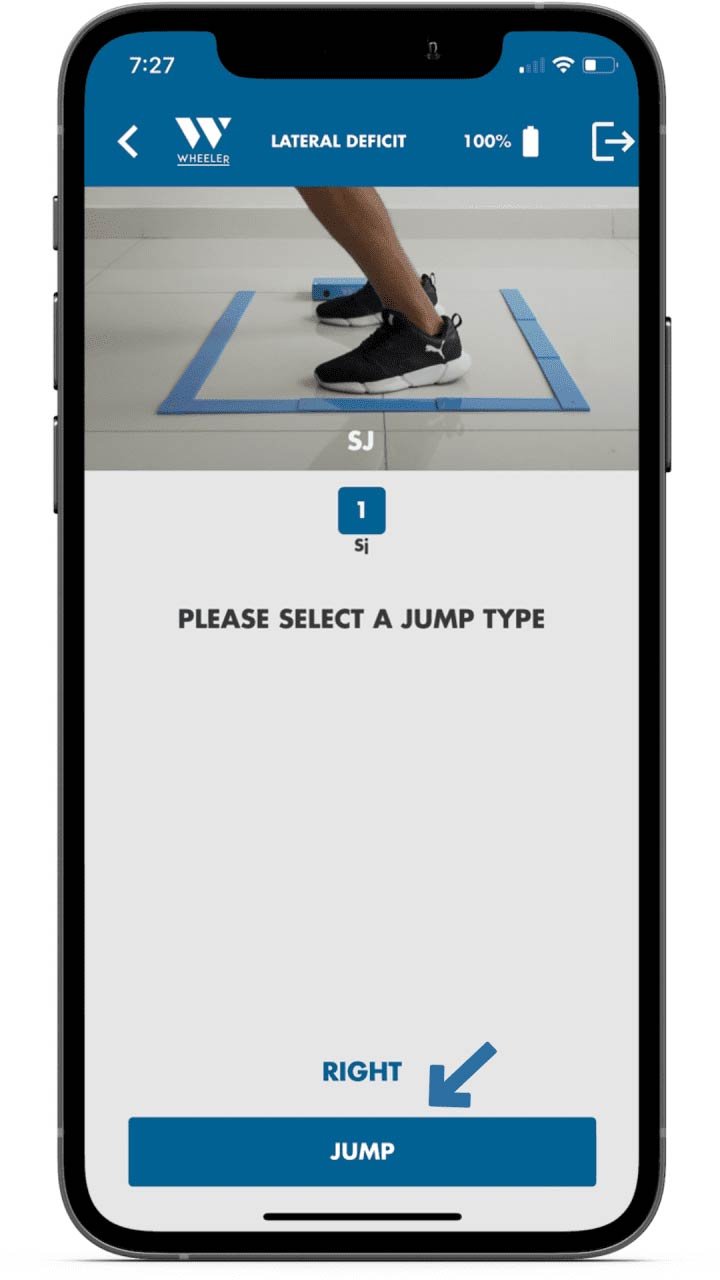
3. The title of the jump will appear on the top of the screen in white. Locate the athlete in the jumping area and select “Jump”.
4. After the SJ, select “CMJ” (Counter Movement Jump) to select the next jump.
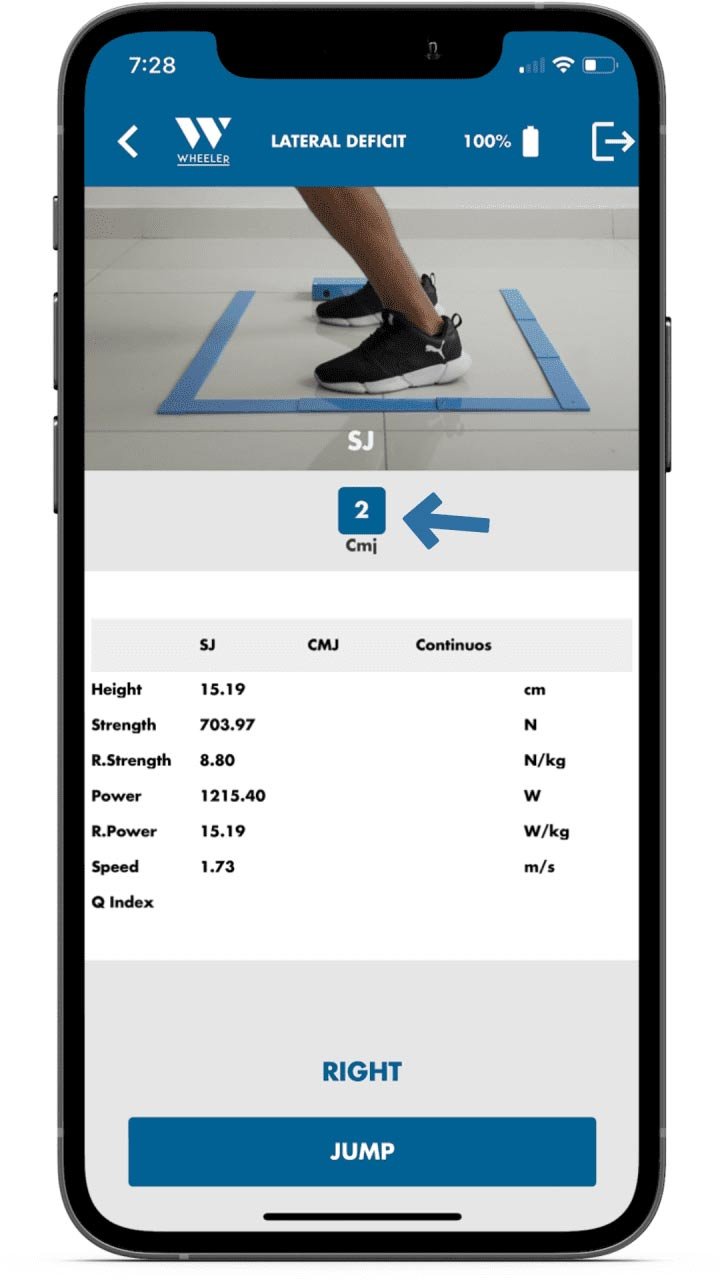
5. The title of the jump will appear on the top of the screen in white. Locate the athlete in the jumping area and select “Jump”.
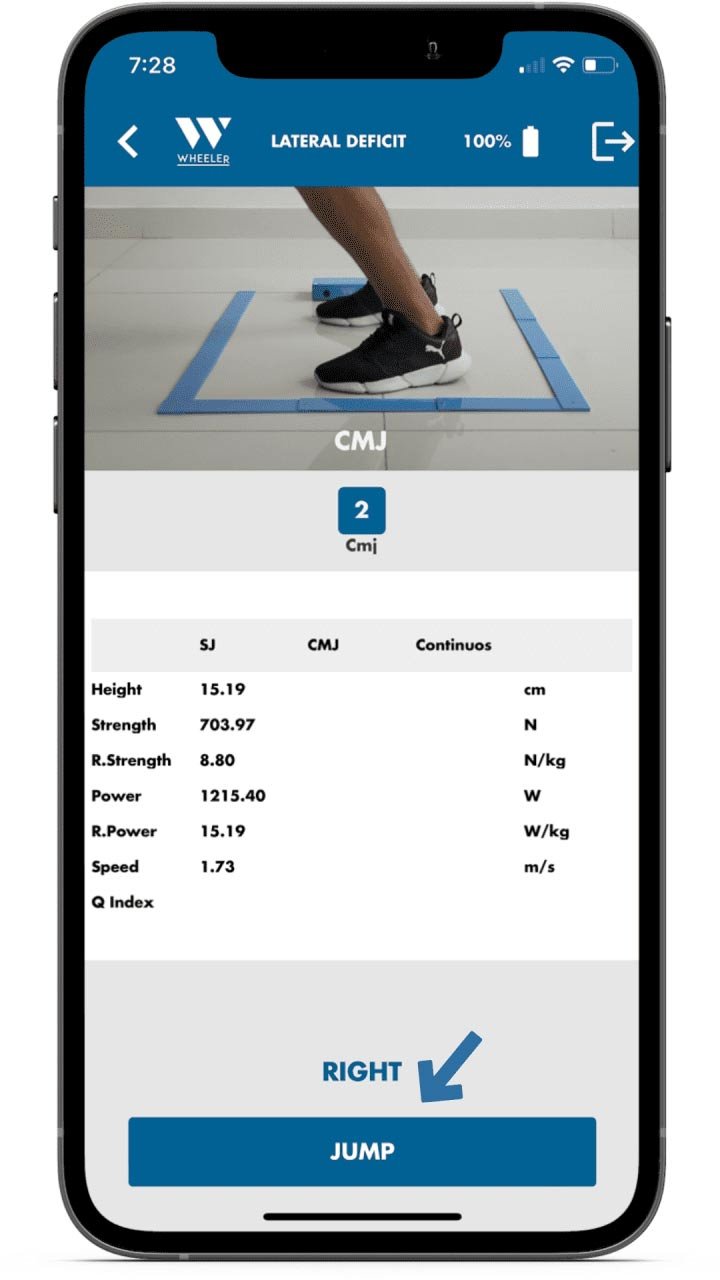
6. After the CMJ, tap on “Continuous” to select the next jump.
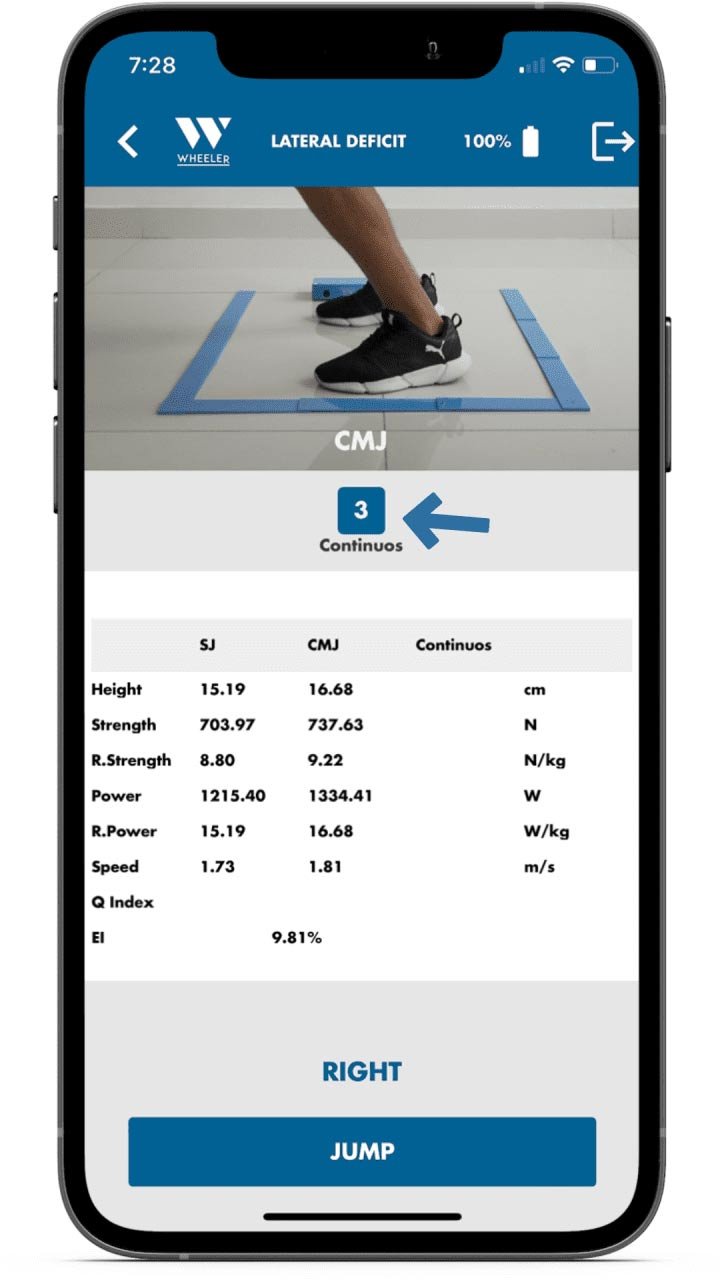
7. The title of the jump will appear on the top of the screen in white. Locate the athlete in the jumping area and select “Jump”.
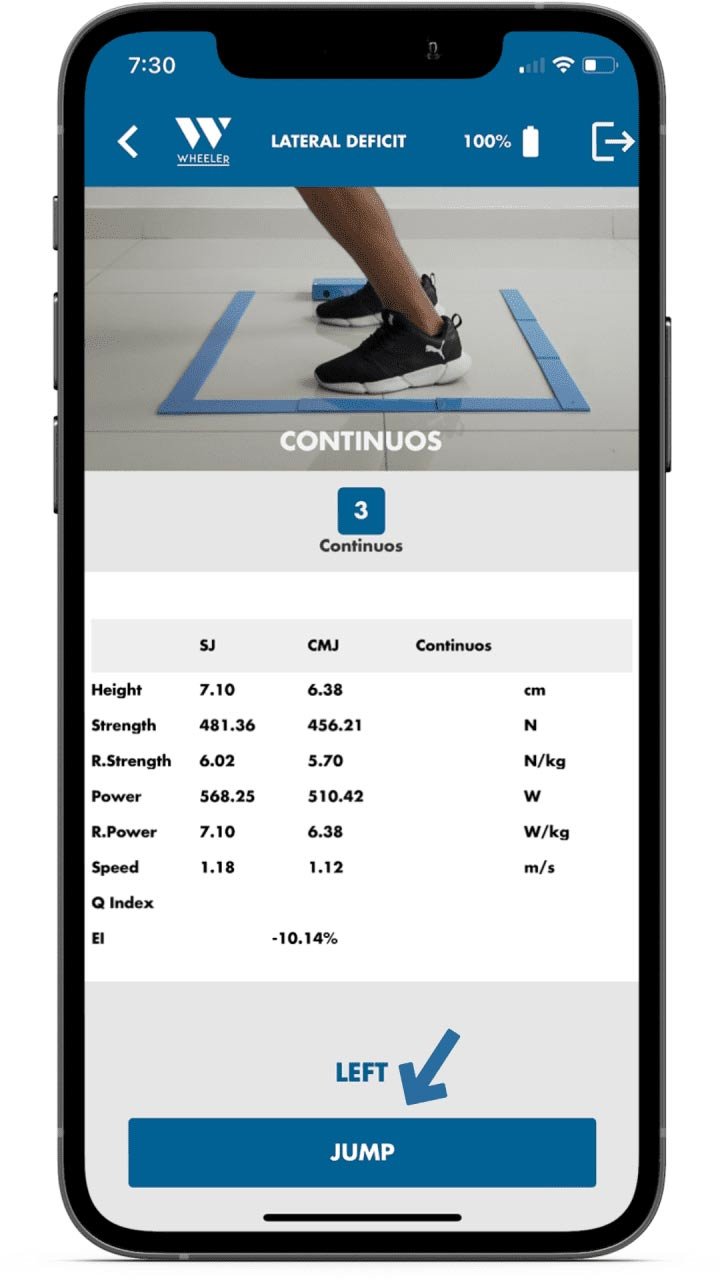
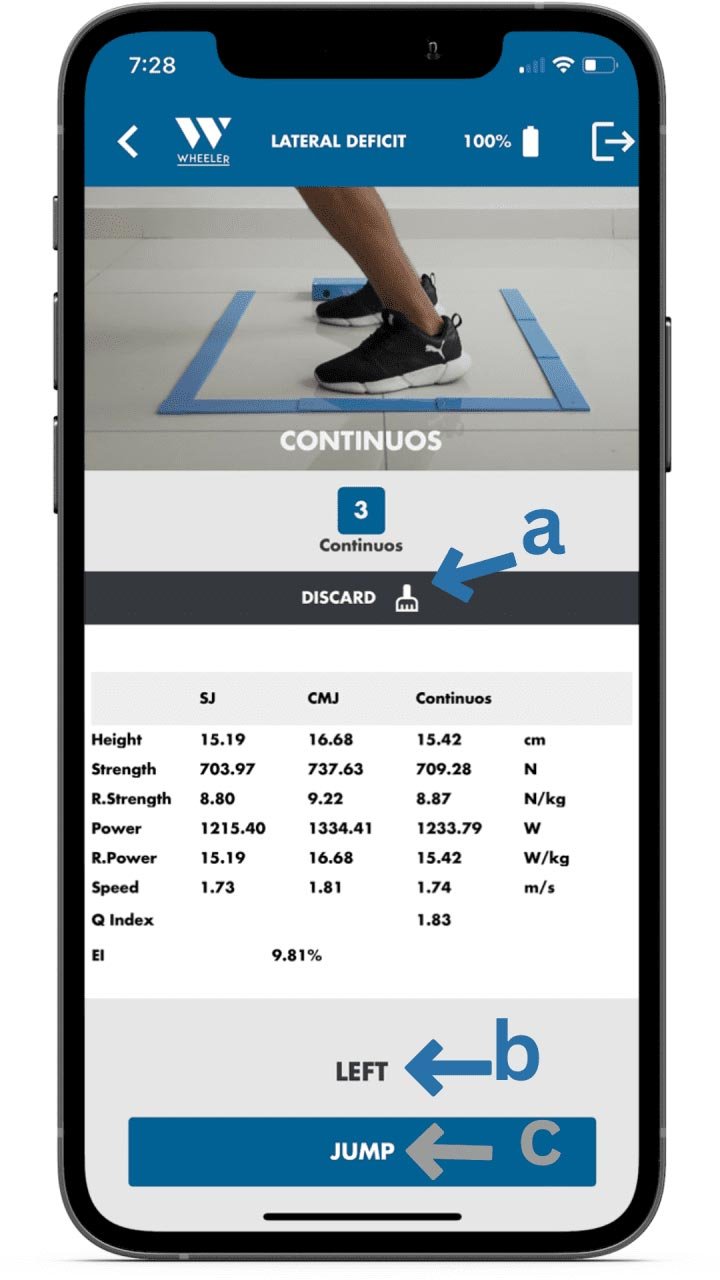
8. After the Continuous jumps, multiple options will become available:
a. Tap on “Discard” to discard this test.
b. Tap on “Left” to continue the testing on the left leg.
c. Tap on “Jump” to repeat the last jump.
For this example, we will choose “Left” to continue with the assessment.
9. After selecting Left, the next jump will appear. Tap on “SJ” to select the jump.
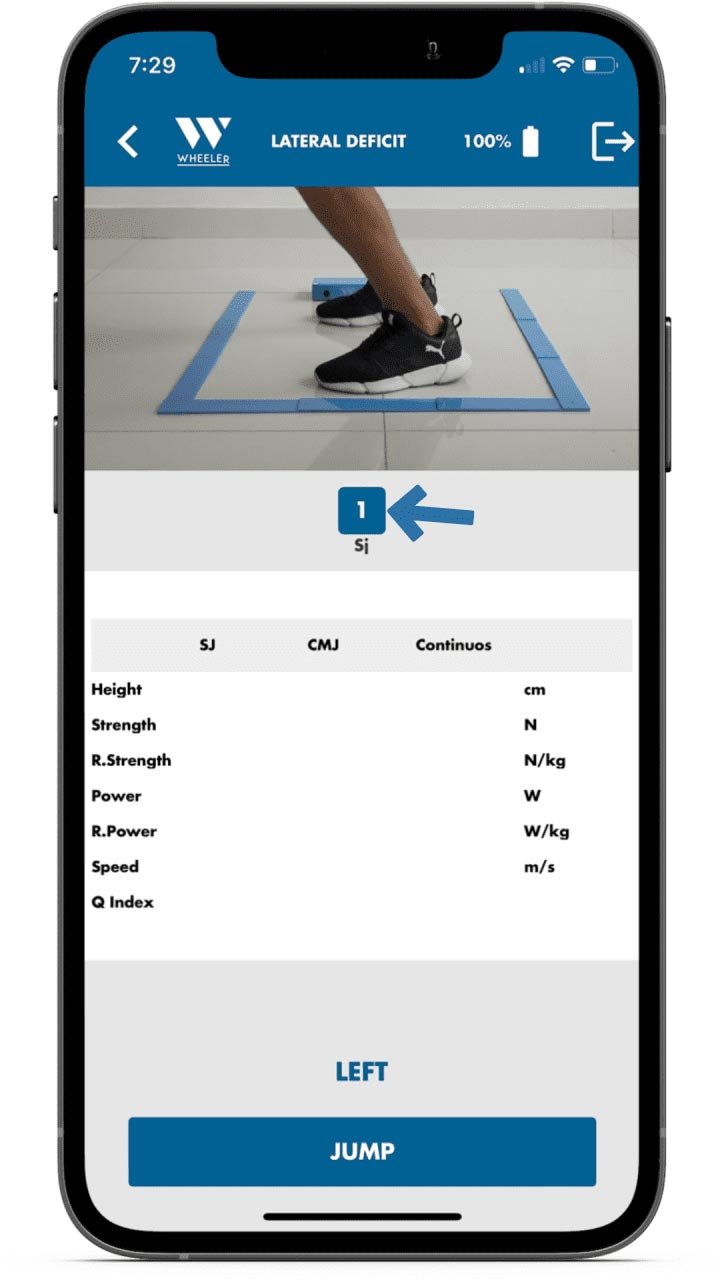
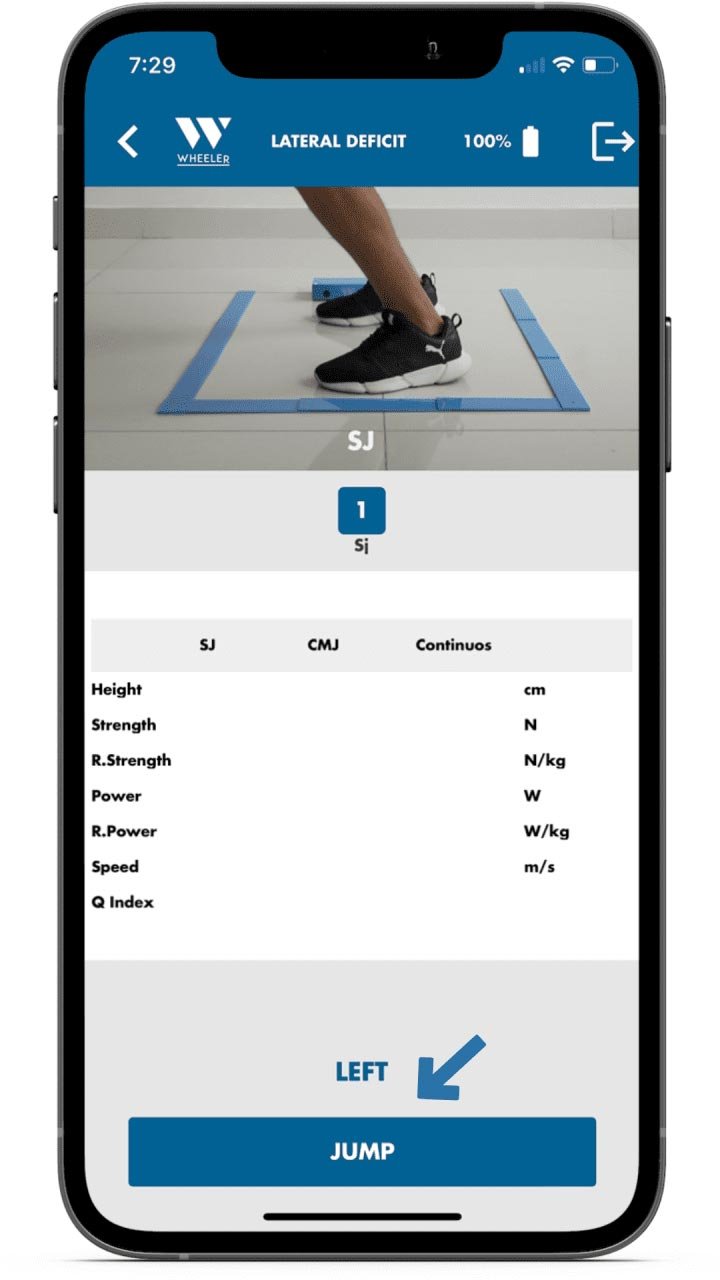
10. The jump title will appear on the top of the screen when selected. Tap on “Jump” to initiate the Squat Jump with the left leg.
11. Next, tap on “CMJ” to select the Counter Movement Jump with the left leg.
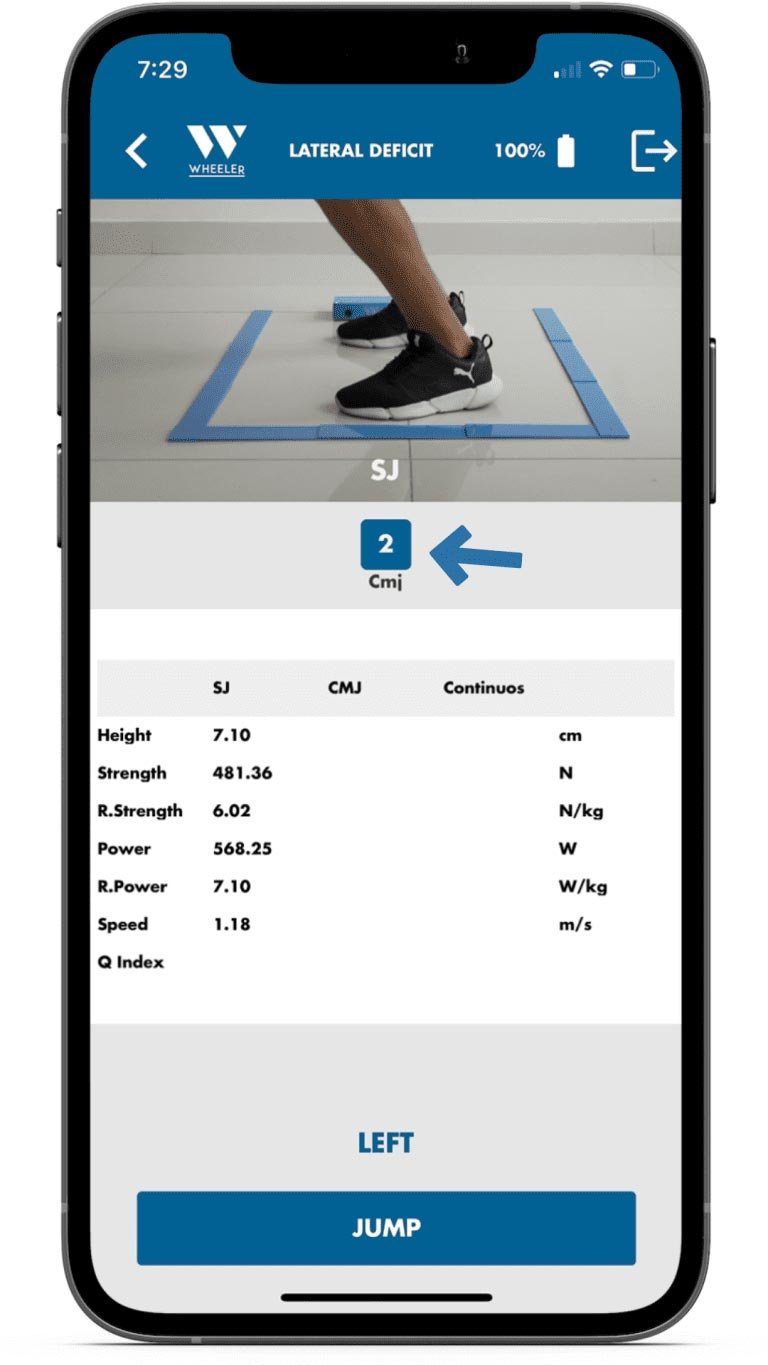
12. The jump title will appear on the top of the screen when selected. Tap on “Jump” to initiate the Counter Movement Jump.
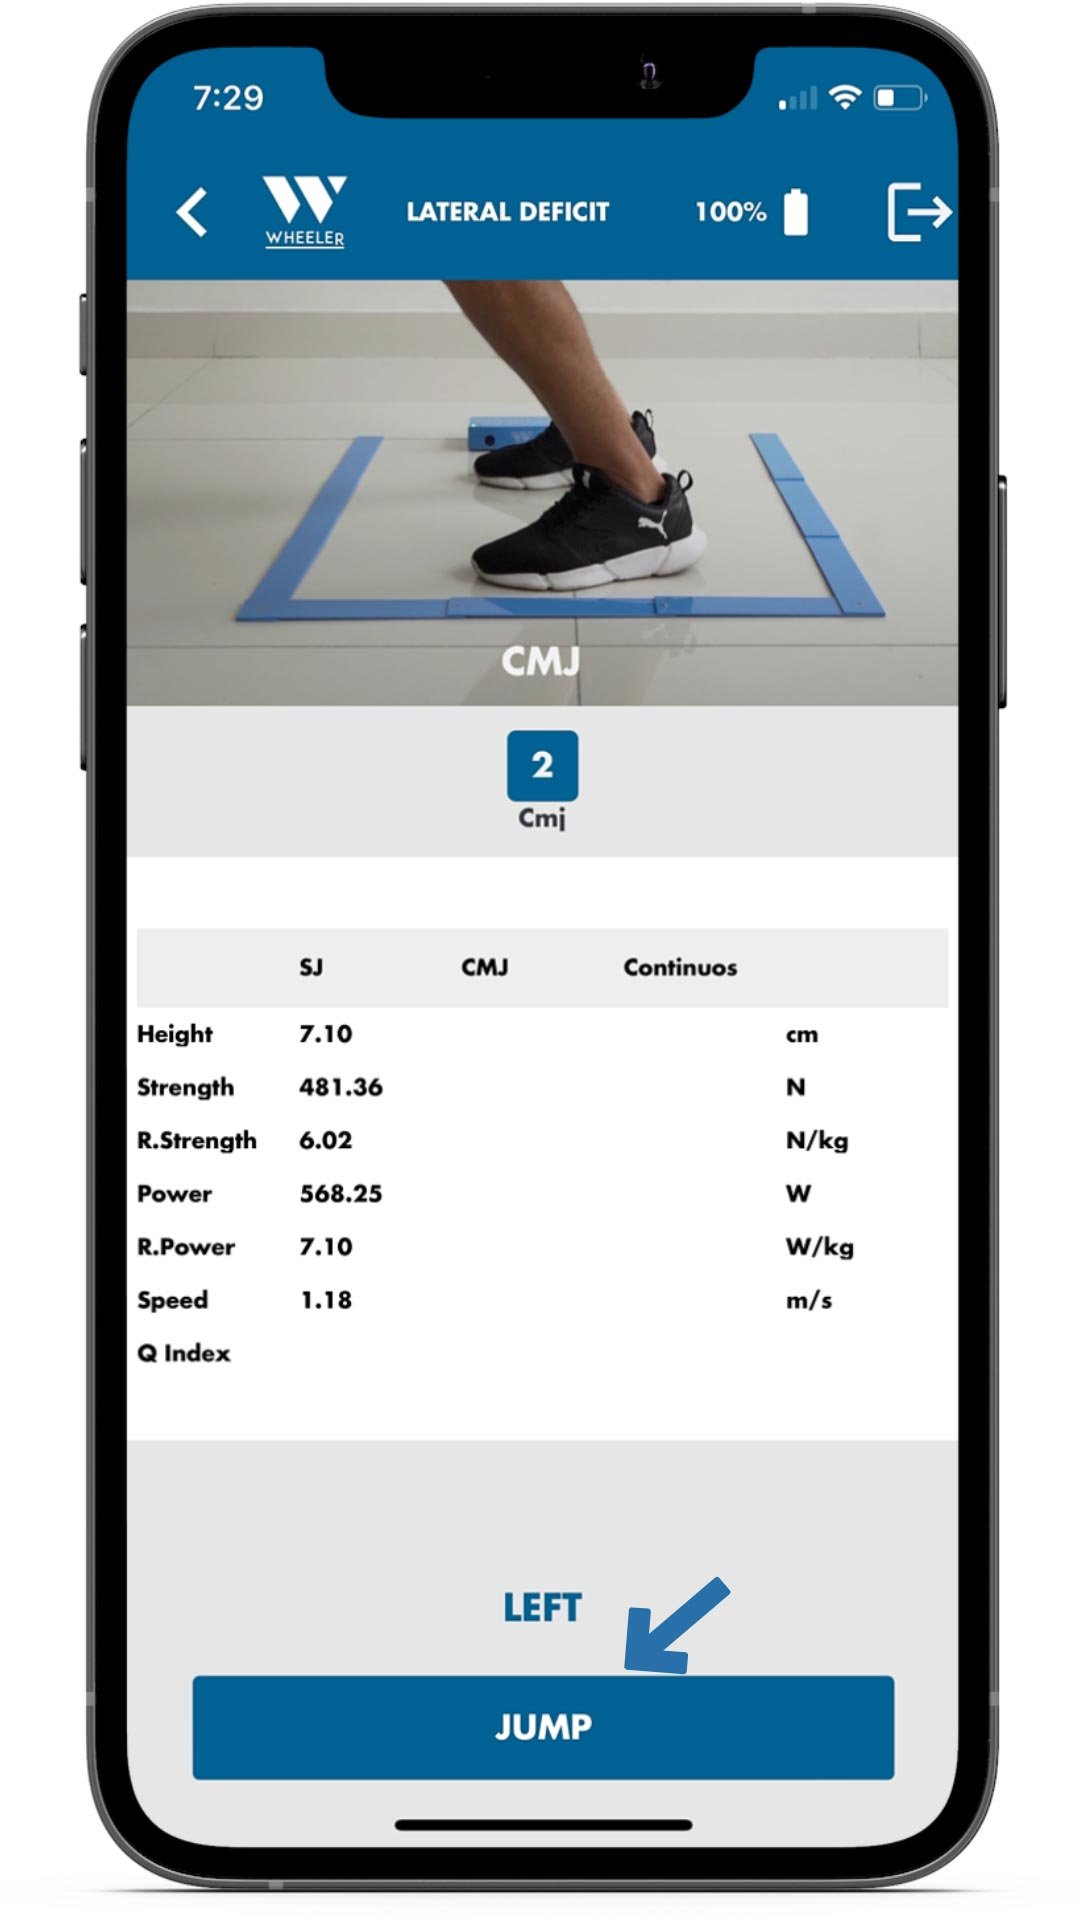
13. Next, tap on “Continuous” to select the Continuous Jumps with the left leg.
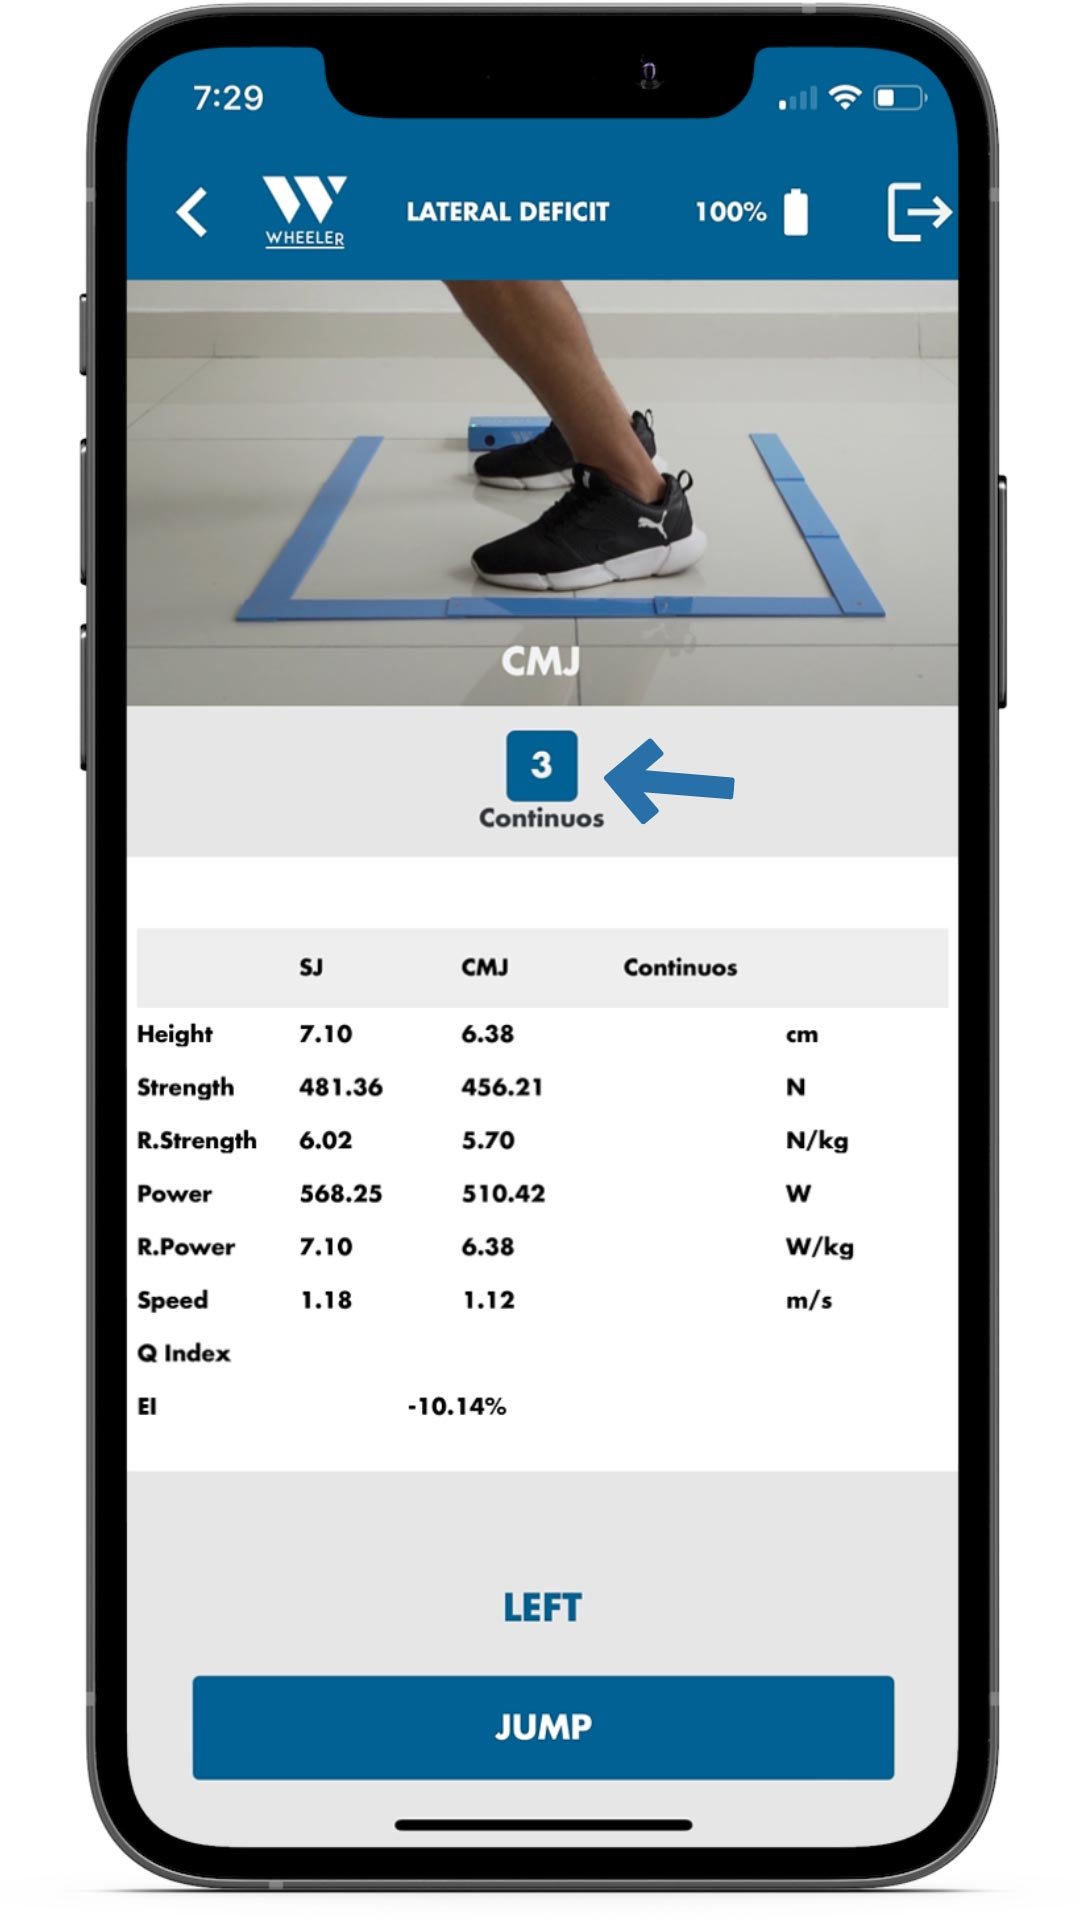
14. The jump title will appear on the top of the screen when selected. Tap on “Jump” to initiate the Counter Movement Jump.
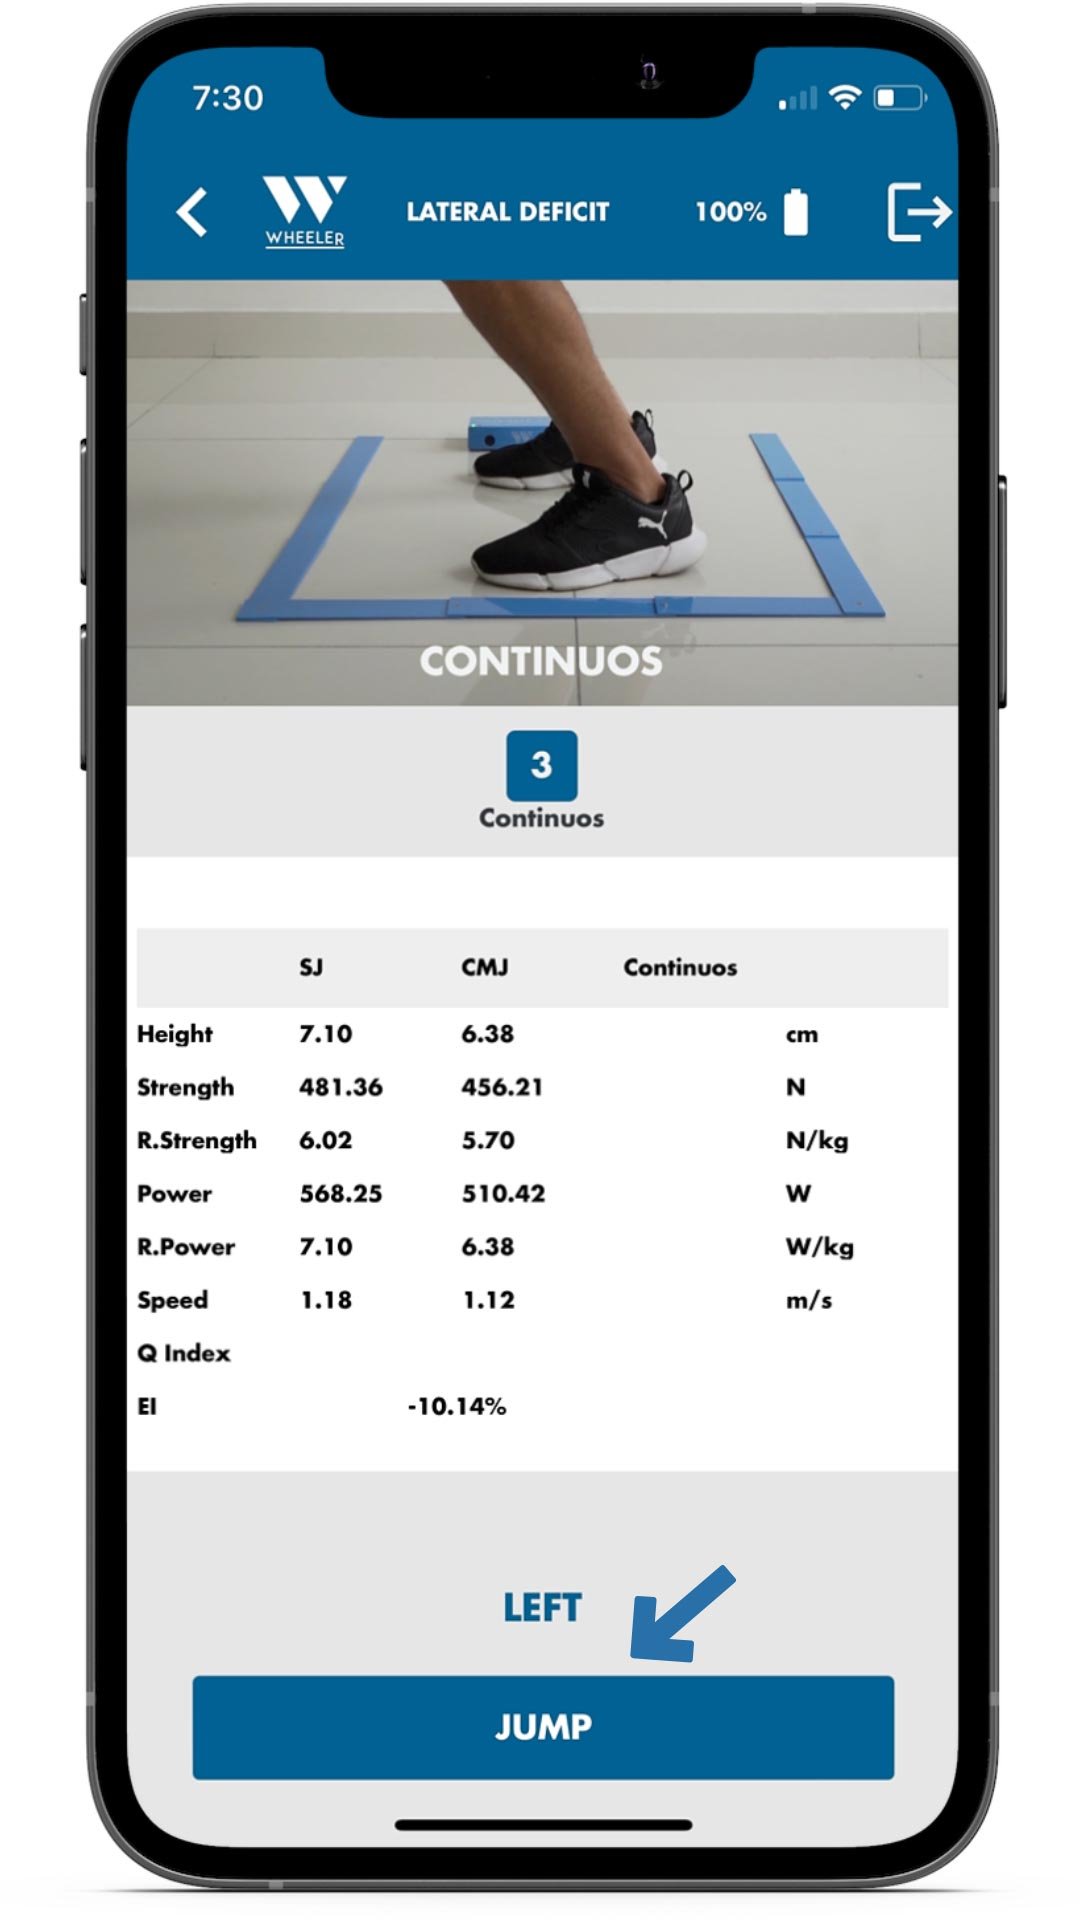
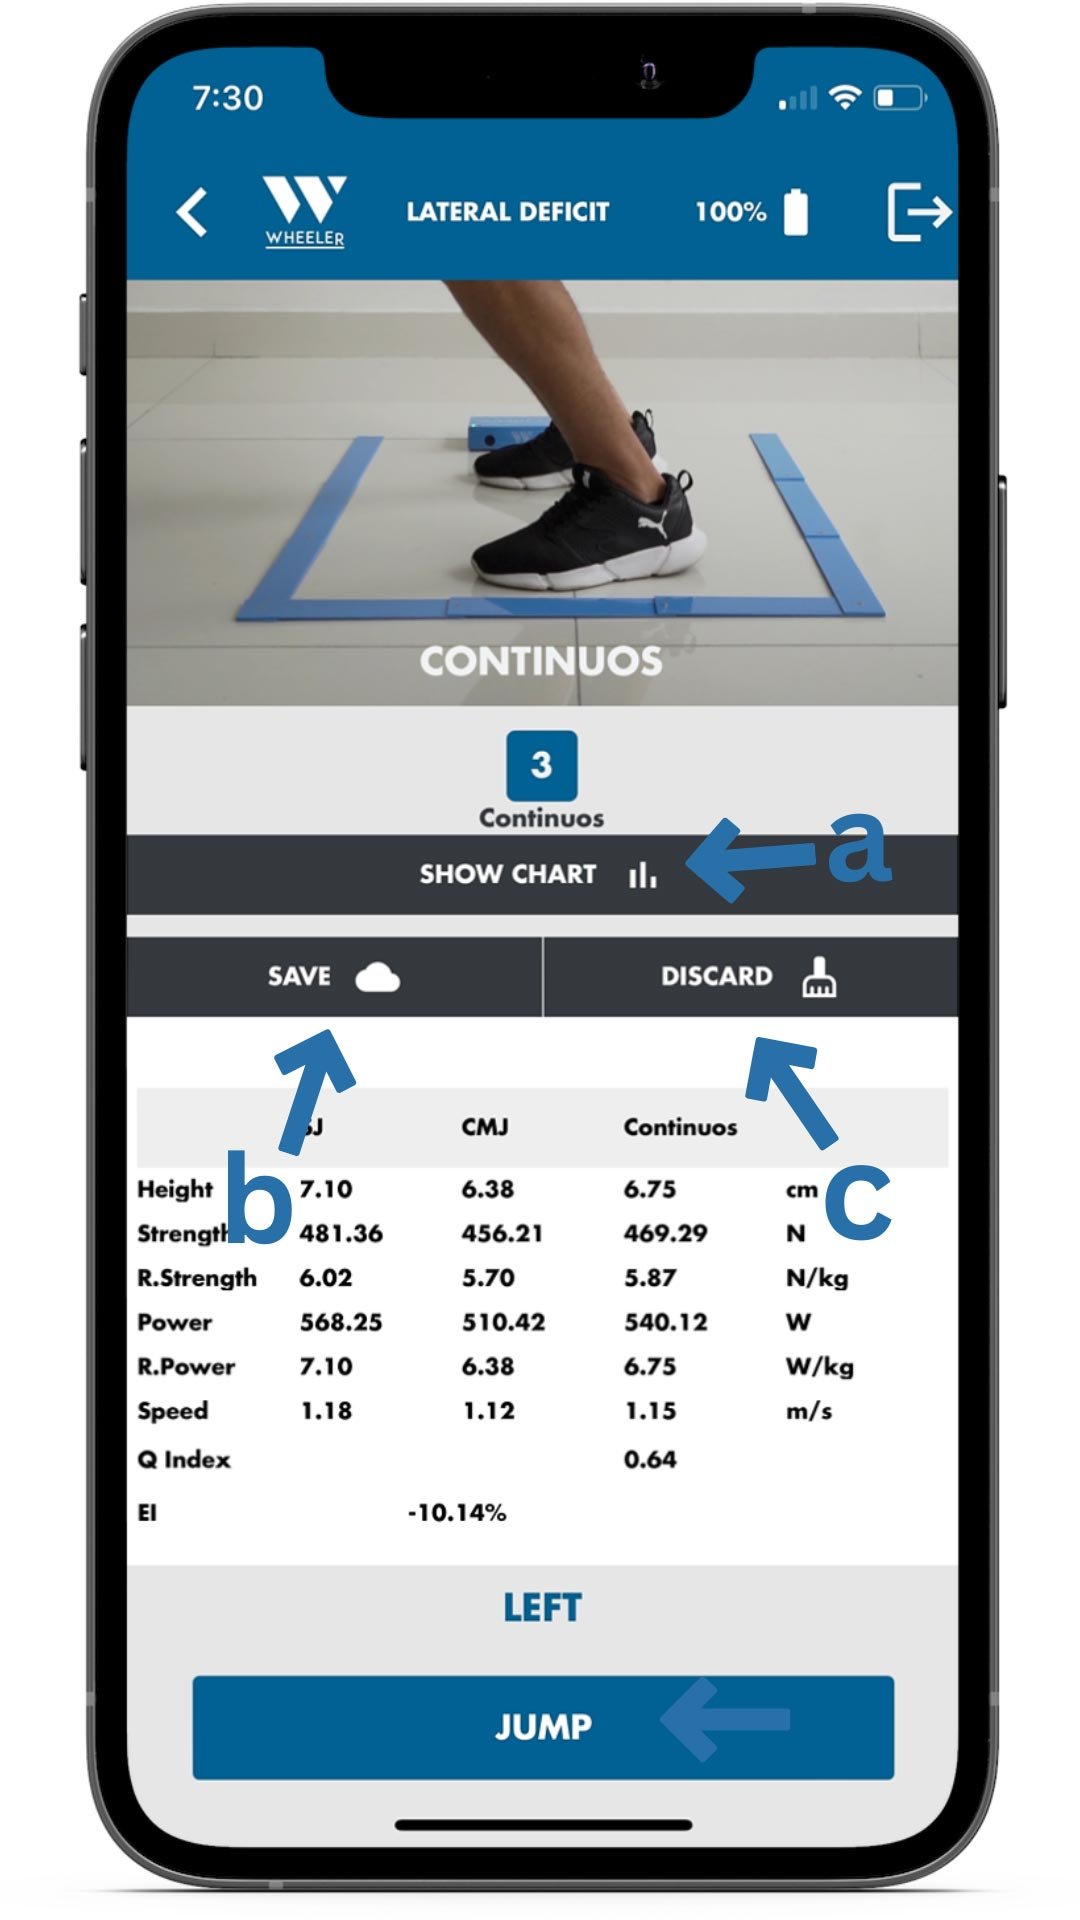
15. Once the final jump has been completed, multiple options will become available:
a. Tap on “Show Graph” to see the graph with the results.
b. Tap on “Save” to save the data on the cloud.
c. Tap on “Discard” to discard the whole test.
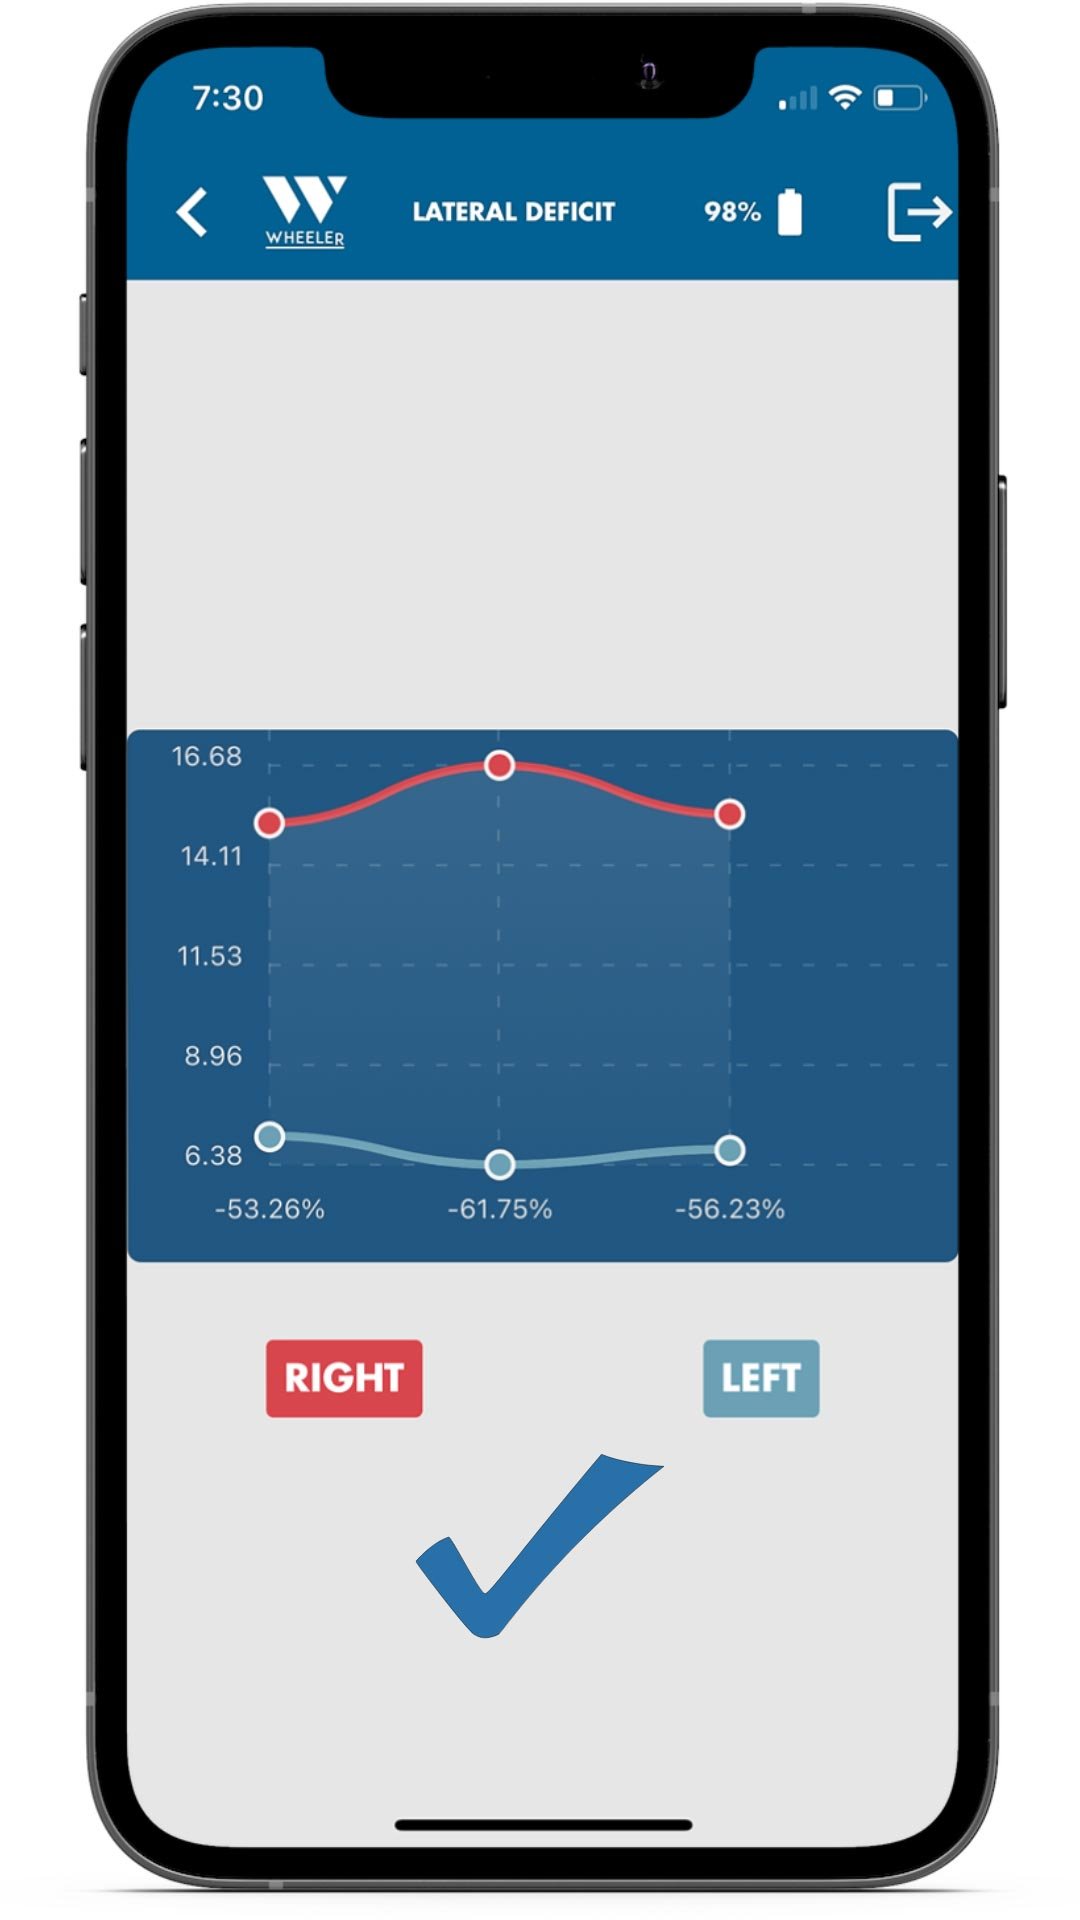
For this example, we will choose Show Graph.
16. The following screen will show the results on a graph comparing both legs so the evaluator can interpret deficiencies.
17. To return to all the assessments, tap on < in the top left corner.


Correct execution
Common Mistakes
Sprint Repetition
This assessment will allow the evaluator to assess the capacity of repeating sprints at a designated distance. It will also assess which speed was the athlete able to develop during each sprint.
Still unsure after watching the video? Follow the step- by- step process below!
1.To start, select the “ Sprint” assessment.
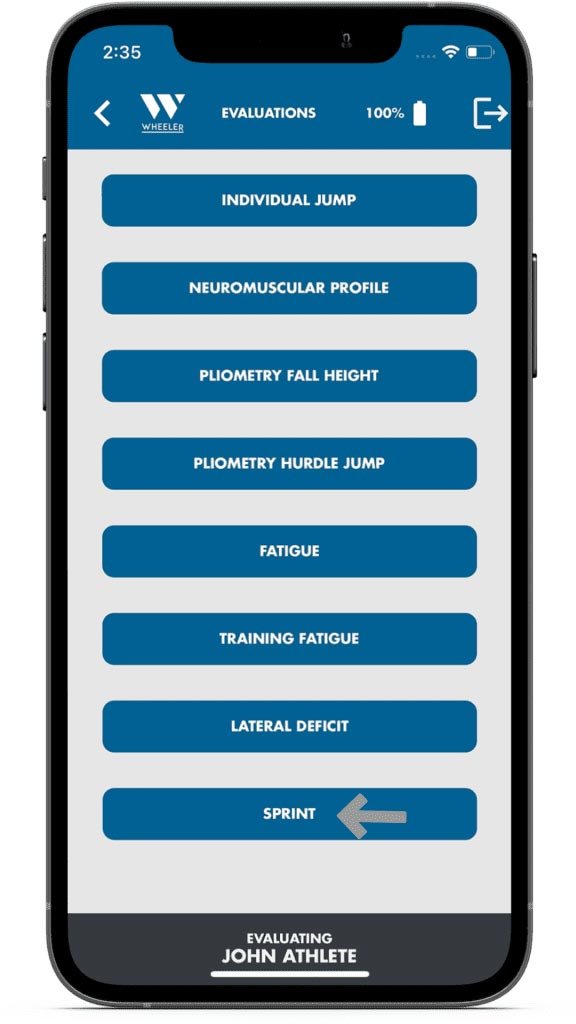
2. On the assessment interface, type the resting time between sets in the “Time” space; and the distance that the athlete will be running in the “Distance” space.
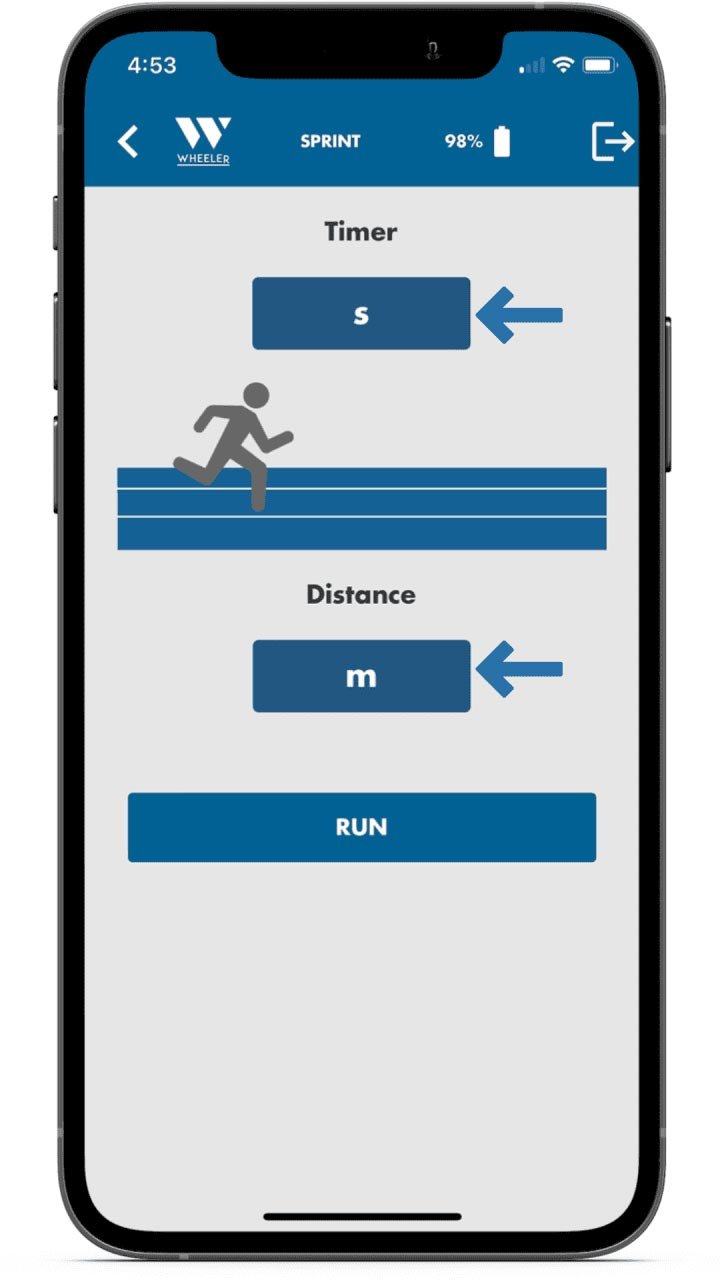
3. Note that this assessment is a back-and-forth run. The athlete needs to depart the WheelerJump measuring area and pass through the area again to re-activate the system.
This means that the distance input on the “Distance” space is a back and forth distance. If the athlete needs to run from point A to point B 5 m, the distance to input on the space will be 10 m:
A to B= 5 m
B to A= 5 m
Total distance= 5 m+5 m= 10m
4. Once time and distance are added are incorrect spaces, select on “Run”.
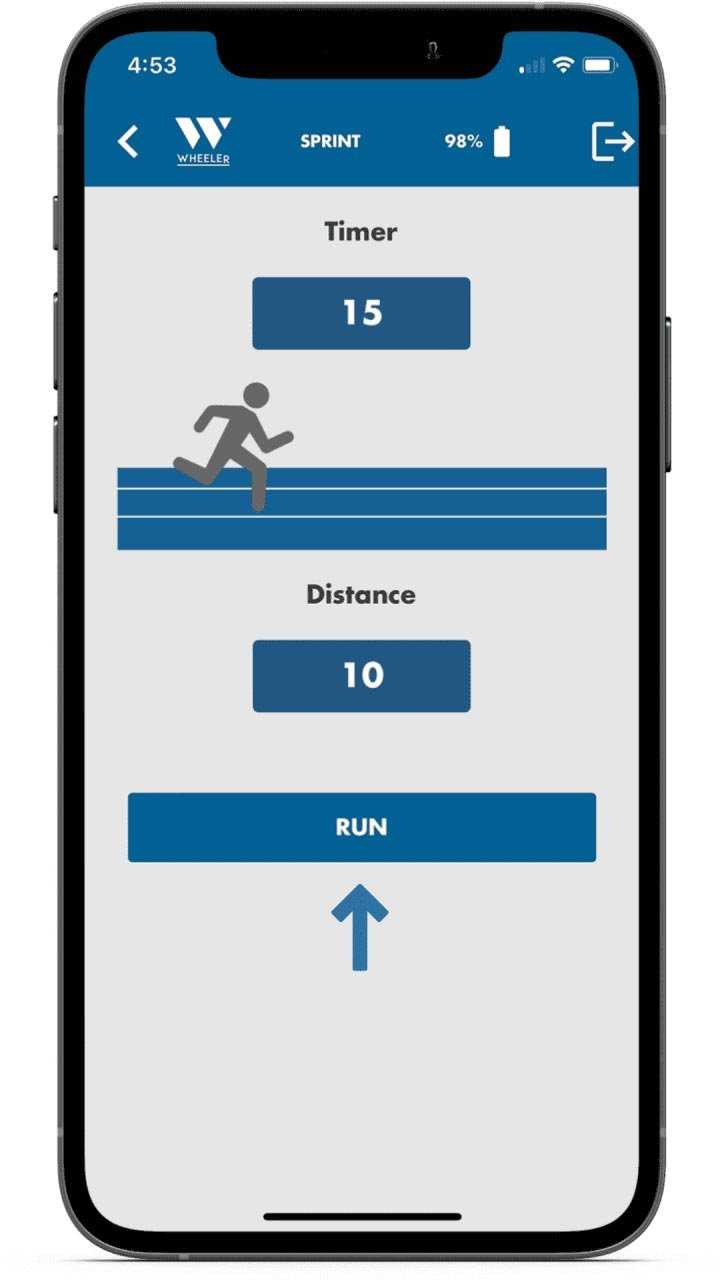
5. The following screen shows that the assessment is currently running.
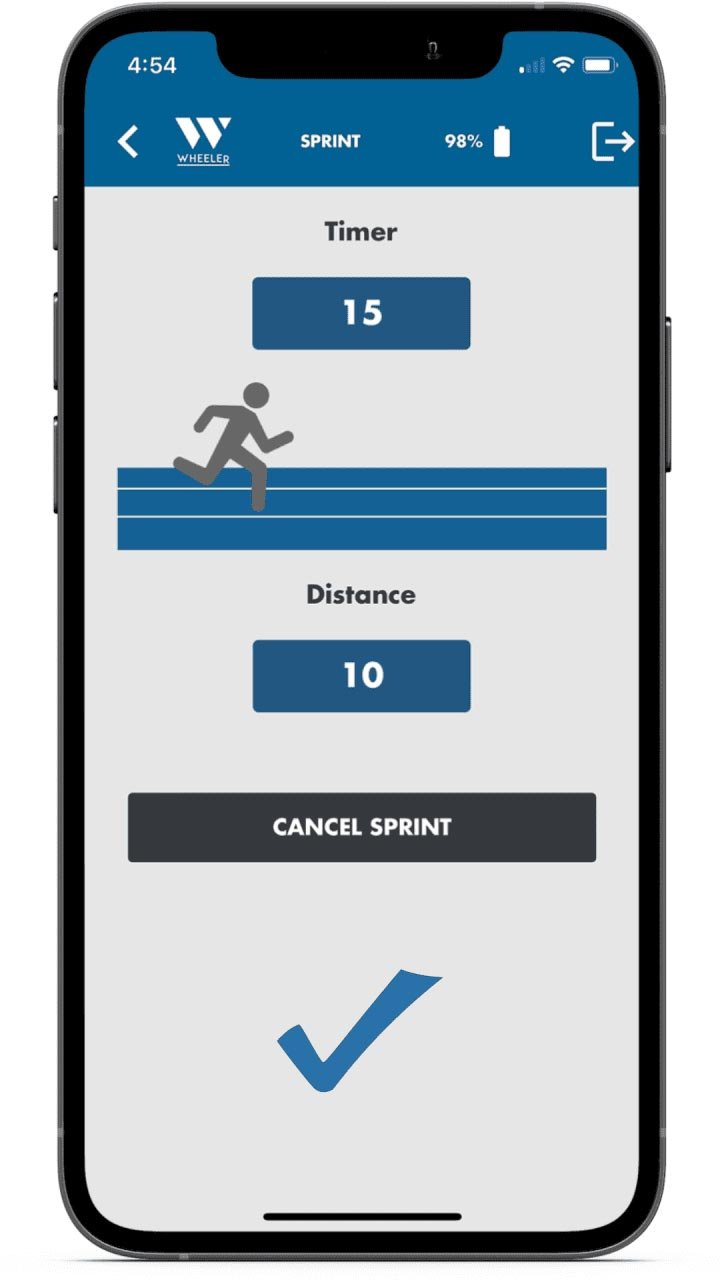
6. Once the athlete crosses the WheelerJump sensors, the timer will start counting down the preselected resting time.
The speed developed by the athlete per second will be displayed in red.
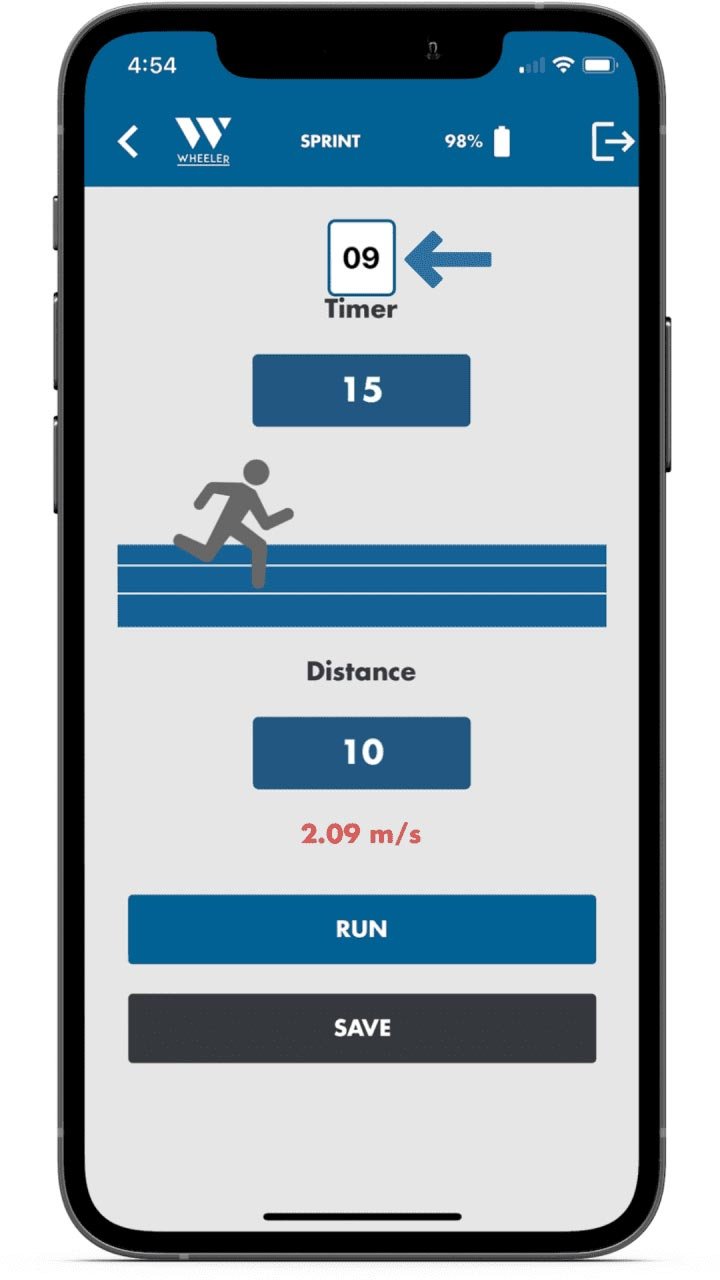
7.Once the time has elapsed, situate the athlete in the testing area again. Tap on “Run” to initiate assessing a second sprint.
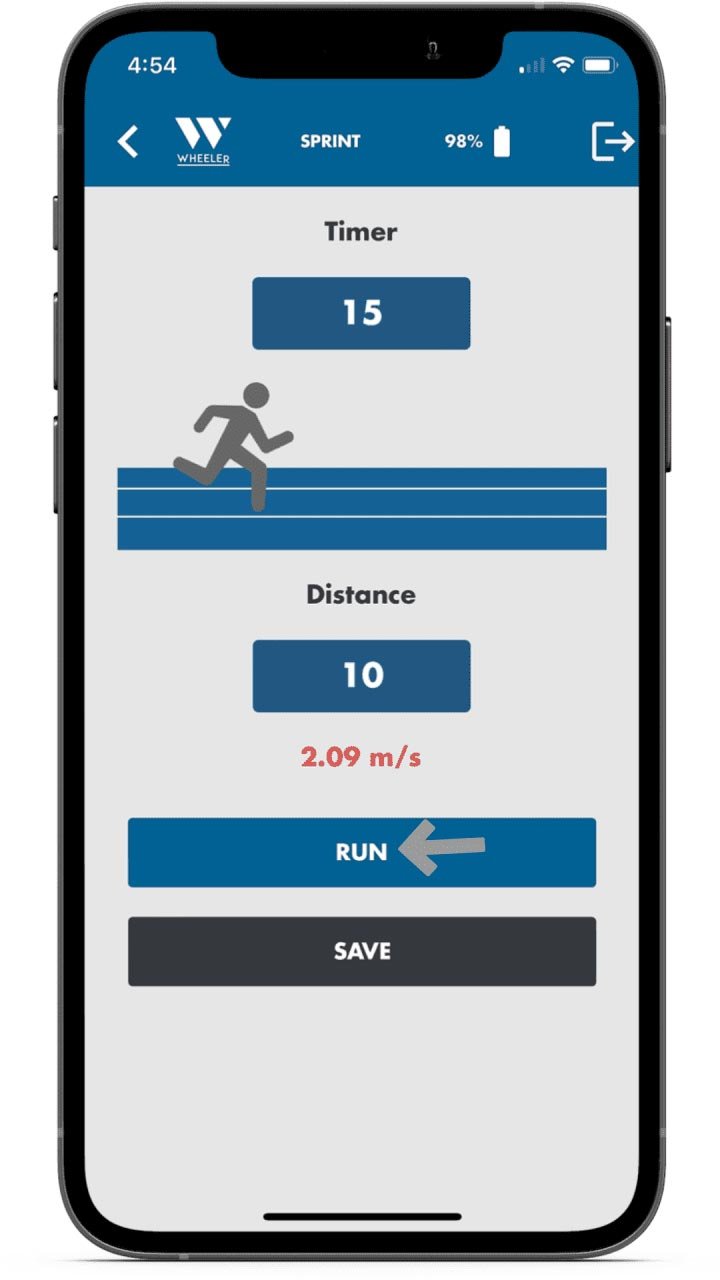
8. Once the athlete crosses the WheelerJump for a second time, the timer will start running again.
Multiple options will become available:
a. Tap on “Reset” to restart the test.
b. Tap on “Show Graph” to see the results on a graph.
c. Tap on “Save” to save the assessment on the data cloud.
For this example, we will be assessing the third (3rd) sprint.
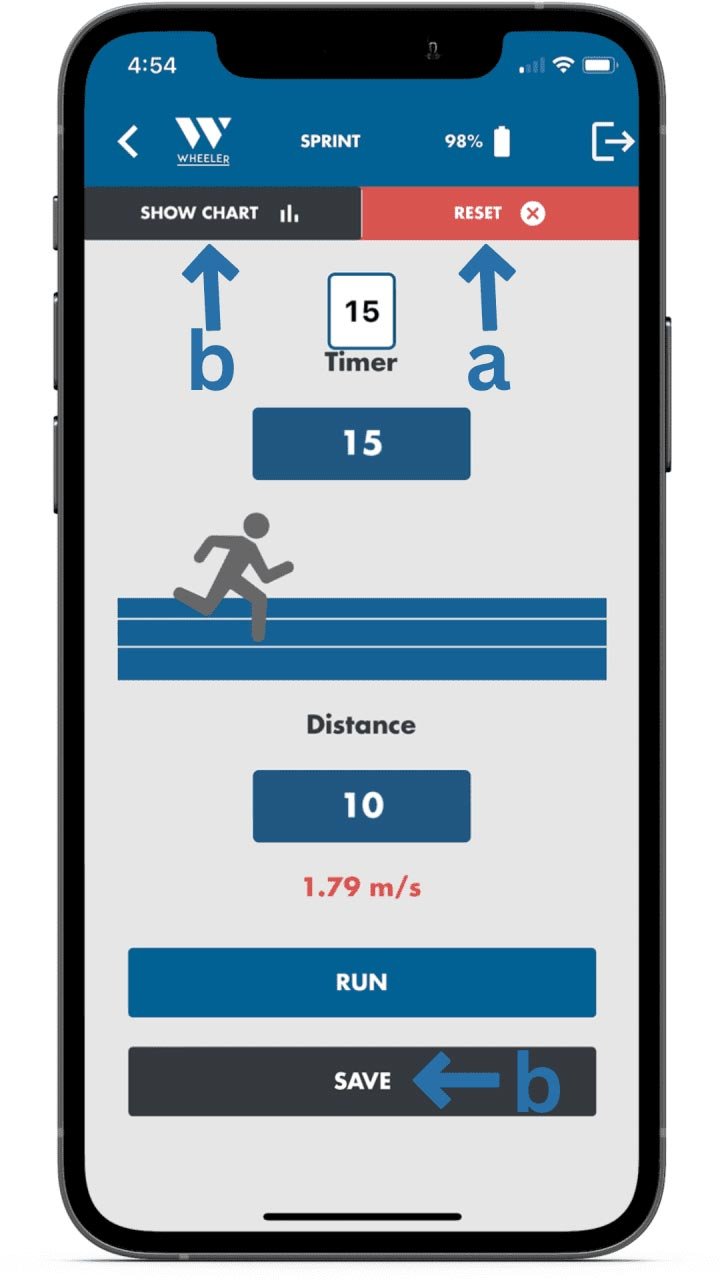
9. Note that you can assess as many sprints as you want and see the evolution of the athlete through the repetitions.
10. Select “Run” to initiate the assessment of the third (3rd) sprint.
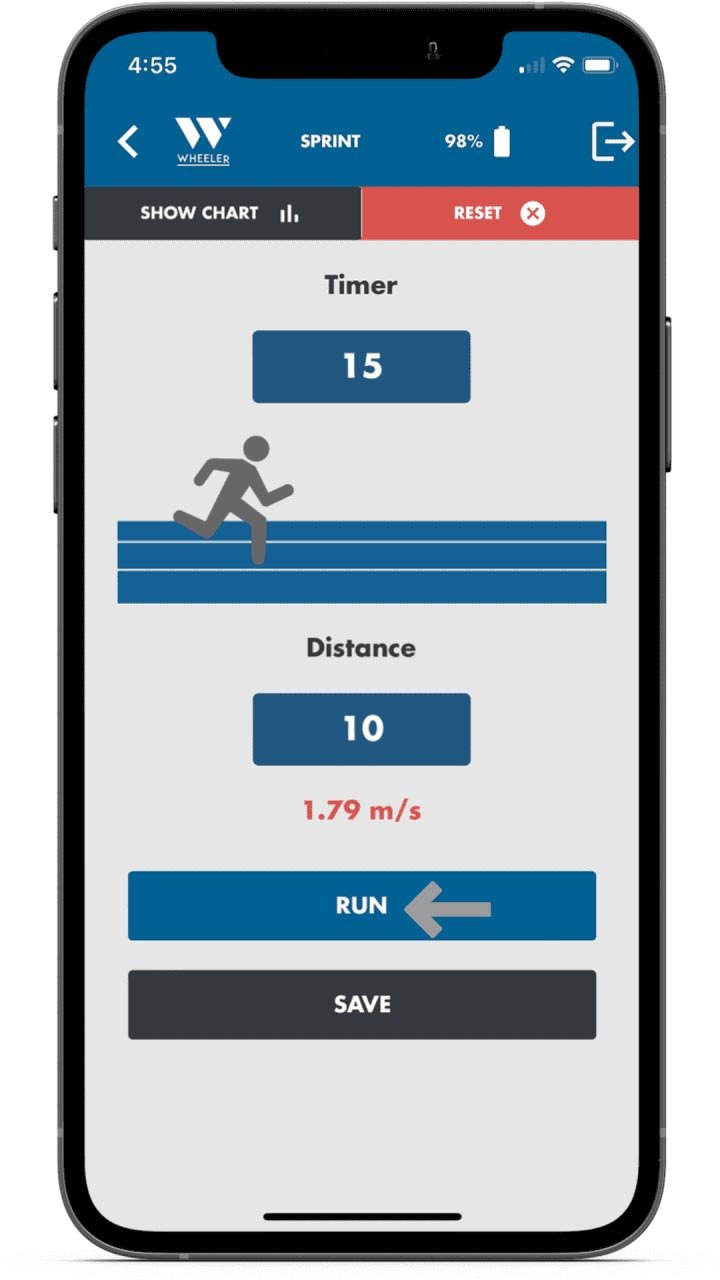
11. Once the athlete finishes the last sprint (in this case the third one), the same options will appear. To see the results as a graph, tap on “Show Graph”.
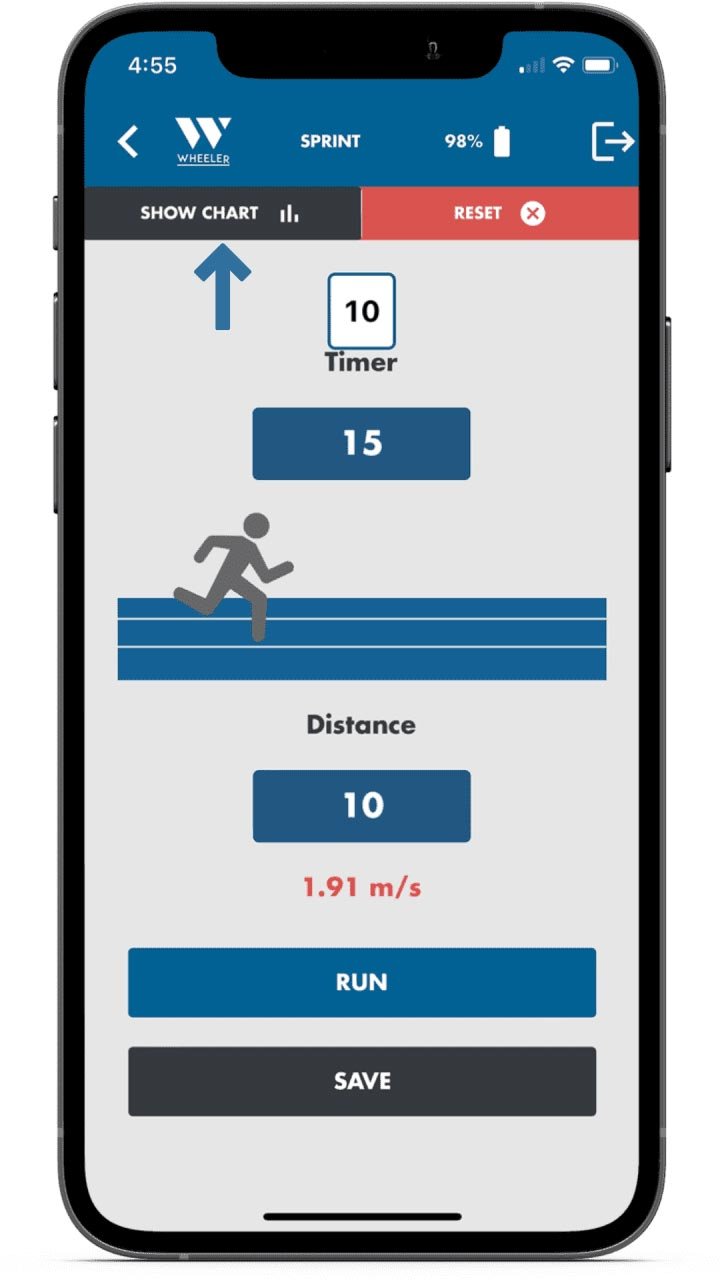
12. The following screen will show the comparison of the three (3) sprints in the form of a graph.
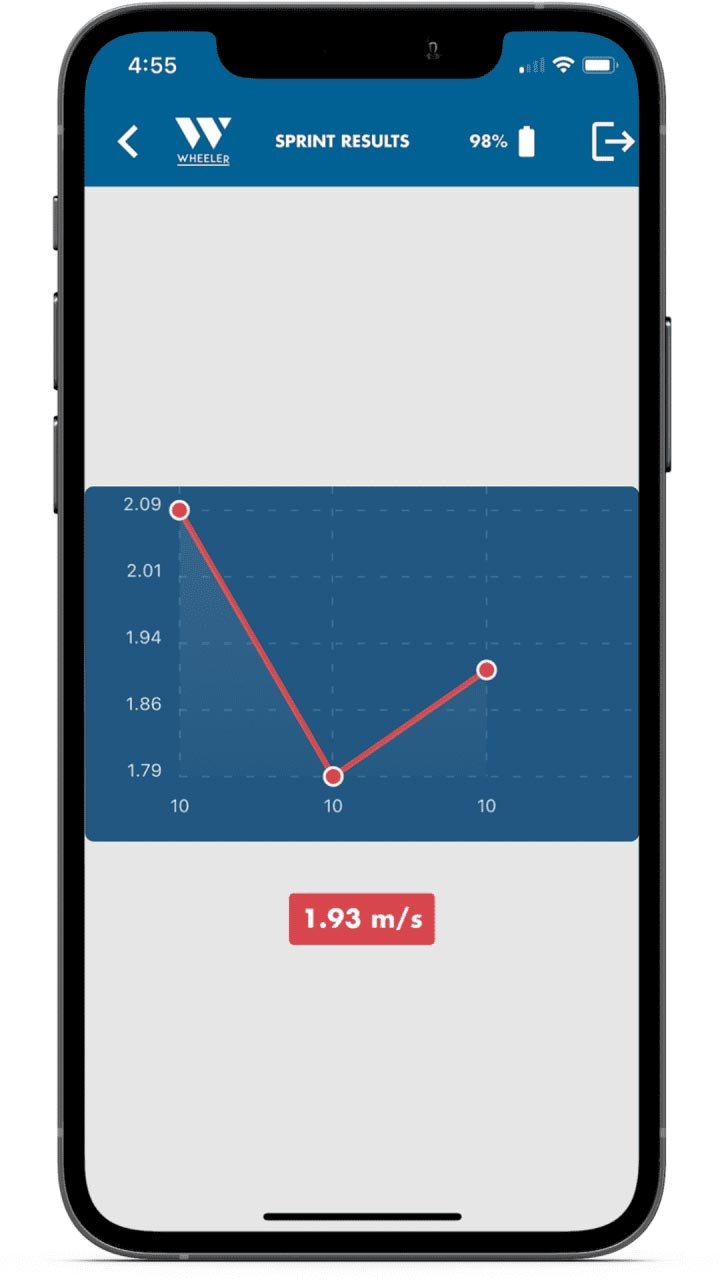
13. To return to all the assessments, tap on < in the top left corner.


Common Mistakes
Now you are ready to roll to the next level!

